Crystal GaugeCalXP Rebuild Kit User Manual
Service instruction sheet, Introduction, Service instructions
Service Instruction Sheet
Introduction
These instructions are intended for use with standard comparator rebuild kit (PN 4138) or the
Skydrol rebuild kit (PN 4158). Both rebuild kits contain all of the parts and tools required to rebuild
the GaugeCal
XP
™
pressure comparator. Rebuilds should be performed only by qualified personnel.
Following service instructions are for the standard comparator rebuild kit (PN 4138). If rebuilding the Skydrol
GaugeCalXP, cross reference the appropriate o-ring part numbers in the Parts List located on the last page.
Service Instructions
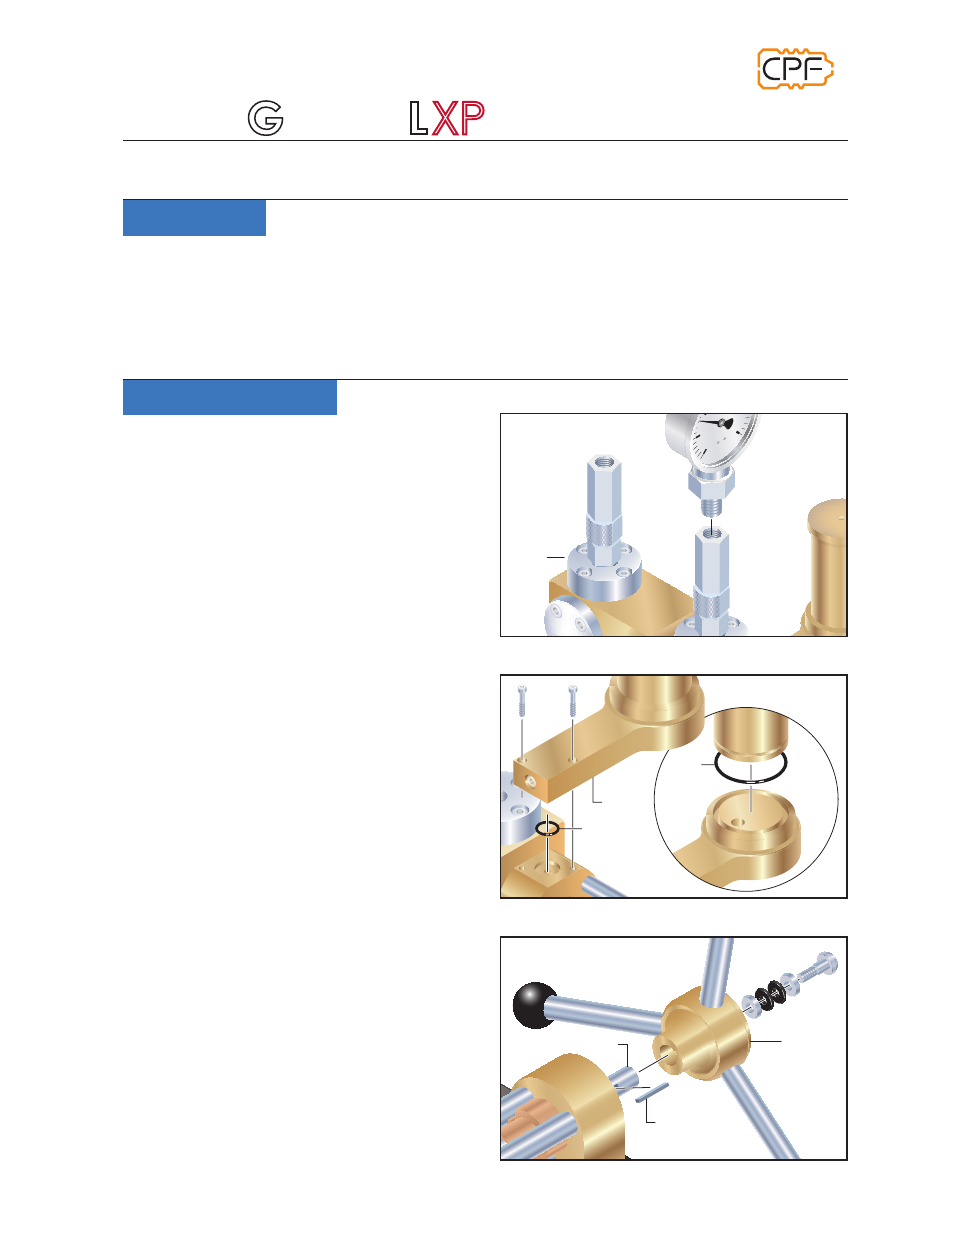
1
Remove all gauges and fittings from the
GaugeCal
XP
pressure comparator (figure 1).
2
Tip the comparator on its end to completely
drain the water or oil from the system.
Always dispose of fluids in a responsible
manner.
3
Use a 3mm Allen key to remove the two (2)
cap screws securing the Reservoir to the
Main Seal Block, then lift to remove the Res-
ervoir and Reservoir o-ring (
PN
2018)
(figure 2).
4
Remove the press-fit Reservoir Vessel,
and replace the lower seal o-ring (
PN
3303
or
PN
3376) (figure 2).
*
Note:
The GaugeCal
XP
is assembled with
a Reservoir o-ring in one of two sizes. Com-
pare your o-ring to the illustrated parts list
on page 6, to determine the appropriate
replacement size for your unit.
5
Use a 4- or 5mm Allen key to remove the
Handle Assembly bolt and washer(s), then
pull to slide the Handle Assembly from the
Piston Assembly (figure 3). Be sure to also
remove the Key from the Piston Assembly
Leadscrew (figure 3).
PRESSURE COMPARATOR
10000PSI–700bar
Gau
g
eCa
l
xp
™
Figure 1
Figure 2
Figure 3
C R Y S T A L
engineering corporation
PSI
50
250
0
300
100
Gauge
Base
Reservoir
O-ring
(
PN
2018)
O-ring
(
PN
3303)
(
PN
3376)
or
*
Handle
Key
Leadscrew
DESIGNED FOR USE WITH CRYSTAL PRESSURE FITTINGS