Rt2000 s – Triton RT2000 Installation Manual User Manual
Page 52
52
RT2000 S
ERIES
- S
ITE
P
REPARATION
AND
I
NSTALLATION
G
UIDE
I
NSTALLING
THE
P
RINTER
P
APER
R
OLL
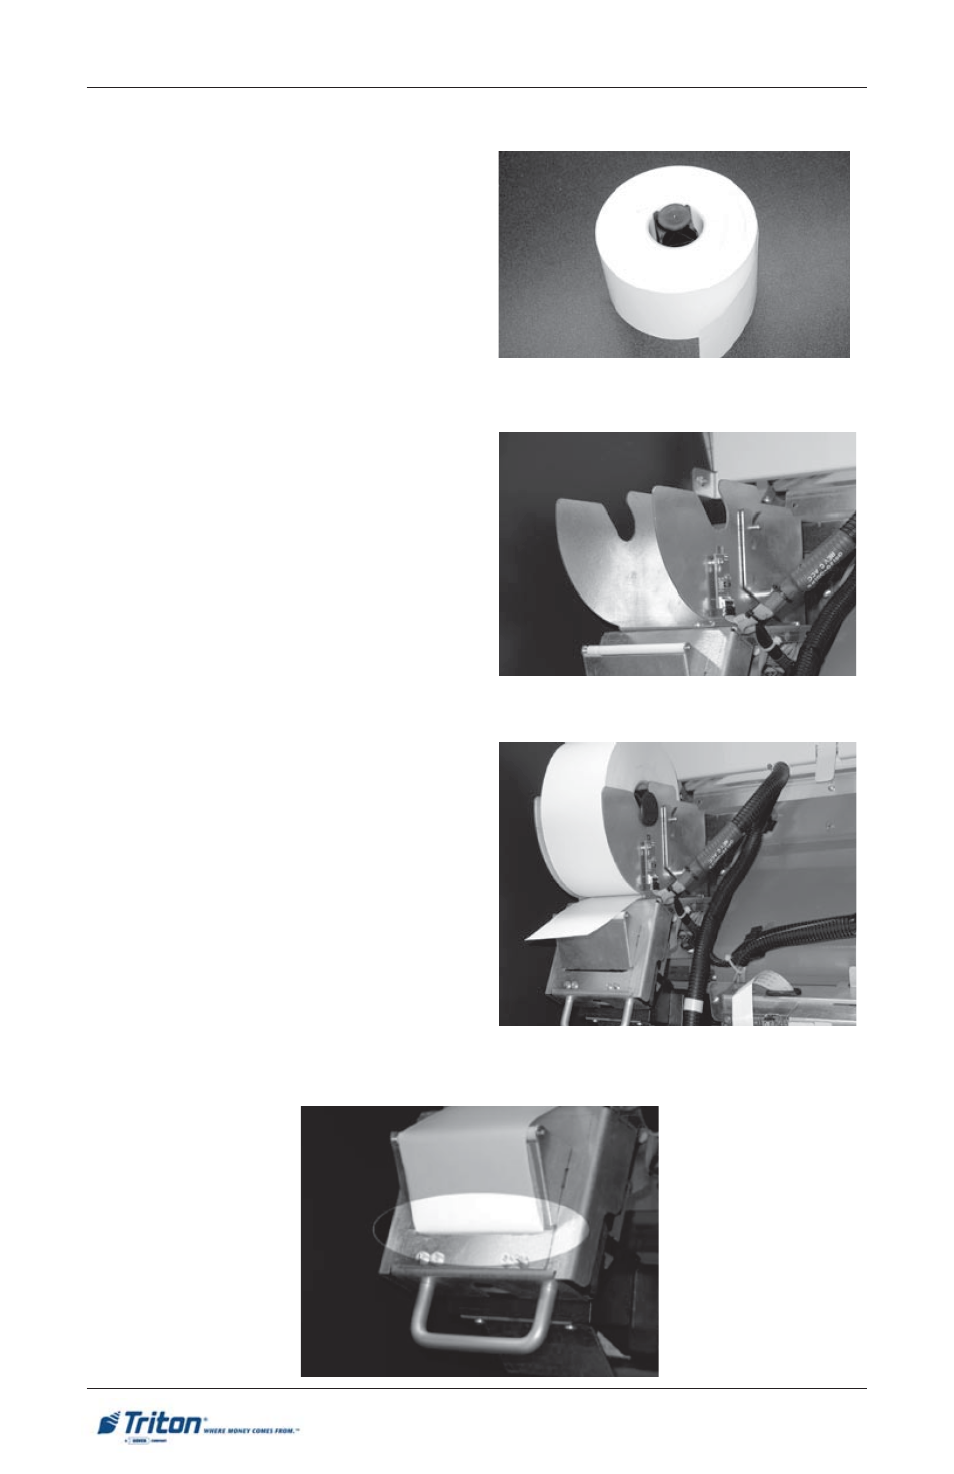
The receipt paper and paper spool are
included in the accessory box.
1.
Open the sleeve cabinet door and
turn the power switch on the power
supply to the ON (I) position.
2.
Unwind about 18 inches from the
end of the roll of paper and use
scissors to cut off. Make sure all of
the paper roll has the glue removed.
3.
Install the 6 inch roll of thermal
paper on to the paper spool as
shown in Figure 1.
4.
Place the spool and paper on to the
paper support bracket (Figure 2) by
sliding slotted ends of the spool
onto the support bracket as shown
in Figure 3.
5.
Make sure the paper feeds off the
bottom of the roll.
6.
Once installed, take the end of
paper roll and feed into the slot on
the printer paper entrance shown
in Figure 4. Once the paper is
detected by the printer, it will
automatically pick it up and finish
feeding into the printer.
Figure 1. Spool inserted into
roll of paper.
Figure 2. Paper support bracket.
Figure 3. Paper loaded on support
bracket support (Bottom feed).
Figure 4.
Feed paper
into slot.
- X-SCALE/X2 Configuration Manual (419 pages)
- ARGO Installation Manual (35 pages)
- ARGO User Manual (97 pages)
- ARGO G60 Installation Manual (31 pages)
- ARGO Quick Reference Guide (10 pages)
- RL331X TRAVERSE User Manual (74 pages)
- FT5000 X2 User Manual (105 pages)
- FT5000 X2 Quick Reference Guide (10 pages)
- 81XX/91XX (including X2)/97XX/RL16XX (5 pages)
- RL1600 Installation Manual (41 pages)
- RL1600 Quick Reference Guide (7 pages)
- RL1600 User Manual (72 pages)
- RL2000 POWER CORD Installation Manual (1 page)
- RL2000 User Manual (124 pages)
- RL2000 Installation Manual (45 pages)
- RL2000 Quick Reference Guide (10 pages)
- RL5000 X2 Series User Manual (122 pages)
- RL5000 X2 Series Installation Manual (55 pages)
- RL5000 X2 Series Quick Reference Guide (12 pages)
- 8100/9100/97XX/RL5000 (X-SCALE/XP) (10 pages)
- 8100 Quick Reference Guide (6 pages)
- 8100 User/Installation Manual (150 pages)
- 9100 Installation Manual (50 pages)
- 9100 Quick Reference Guide (8 pages)
- 9100 User Manual (172 pages)
- 9100 Electronic Lock Installation Manual (8 pages)
- 96XX CASH DISPENSER CABINET Installation Manual (6 pages)
- 9650 Operation Manual (264 pages)
- 9600 Series Quick Reference Guide (2 pages)
- 9640 Operation Manual (265 pages)
- 9600 Operation Manual (209 pages)
- 9610 Series Quick Reference Guide (2 pages)
- 9610 Operation Manual (210 pages)
- 97XX Series Operation Manual (265 pages)
- 9710 Series Quick Reference Guide (2 pages)
- 9700 Series Quick Reference Guide (2 pages)
- 9705 Series Quick Reference Guide (2 pages)
- 9200 Installation Manual (26 pages)
- 9200 Operation Manual (179 pages)
- MAKO 2000 Operation Manual (217 pages)
- MAKO PEDESTAL Installation Manual (8 pages)
- MAKO EXTENDED CABINET Installation Manual (7 pages)
- RT2000 X2 User Manual (109 pages)
- RT2000 X2 Installation Manual (36 pages)
- RT2000 X2 Quick Reference Guide (8 pages)