Tilton 700-Series Hydraulic Release Bearing (98-1115) User Manual
Page 2
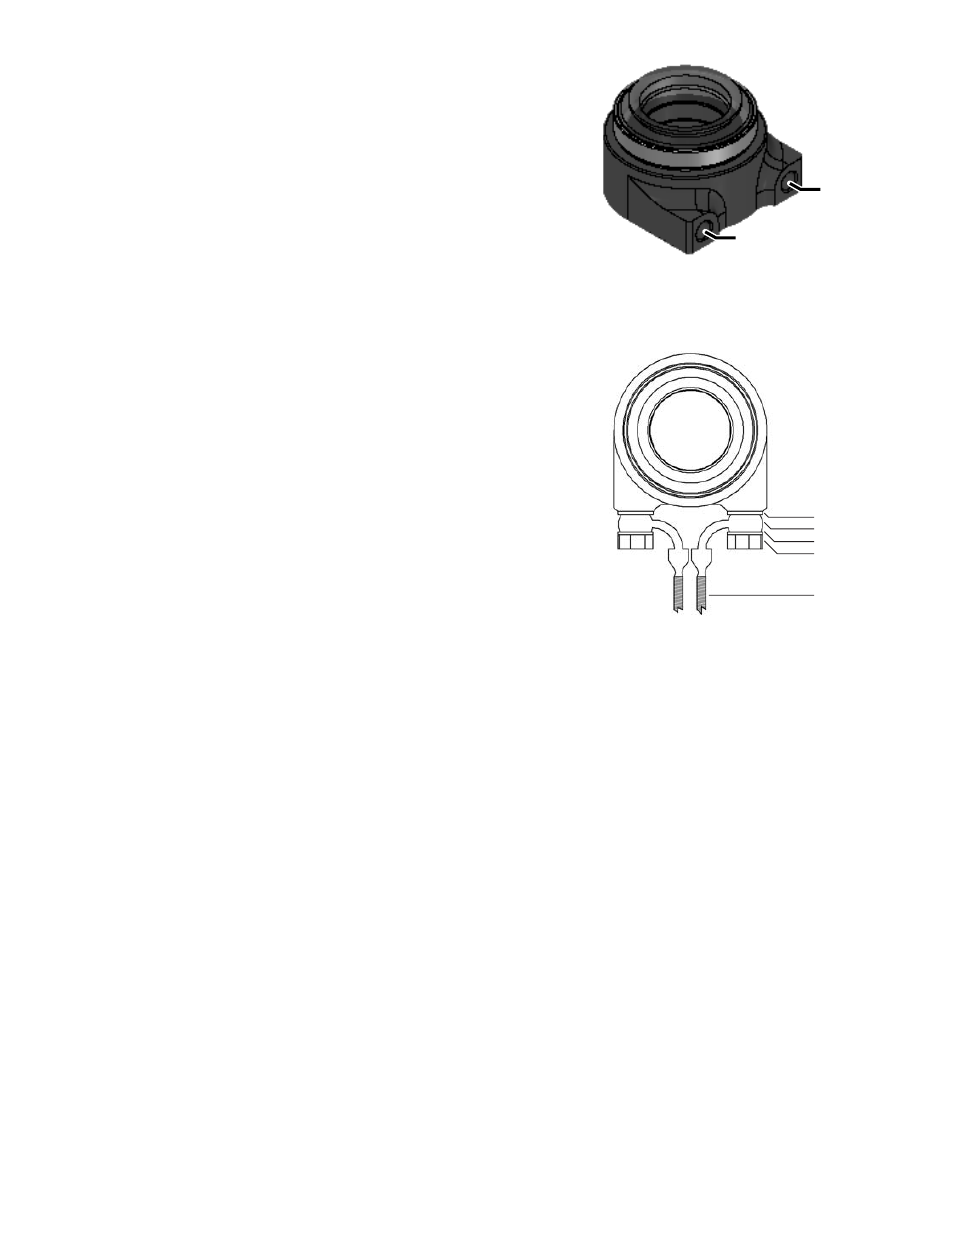
Crush Washer
Banjo Fitting
Crush Washer
Banjo Bolt
-3AN Line
Lower Port
(Supply Line)
Upper Port
(Bleed Line)
SUPPLY LINE ASSEMBLY
1. Assemble one of the banjo fittings with the supplied crush washers and banjo bolt
loosely onto the supply port of the hydraulic assembly (see Diagram 2).
Note:
a crush washer needs to be placed on either side of the banjo fitting
for proper installation.
2. Trial fit the line in place and determine the length required for the supply line to reach
the master cylinder. Route the supply line clear of any obstructions to prevent damage
and away from heat sources to prevent pedal fade.
3. Cut braided line to length and attach fittings.
4. Leave the banjo fitting loose for the supply line at this time.
BLEED LINE ASSEMBLY
1. Assemble the second banjo fitting with crush washers and banjo bolt and loosely place
the fitting into the bleed port.
2. Trial fit the remainder of the line, selecting a location for the bleed fitting that is outside
of the transmission housing.
3. Thread the supplied bleed screw into the newly attached fitting on the bleed line.
FINAL ASSEMBLY (REFER TO DIAGRAM 3)
1. With supply and bleed line assembled, clock banjo fittings inward, toward each other
leaving a small gap in between.
2. Tighten banjo fittings.
DRIVELINE ASSEMBLY
1. While installing the transmission, carefully route both lines through the release fork
window.
2. Once the transmission is seated, confirm that all parts of the release bearing and hydrau-
lic lines clear the clutch and flywheel.
3. Complete the driveline installation.
MASTER CYLINDER SELECTION
The recommended master cylinder bore diameter for use with this hydraulic release bear-
ing assembly and a 7.25" clutch is 3/4". If you are using the OEM clutch master cylinder,
please check the bore diameter.
MASTER CYLINDER PRIMING
1. Fill the master cylinder with brake fluid. Use a DOT 3, DOT 4 or other non-silicone based
fluid. Avoid DOT 5 (silicone based) fluids since they are not compatible with the seals.
2. Open the bleed fitting (if equipped) at the master cylinder while the line port is closed.
3. Gently depress the clutch pedal, close the bleed screw and release the clutch pedal.
4. Repeat Steps 1 and 2 until fluid free of air bubbles emerges.
Do not stroke a Tilton master cylinder more than 1".
HYDRAULIC RELEASE BEARING BLEEDING
1. Fill the master cylinder reservoir with DOT 3 or DOT 4 brake fluid.
2. Apply approximately 3 lbs of force on the clutch pedal. You want enough force to hold
the bearing out against the clutch diaphragm spring, but not enough to actually move
the spring.
3. Open the bleed screw that is attached to the bleed line on the hydraulic release bearing.
4. Completely stroke the pedal.
5. Close the bleed screw.
6. Let the pedal return to its relaxed position and wait a few seconds.
7. Repeat Steps 2 through 6 while keeping an eye on the fluid level until all air is removed
from the system.
Note:
You do not want to stroke the clutch during the bleeding process.
All you are trying to do at this point is get all of the air out of the system.
Do not stroke the clutch until the pedal stop is set!
Diagram 2
Diagram 3