DataComm 45-0051-WH Expandable Media Box with Duplex Receptacle User Manual
Page 8
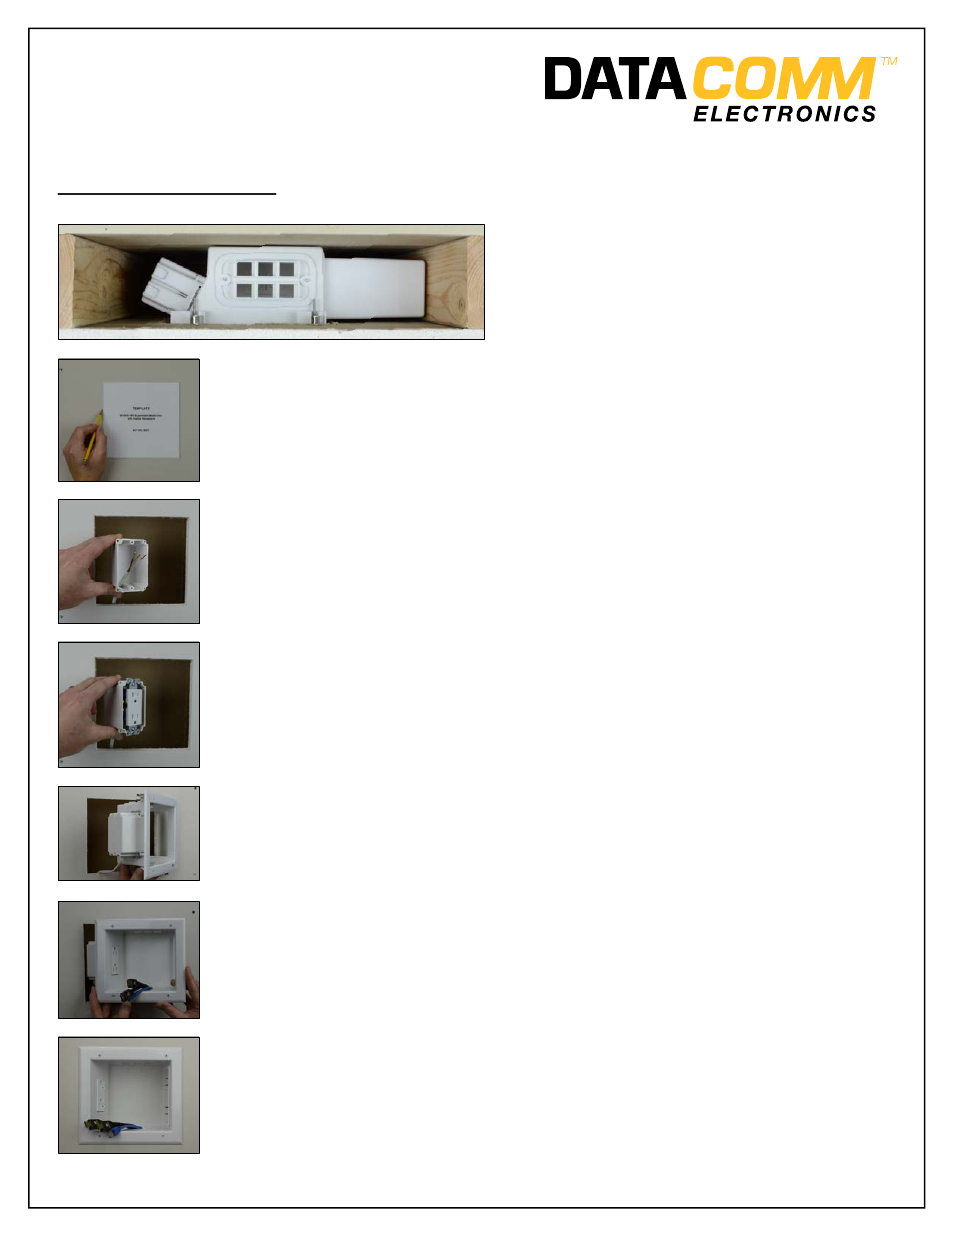
Fig. 3
Fig. 1
Fig. 4
Fig. 5
Fig. 2
Fig. 6
Fig. 7
Tools Required:
• Drill with Phillips Bit or Phillips Head Screw Driver
• Pen or Pencil
• Sheetrock Saw or Utility Knife
• 6 Ft. Tape Measure
Installation Instructions:
Figure 1:
Top view - shows needed space between the
drywall and the studs.
Figure 2:
Cut out the supplied template on page 3 of this instruction sheet. Place the template on
the wall in the desired install location. Using your pen or pencial, trace the template on the
wall. Using a drywall saw or utility knife, cut a hole in the drywall the size of the template.
See Figure 1 before tracing your opening. Remember, this wall plate is designed to be
installed between the studs. It cannot be installed on top of a stud.
Figure 3:
Run the source of power to the included Old Work Electrical Box. Be sure to follow all
local electrical codes.
Figure 4:
Connect the suplied Duplex Surge Suppressor to a piece of 14/2 wth ground UL approved
electrical building wire that you have pulled from a power source. Strip off approximately 3
inches of the outer jacket of the wire. Be careful not to cut the jacket of the inner wires.
Connect the hot line (black) wire to the brass colored terminal screw and neutral (white)
wire to the silver colored terminal screw. Be sure to connect the grounding (green) or bare
grounding wire to the green colored terminal screw. Once you have wired the Duplex Surge
Suppressor, screw it into the Old Work Electrical Box until the receptacle is firmly secured.
Figure 5:
Use the four provided screws to secure the Old Work Electrical Box and Receptacle to
the mounting studs on the backside of the Expandable Media Box.
Figure 6:
Important: Before installing the Expandable Media Plate into the template opening, make
sure to pull your low voltage cables through the low voltage cable opening.
After low voltage pass through: Starting with the receptacle side of the Expandable
Media Box slowly sliding it into the opening. Swing the opposite side of the Media Box
into position until the entire Media Box is flush with the wall. Now screw down the screws
with wings; these wings fasten tightly against the back of the drywall. Push Expandable
Cavity into place.
Figure 7:
Your new Expandable Media Box with Duplex Surge Suppressor is now installed and
ready for the TV mount to be installed. Install your TV mount bracket per the TV bracket
manufacturer’s instructions.
Page 2 of 3
888.223.7977
770.662.8205
www.DataCommElectronics.com
Instruction / Installation Sheet
Expandable Media Box
with Duplex Surge Suppressor
Part # 45-0061-WH CONTINUED
05/01/2014