Burcam 450475 EASYFLUSH TOILET SYSTEM 1/2HP 115V User Manual
Page 5
5
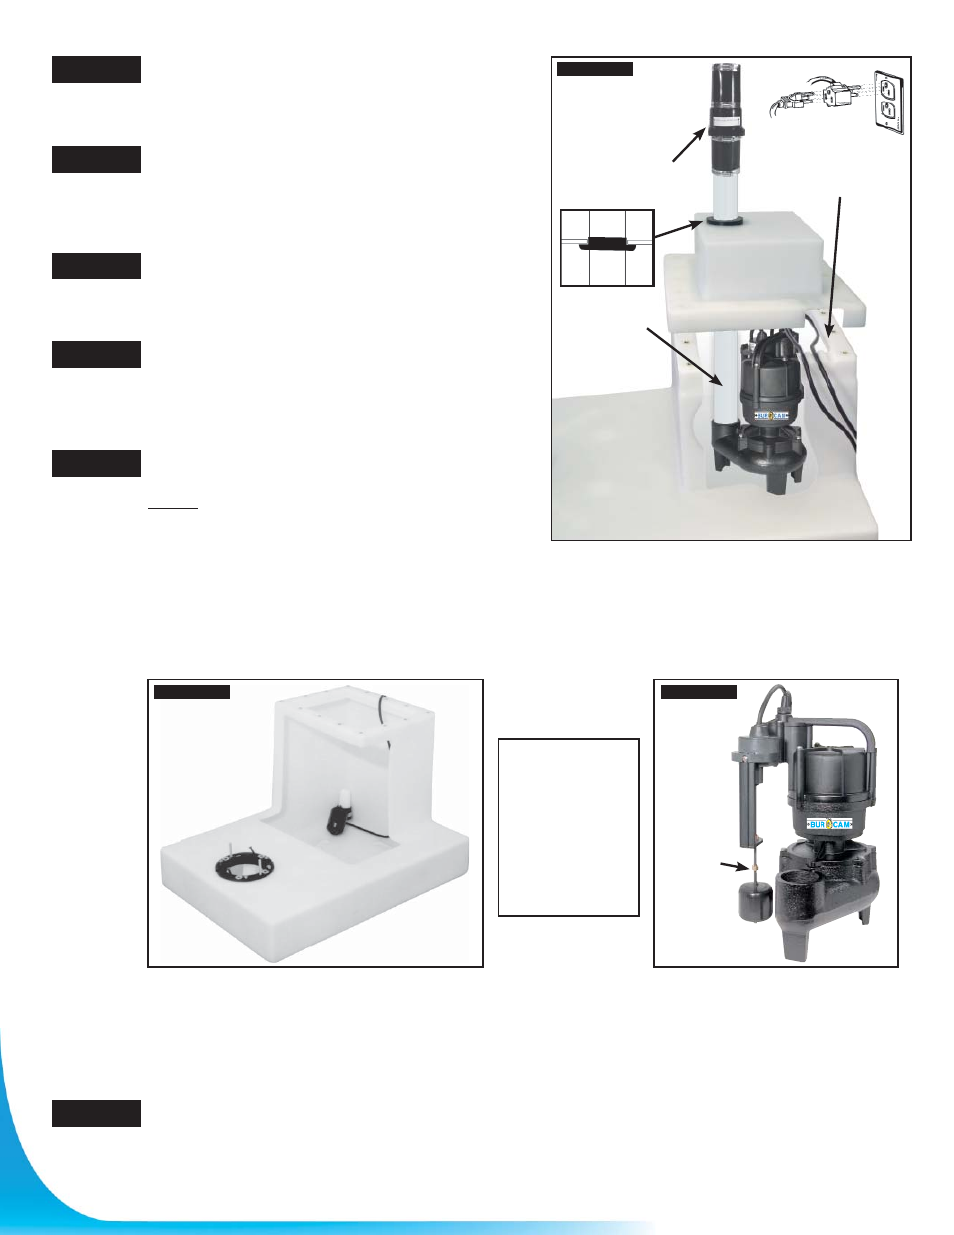
Screw the discharge pipe to the pump. A vent hole is
drilled in the pipe, at the adapter end. This will eliminate
the unit from getting air logged. That would prevent the
pump operation.
Install a 2’’ Aqua Flex rubber gasket under the pump cover,
in the appropriate opening for discharge line. Lubricate
the gasket with soap and insert lid halfway (Photo K).
The large lip of the gasket should be fl ush with the inside
of the cover.
Install the 2’’ check valve, making sure that the inside
fl ap opens upward to the discharge line, then, connect
the piping to the overhead sewer line. You are now
ready to test the operation of the pump.
The mechanical switch provided with your pump,
is supplied with a serial electrical male plug. Insert the
power cord of the pump, into the piggy-back receptacle of
the switch and plug it into the electrical ‘GFCI’ grounded
outlet.
Fill the basin through the toilet opening. The pump
should start when the water level reaches 4 1/2’’.
NOTE: The system is sold with two (2) possible types
of switch. Follow the instructions for the type supplied
with your unit. Mechanical switch
(Photo L) or vertical
switch (Photo M).
MECHANICAL SWITCH:
The switch is attached to the basin cone shape adapter which activates the
pump on a 30° angle. No other type of mechanical switch will work effectively. It must be installed as
illustrated, and the lenght of electric cord over the rubber protector should be 1 1/2’’. The color of the
switch is red, to identify the proper model. To adjust the pump start level, unplug the pump and adjust the
length of the switch cord, by either shortening or lengthening the cable over the rubber ring.
VERTICAL SWITCH: This type of switch is pre-set at the factory and does not normally need adjustement.
However, the stoppers can be used to correct an inadequate setting. Simply use an "Allen" key to make
the adjustements.
For either replacement switch, consult your retailer or call our customer service at 1 800.361.1820.
These type of switch are exclusive to BURCAM.
Install your toilet in the desired location with a wax ring and bolts. Slide the brass screws in the proper slot
position. Hook up the water line, turn it on and check for leaks. Flush the toilet and allow the pump to cycle
and insure a proper operation. Toilets with less than a 1.6 gallon fl ush are not recommended for use in our
"EASY FLUSH" System. For a better performance and to create a better water flow, it is recommended
that the unit is flushed twice, from time to time.
STEP 14
STEP 15
STEP 16
STEP 17
STEP 18
STEP 19
PHOTO M
PHOTO L
VERTICAL
VERTICAL
SWITCH
SWITCH
4 1/2" LEVEL
STOPPER
MECHANICAL
MECHANICAL
FLOAT SWITCH
FLOAT SWITCH
CHECK VALVE
DISCHARGE PIPE
ADHESIVE SEAL INSIDE
BRASS INSERTS
PHOTO K
The pump does
not remove all
the water in the
tank. When the
pump stops the
remaining water
level may varied
from 2
" to 3 1/2".
This is normal.