Ultra compact cart, Assembly instructions, Step 1 – Anthro UltraCompact Cart Assembly Instructions User Manual
Page 2: Step 3, Step 4, Step 5, Step 6, Step 2, Step 7
Ultra Compact Cart
Assembly Instructions
Anthro
®
Corporation Technology Furniture
®
10450 SW Manhasset Drive Tualatin, Oregon 97062 anthro.com
Step 1
Before proceeding, please review the Assembly
Instructions of all Anthro Products you purchased
and are planning to include in this installation.
These Instructions will cover both the Ultra Compact
Cart and Universal Keyboard & Mouse Caddy assembly.
You may disregard the Keyboard & Mouse Caddy Instructions
that came in the separate packaging.
Step 3
Attach four Shelf Supports to both Shelves.
Begin by first installing a Shelf Clamp into the Shelf
notch. Be sure the pointed “barbs” face towards the
outer Shelf edge.
Slide a Shelf Support into the recesses of the Shelf
Clamp and Shelf. Push in as far as possible.
Secure with a Clamp Screw.
anthro.com
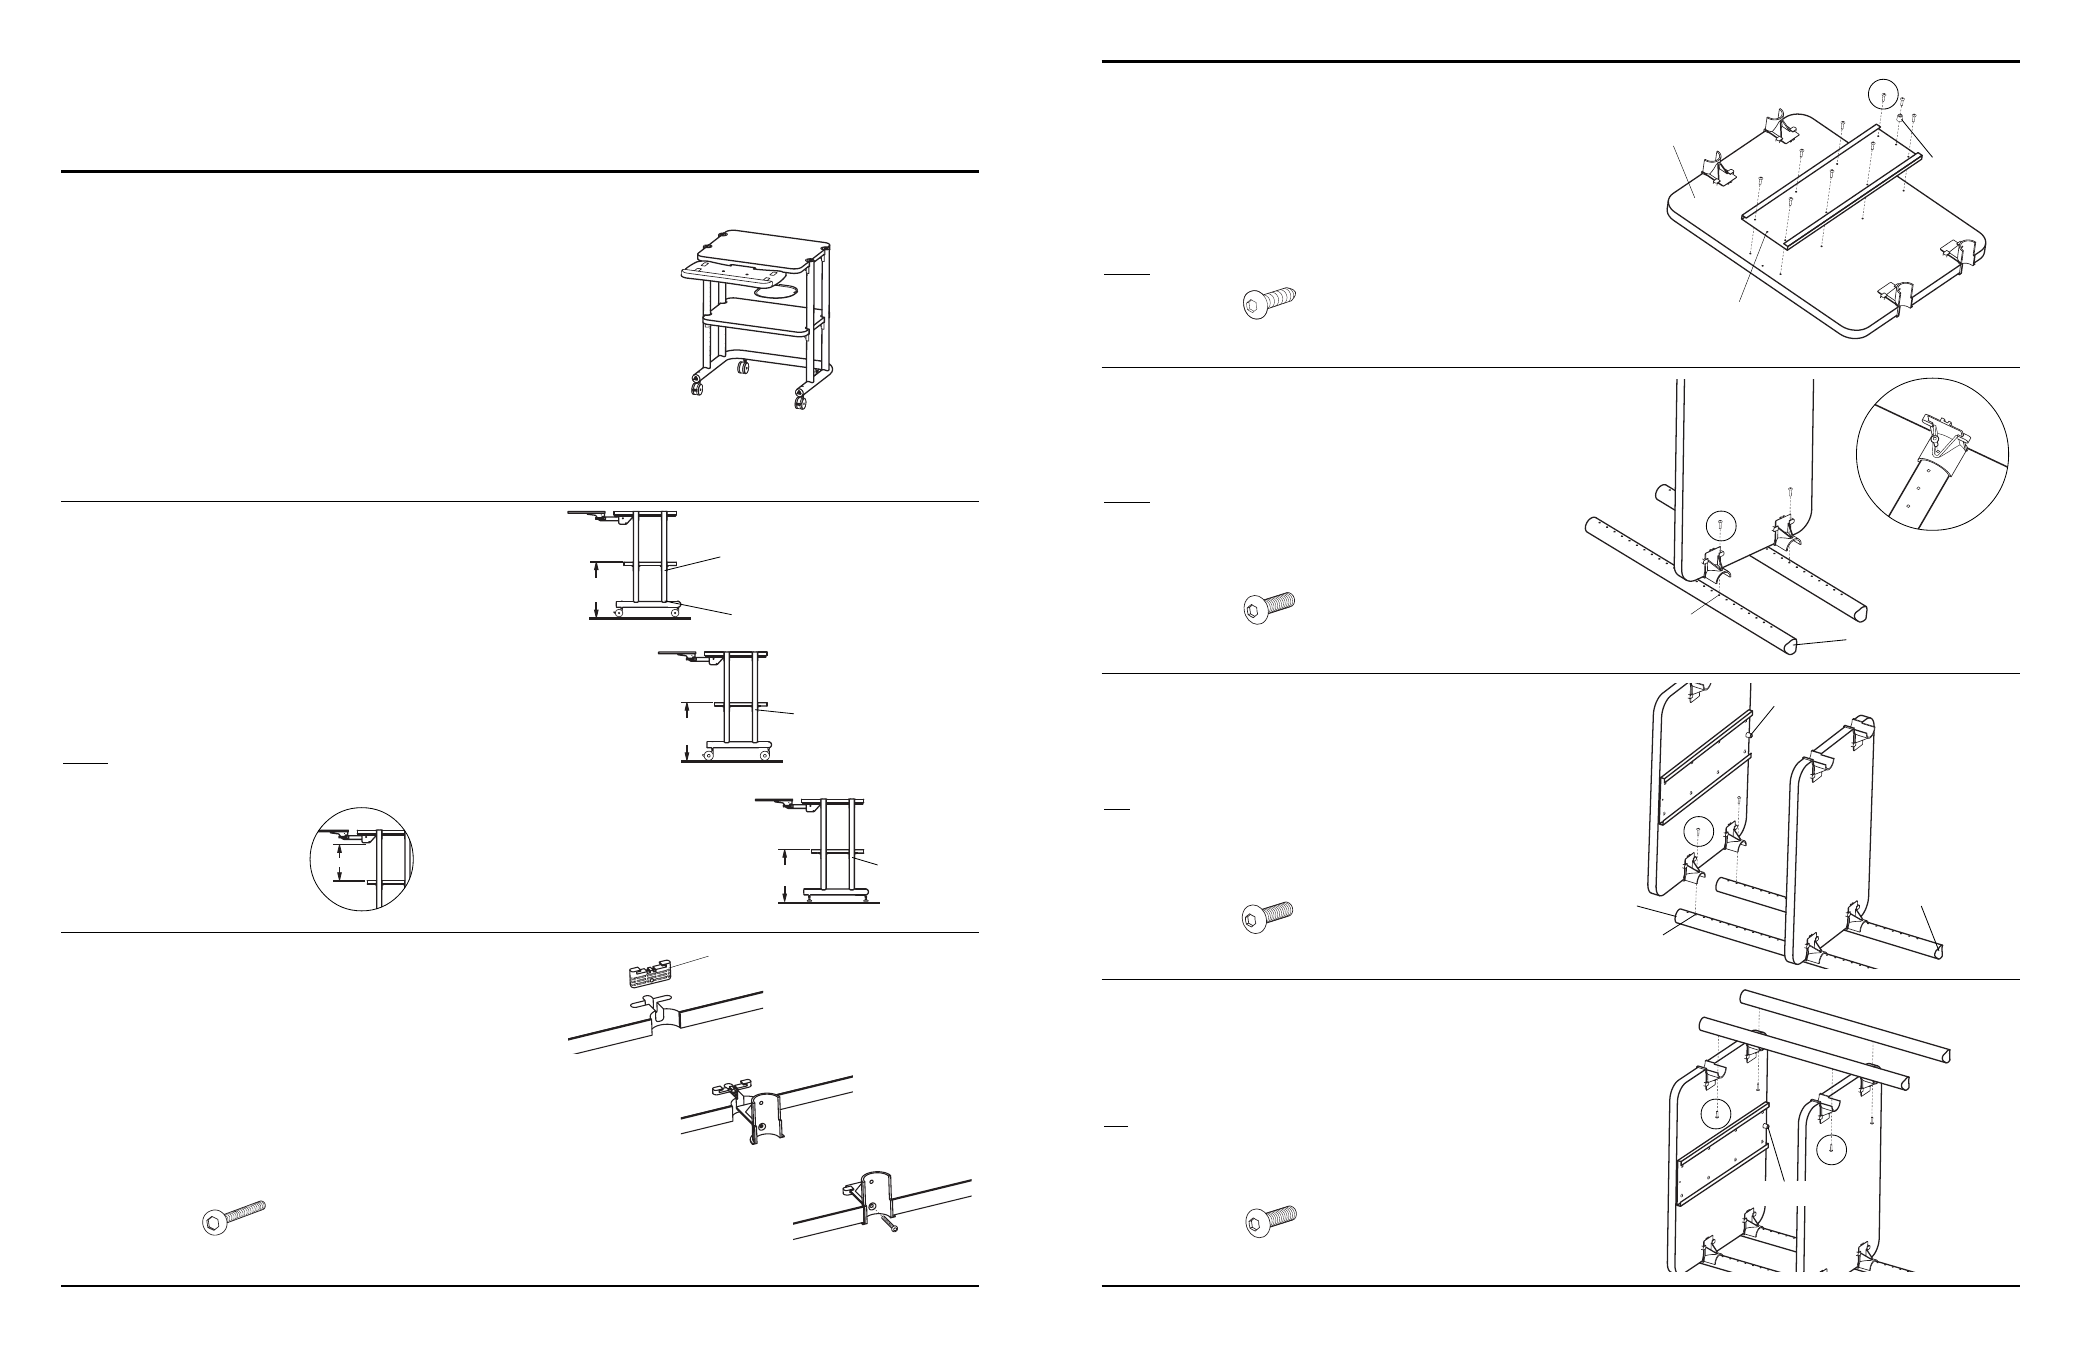
Step 4
Unpack the Universal Keyboard & Mouse Caddy items.
Align the ten Caddy Tray holes with those on the underside of
your Cart’s Large Shelf. Secure the Tray using eight Wood
Screws (installed on the edges of the Tray).
Finally, insert one Wood Screw through a Rubber Stop and
install the Stop towards the “rear” of your Cart.
NOTE: One hole will be left open.
Step 5
Loosely attach the Small Shelf to Hole 8 from the
bottom (coped end) of two Vertical Legs using two
Support Screws.
NOTE: Handle the Shelf Assembly carefully until the Cart is
fully assembled.
Step 6
Loosely attach the Large Shelf to Hole 2 from the
top (non-coped end) of the Vertical Leg Assembly
(from Step 5) using two Support Screws.
TIP: Use the holes in the Vertical Legs as a ruler to
ensure that your Support Screws are installed into the
correct locations.
Questions? 1-800-325-3841
First
Next
Last
Support Screw
325-5010-00
Clamp Screw
325-5086-03
Barbs
Step 2
Determine the best location for your Cart’s Shelves.
Your Cart is designed to have the Large Shelf installed
above the Small Shelf (as shown in these instructions).
For a Small Shelf location that is higher or lower than
16” from the floor, refer to the illustrations shown at
right to determine which hole to attach your Small Shelf.
Once assembled, it is very difficult to move a Shelf
without taking the Cart apart and starting over.
NOTE: These instructions will place your Small Shelf 16” from
the floor using the standard 2
3
/
8
” Casters.
075xx, 075Lxx with 2
3
/
8
” Casters shown
075xx
Ultra Compact Cart shown with
the Universal Keyboard & Mouse
Caddy and 2
3
/
8
” Casters
(075Lxx available with Mouse
Caddy on left)
075xx4, 075Lxx4 with 4” Casters shown
075xxGL, 075LxxGL with Glides shown
Hole 9=17”
Hole 8=16” (measured from the coped end)
Hole 7=15”
Hole 8=17”
Hole 7=16”
Hole 6=15”
Hole 11=17”
Hole 10=16”
Hole 9=15”
REMINDER: You may want to
measure your equipment to
make sure it fits between the
selected Shelf locations.
Coped end
16”
16”
16”
Support Screw
325-5010-00
Step 7
Loosely attach the 3
rd
and 4
th
Vertical Legs to the Shelf Assem-
bly (from Step 6) using one Support Screw per Shelf Support.
Once all four Vertical Legs are attached, tighten all Support Screws.
TIP: Use the holes in the Vertical Legs as a ruler to ensure that your
Support Screws are installed into the correct locations.
In preparation for Step 8, rotate your Cart upside down.
Support Screw
325-5010-00
1
/
2
” Wood Screw
325-5106-00
Do not install a Wood
Screw into this hole
NOTE: There is more
distance from the
Shelf Supports to the
Front Shelf edge
DON’T FORGET: The Keyboard
Caddy will require additional space
between the Shelves in order to fully
slide to the back of the Tray.
Rubber Bumper
Rubber Bumper
Rubber Bumper
Bottom (coped) end
Hole 8=16”
(using 2
3
/
8
” Casters)
Insert one Support Screw
through each Shelf Support
Top (non-coped) end
Hole 2
Bottom (coped) end