Pfister E23-BMFC User Manual
Page 2
Thank you for purchasing this Price Pfister product. All Price Pfister products are carefully engineered, and factory
tested to provide long trouble-free use under normal conditions. This faucet is easy to install using basic tools and our
easy to follow illustrated instructions. If you have any questions regarding this product, contact your local distributor.
1 BEFORE PROCEEDING:
WARNING: Read all the instructions completely before
proceeding. Price Pfister recommends calling a professional if you
are uncertain about installing this product!
This product should be installed in accordance with all local and state plumbing
and building codes.
2
2 WATER SHUT-OFF:
Locate water supply inlets and shut off the water supply valves. These
are usually found near the water meter.
3 SURFACE PREPARATION:
For optimum performance of your new Price Pfister Single Control
Bidet faucet, a minimum water pressure of 20 PSI [137.89 KPascal] is
required. Have the basic tools ready for removal of old valve. If you
are replacing an existing faucet, disconnect the old one and clean the
mounting surface thoroughly.
4 TOOLS RECOMMENDED:
For Iron Pipe Installation:
♦ Phillips Screwdriver ♦ Adjustable wrench
♦ Pipe Wrench
♦ PTFE Plumbers Tape
♦ Thread Sealant
♦ Slotted screwdriver
Some additional tools may be required.
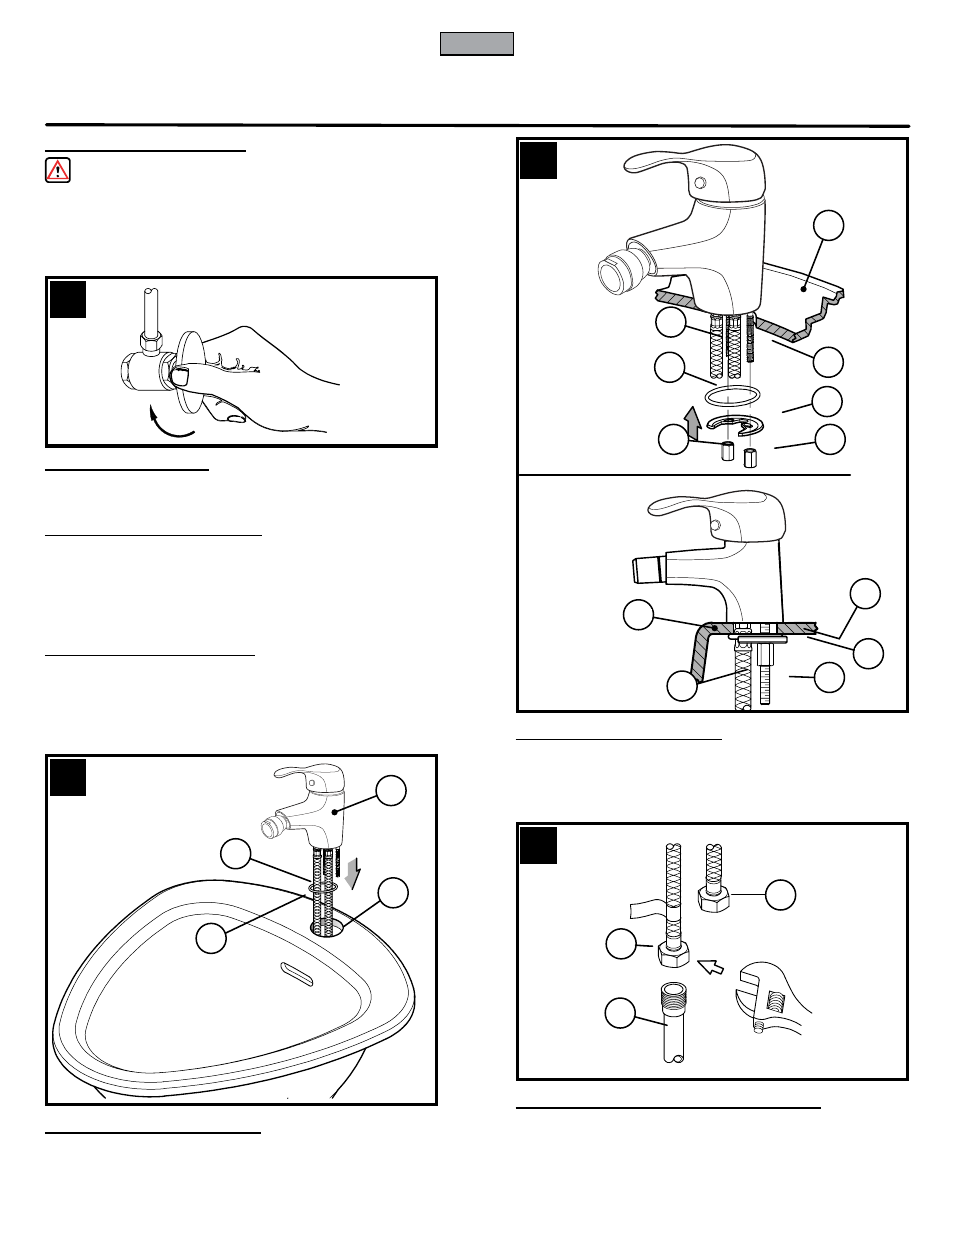
5 INSTALLING THE FAUCET
Insert O-Ring (5B) through the Faucet Supply Tubes (5A). Insert Faucet
Supply Tubes (5A) and O-Ring (5B) through the hole in bidet (5D). Align
the Faucet Body (5C) to desired position.
6 SECURING THE FAUCET
From underneath bidet, feed O-Ring (6A) and Clamp Washer (6B) over the
supply tubes (6C) and Clamp Screws (6D). Tread the Clamp Nuts (6E) on
the Clamp Screws (6D) until faucet is firmly secured to the sink (6F).
7
5
6
7 CONNECTING WATER SUPPLY LINES
Connect hot Water Supply Line (7A) to hot Inlet fitting (7B) indicated by
red flag. Be sure to hold faucet inlet fitting (7B) steady while tightening
the supply line. Wrench tighten until seal is achieved. Repeat for cold
Water Supply (7C).
2
ENGLISH
5B
5A
6A
7B
7C
5D
5C
6C
6D
6B
6C
6E
6F
7A
6E
6D
6B
6E
6F
Model E23-AMFC is shown.