Air supply, Lubrication, Troubleshooting – Sunex Tools SX280 User Manual
Page 4: Operation
SX280: Parts Breakdown & Operating Manual
4
10/25/11
5. Squeeze the Throttle Lever (32), and the Punch (34) will pierce
the workpiece.
6. Align the tool with the next mark on the workpiece, and repeat
step 5 until the job is finished.
7. Disconnect the air supply.
8.
WARNING: After disconnecting the Air Punch/Flange Tool
from the air supply, there could still be enough air pressure
to fire the Punch/Flange Tool. After making sure the air supply
is disconnected, ALWAYS fire the Punch/Flange repeatedly to
make sure all air is bled from the tool.
FLANGING:
1.
WARNING: Always wear heavy-duty leather gloves when
handling sheet metal. Sharp edges can cause severe injury.
Always wear ANSI-approved safety goggles.
2. Measure and cut the workpiece to the correct dimensions.
3. Connect the Air Punch/Flange Tool to your air supply. Do not
exceed 90 PSI.
4. Secure the workpiece in a vise or use another appropriate
clamping method.
5. Insert the workpiece into the flanging jaw between the Anvil
Bed (39) and the Punch Die Bed (40). Make sure the workpiece
is all the way flush against the back of both the Anvil Bed (39)
and the Punch Die Bed (40). Squeeze the Throttle Lever (32),
and the Anvil Bed (39) will be driven against the Punch Die
Bed (40), forming a flange.
6. Release the Throttle Lever (32). Slide the tool along the edge
of the workpiece to where the Anvil Bed (39) and the Punch
Die Bed (40) overlap part of the workpiece you just flanged.
Repeat step 5.
7. Repeat steps 5 and 6 until until the entire length you wanted
to flange is finished.
8. Disconnect the air supply.
9.
WARNING: After disconnecting the Air Punch/Flange Tool
from the air supply, there could still be enough air pressure
to fire the Punch/Flange Tool. After making sure the air supply
is disconnected, ALWAYS fire the Punch/Flange repeatedly to
make sure all air is bled from the tool.
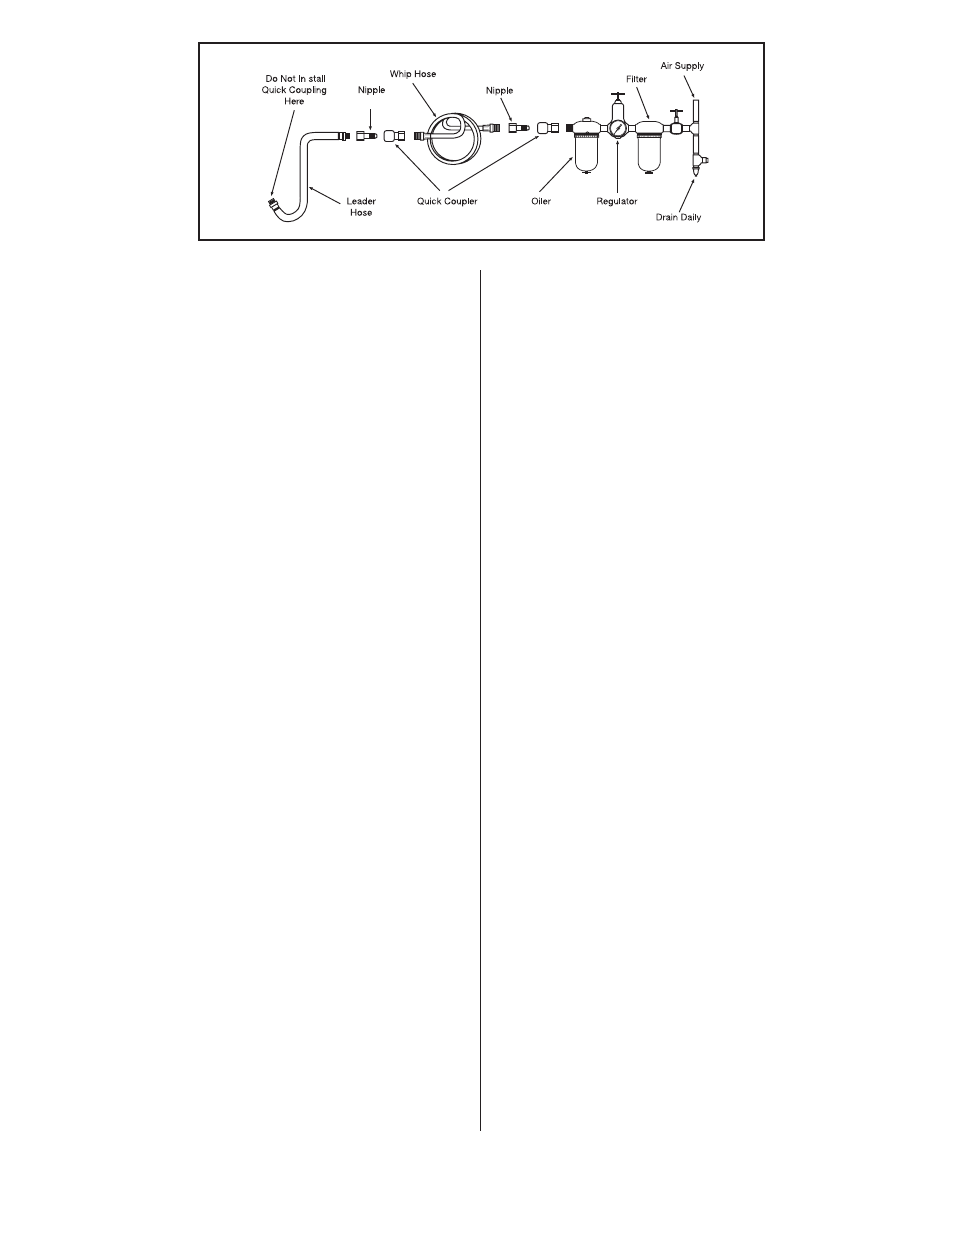
Air Supply...
Tools of this class operate on a wide range of air pres sures. It is
recommended that air pres sure of these tools mea sures 90 PSI at the
tool while running free. Higher pres sure (over 90 psig; 6.2 bar) will
short en the tool life and can cause accessory failure due to over speed.
Always use clean, dry air. Dust, corrosive fumes and/or water in the air
line will cause damage to the tool. Drain the air tank daily. Clean the
air inlet filter screen on at least a weekly schedule. The rec om mend ed
hookup pro ce dure can be viewed in figure 1.
Lubrication...
Lubricate the tool each day after use with quality SAE #10 air motor oil.
Add the oil to the air inlet or into the hose at the nearest connection to
the air supply then run the tool until all excess oil is expelled from the
exhaust. Total oil quantity needed for this procedure is approximately
1 ounce.
Troubleshooting...
Other factors outside the tool may cause loss of power or erratic
action. Reduced compressor output, excessive drain on the air line,
moisture or restrictions in air pipes or the use of hose connections
of improper size or poor conditions may reduce air supply. Grit or
gum deposits in the tool may cut power and may be corrected by
cleaning the air strainer and flushing out the tool with gum solvent
oil or an equal mixture of SAE #10 and kerosene. If outside conditions
are in order, disconnect tool from hose and take tool to your nearest
authorized service center.
Operation...
PUNCHING:
1.
WARNING: Always wear heavy-duty leather gloves when handling
sheet metal. Sharp edges can cause severe injury. Always wear
ANSI-approved safety goggles.
2. Pre-mark the desired location of each hole you wish to punch on
the workpiece.
NOTE: If the workpiece is to be both punched and flanged, flange it
first, then measure for the hole placement. Flanging will change the
dimensions of the workpiece.
3. Connect the Air Punch/Flange Tool to your air supply. Do not
exceed 90 PSI.
4. Insert the edge of the workpiece between the Punch Die (38) and
the Punch (34). Make sure your marks are aligned with the Punch
Die (38).
FIGURE 1