Installation steps – striping configuration – Sonnet Technologies Tempo RAID66 ATA Hardware RAID Controller Card User Manual
Page 2
2
2. Locate the jumper blocks on your hard drives. Figure 2 shows the two most
common jumper block locations.
Installation Steps – Striping Configuration
This section covers the configuration and installation of the Tempo RAID66 and
one or two pairs of hard drives to create striped volumes (two drives per volume);
striping improves disk performance (data input/output speeds), in many cases,
significantly. If you intend to use the Tempo RAID66 as a PCI host adapter
instead, and not take advantage of the striping function, skip to page 5 for
normal, non-RAID configuration installation steps.
1. Shut down the computer.
2. Remove the case cover from the computer and access the expansion card
area and drive bay(s) in your computer; refer to your computer’s user manual
for specific information.
3. Configure your hard drives’ jumpers as follows:
When installing one pair of drives to create one striped volume, you must
set the jumpers on both drives to the single setting when available, or the
master setting if not. When connecting two pairs of drives to create two
striped volumes, set the jumpers on one pair to the master setting and on
the other pair to the slave setting.
4. Install the hard drives into expansion bays. (Depending on your computer
model, drive mounting brackets/carriers or drive mounting sleds may be
required to install your hard drives. Refer to your computer’s user manual.)
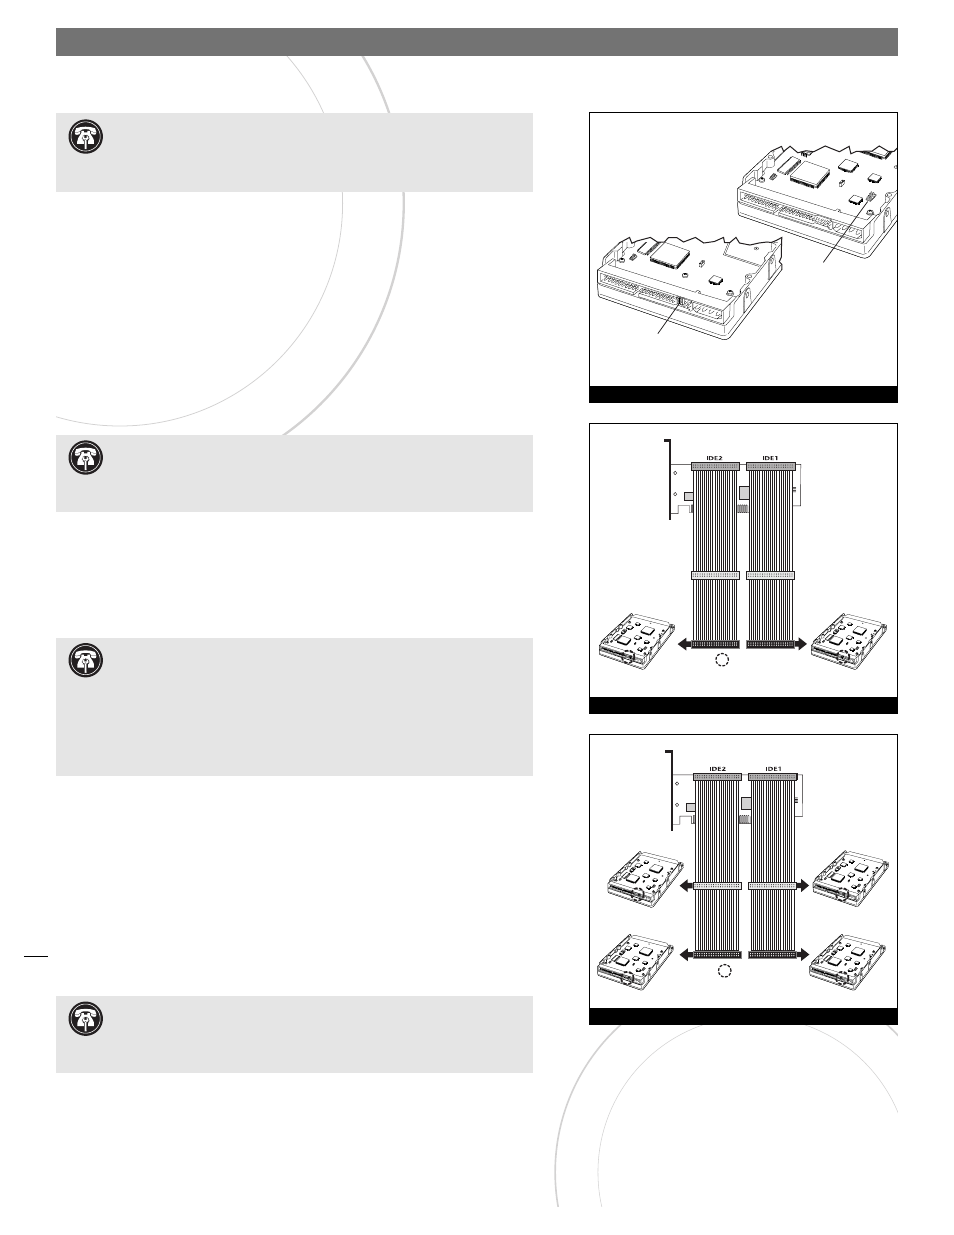
5. Connect the ATA/66 cables to the hard drives as follows:
When connecting one pair of drives, connect the master connector on each
ATA/66 cable to each drive (Figure 3). When connecting two pairs of drives,
connect the ATA/66 cables’ master connectors to the drives with jumpers set
in the master setting; connect the slave connectors to the drives with
jumpers configured in the slave setting (Figure 4).
jumper block
jumper block
Figure 2
Tempo RAID66 Macintosh
ATA Hardware RAID Controller
Ultra ATA/66 cable
drive 2
(single or master)
drive 0
(single or master)
Ultra ATA/66 cable
- jumpers
Figure 3
Tempo RAID66 Macintosh
ATA Hardware RAID Controller
Ultra ATA66 cable
drive 3 (slave)
drive 2 (master)
drive 1 (slave)
drive 0 (master)
Ultra ATA66 cable
- jumpers
Figure 4
.
Support Note:
When the Tempo RAID66 is used as a RAID controller,
you must connect your hard drives in pairs. We recommend that you
use identical hard drives in your RAID setup. If you choose to use drives with dif-
ferent capacities, your striped volume’s size will be equal to twice the capacity of
the smaller drive. Refer to the hard drives’ user manuals for jumper setting
information specific to your drives. Alternately, you may find jumper setting
information printed on your hard drives’ labels. Make sure the drives are oriented
the same way as the illustration before moving jumpers.
Support Note:
Certain computer models may require technical knowl-
edge to gain access to the drive expansion bays. We recommend you first
consult your computer’s user manual. If you feel you are unable to install the
computer hardware, contact a qualified technician.
Support Note:
A pair of drives consists of two drives connected at
the same position (connector) on each of the two ATA/66 cables, such as
master + master, or slave + slave. Two drives connected on the same cable (mas-
ter + slave) are not recognized as a pair by the Tempo RAID66.
Support Note:
Most hard drives are factory preset for use as a single or
master drive. To change the setting, you will need to reconfigure the hard
drives’ jumpers. Be sure the jumpers are configured properly, otherwise, your
computer may not boot or your new drives may not be recognized.