Aastralink rp solution quick start guide page 2/2, Before installing the software, Using the autoinstall cd – Aastra Telecom AastraLink RP 6751i RP User Manual
Page 2: Setting the password, date and time, Starting administrator, Testing your system, Aastralink rp quick reference
AastraLink RP Solution Quick Start Guide Page 2/2
For additional information and documentation, please visit: www.aastratelecom.com
Your AastraLink RP system requires an
up-to-date version of one of the following
operating systems:
Microsoft
®
Windows XP Professional or Home
Edition with Service Pack 2 (SP2, 32-bit) with
the lastest security updates
Microsoft
®
Windows Vista (32-bit) with the
latest security updates
Windows Server 2003 R2 SP2, 32-bit
Small Business Server 2003 R2, 32-bit
®
Before installing the software . . .
• Before you install the Microsoft
®
Response Point
TM
phone system
software on your computer, please complete the steps described on
the first page of this Quick Start Guide.
• All components of the AastraLink RP system should be assembled,
connected, and powered up so they will be automatically detected
when you install the software.
• It is suggested that you add at least one phone to ensure your
system is working. Additional phones or gateways may be added at
any future time.
NOTE: All phones, base units, and gateways must be connected to the
same local area network.
5
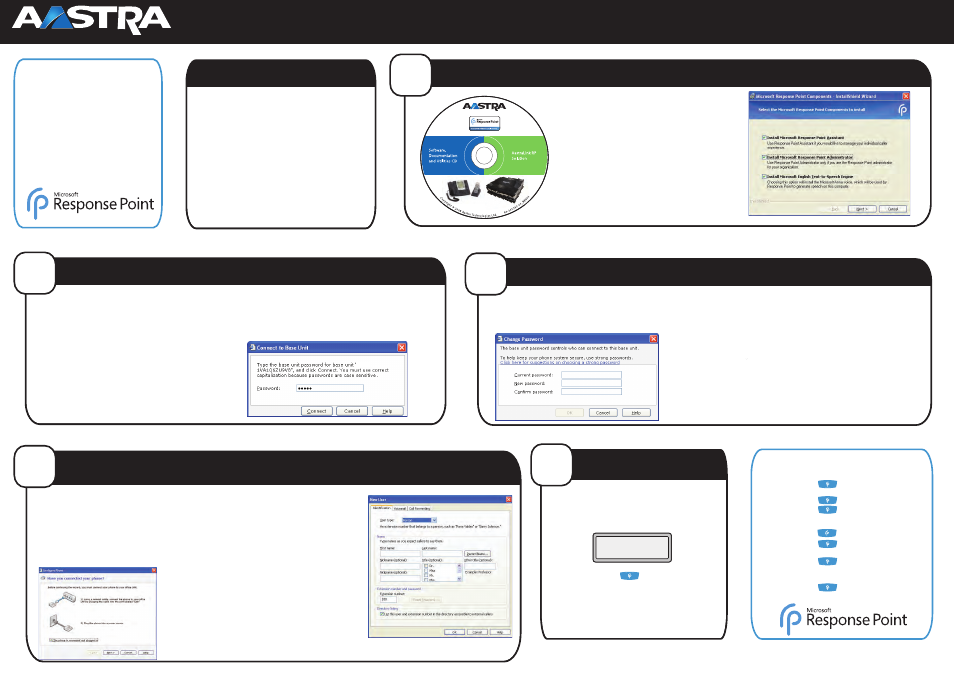
Using the Autoinstall CD
1 Locate the AastraLink RP Solution CD which was supplied with the
AastraLink RP 500 Base Unit.
2 Insert the CD into the CD drive of your computer. The Autoinstall
Window opens.
NOTE: If the Autoinstall window does not open, use the Windows Explorer to
view the CD directory. Double-click Setup.exe to start the installation process.
3 Click the Install button.
4 Check the Install Microsoft Response Point Administrator box so
all boxes are checked. (Microsoft Response Point Assistant is used for
your personal phone line, and the Microsoft English Text-to-Speech
Engine is used to record user names for the phone system.)
5 Click Next. Follow the prompts to install the Microsoft Response Point
phone system software.
NOTE: You must review and accept the license agreements to install the
software.
6 When the installation is complete, continue to step 6.
7
Setting the Password, Date and Time
3 In the Current password box, type the current password (the default is
admin).
4 In the New password and Confirm password boxes, type the new password,
and click OK.
The date and time of your of your entire AastraLink RP system is set through the
base unit. The base unit will then restart, which can take several minutes.
5 Click the Base Unit button.
6 Click the date and time next to the Date and time on the base unit option
under Properties.
7 In the Set Date and Time dialog box, select the options that you want.
NOTE: Because these settings are not updated in real time when the dialog box is
open, they will soon not match the base unit's current date and time.
8 Click OK.
It is recommended that you set a new base unit password, and change it regularly.
1 Click the Base Unit button.
2 In the Tasks pane, under Properties, click Change Password.
1 Select Start > All Programs > Microsoft Response Point
Administrator. The Important Notice screen appears.
2 Review the emergency considerations listed and click OK. The Select the
base unit screen appears.
NOTE: If no base units are listed, ensure your base unit is turned on and wait 30
seconds for the list to refresh. If it is still not detected see ‘Troubleshooting’ in the
AastraLink RP Administrator Guide.
3 Choose your base unit. If more than one is shown, check the MAC address
on the bottom sticker on your base unit. The first time you connect, a
security screen appears.
4 Confirm that the correct MAC address for your base unit is displayed, and
click Yes to continue. A security warning screen appears.
5 Click Yes to accept the security certificate. The Connect to Base Unit
dialog appears.
6 Enter the default password
admin and click Connect. The change password
now dialog appears.
The Microsoft Response Point Administrator phone system software is now
connected to the Aastralink RP 500 Base Unit. Change the password now, or
do so later following step 7.
6
Starting Administrator
®
TM
TM
TM
The AastraLink RP Solution works with Aastra RP phone models
6751i RP, 6753i RP and 6757i CT RP. Any combination of
these models may be used on one network.
1 Click the Phone System button.
2 In the Tasks pane, under Phones, click Add Phone, which
displays the Configure Phone Wizard.
3 Confirm that the phone is connected and plugged in, select the
check box at the bottom of the Have you connected your
phone page, and click Next.
4 On the What phone do you want to add page, click the phone
you just connected.
NOTE: If you do not see the phone click Refresh in the Tasks pane. If
you still do not see the phone, make sure that the phone is connected
to the LAN, unplug the phone from the power source, and plug it back
in. You may need to wait at least sixty seconds before the phone is
initialized and ready to be configured.
5 Click Next to display the Who will receive calls on this
phone page.
6 Click Assign User to select a user, and click OK. The New User
dialog appears.
7 Type the correct information on the Identification tab and click
OK. The What do you want to name this phone page opens.
8 The name and the owner of the phone have been filled in for
you automatically. You can change them both if you want, and
click Finish.
9 When the configuration process is complete, click Close.
Additional phones and users may be added by repeating steps
1-9.
NOTE: Some AastraLink RP phones have multiple lines, and allow you
to assign a unique user to each line.
Test your phone as follows.
• Voice dialing: Press the button. The Response Point
Base Unit will chime. Say ‘What can I say?’ for voice-activated
dialing options.
•Placing outgoing calls: From your phone dial ‘9’ followed by an
external phone number.
Congratulations on the successful installation of your new
AastraLink RP Solution!
Jane Doe
101
Tue Aug 19 11:31
When configuration of your Aastra IP phone is completed using the
Microsoft Response Point Administrator phone system software, the
phone is automatically configured by the software and is reset by
the Base Unit.
After the phone restarts, you will see the assigned extension and user
name on the phone display panel.
8
Adding phones and users to your AastraLink RP Solution
9
Testing your System
•check voicemail
say voicemail or dial 886
(default password is 9999)
•call internally
say (name)
or dial extension
•call externally
say (name)
or dial 9+number
(External phone numbers must be entered as contacts using Assistant for
voice-dialing access.)
•park a call
(and listen for parked call #)
•retrieve a call
say retrieve my call
or say retrieve call (call #)
•transfer a parked call
say transfer my call to (name)
or say transfer call (call #) to (name)
or dial 7*(call #) (extension)
•list directory
say directory
AastraLink RP Quick Reference
41-001259-00_REV04
TM
Aastra