Adder Technology AdderView CATx 1000 User Manual
Page 26
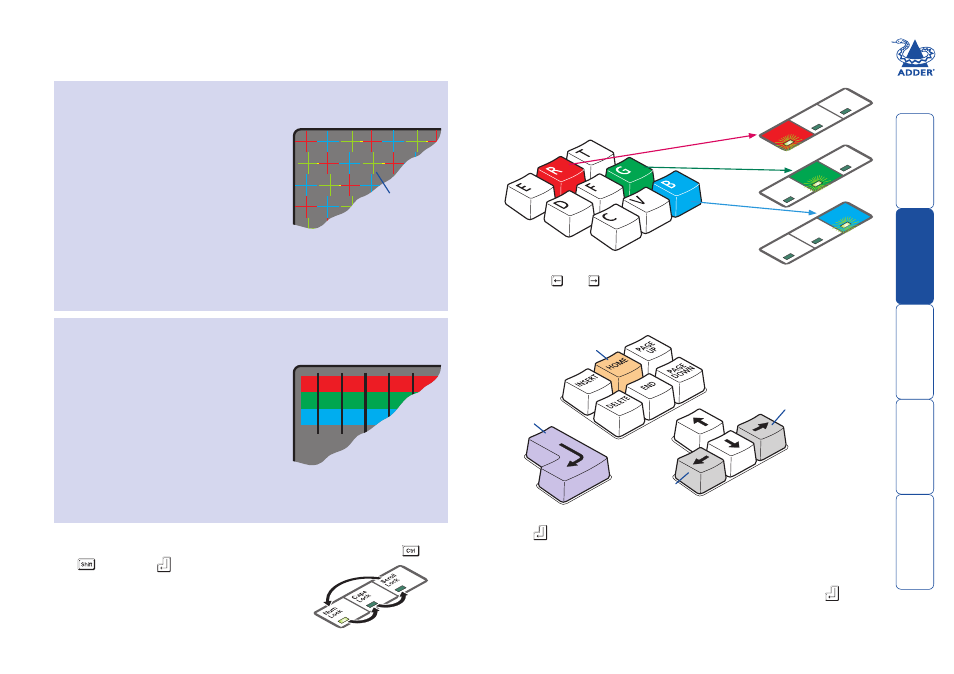
Convergence test
pattern showing the
RGB crosses. In this
case, the green signal
can be seen out of
line with the other
two colours.
To use skew adjustment
1 Display a skew pattern on the appropriate computer. You can either use the
supplied skew pattern or create your own:
Using the supplied skew pattern
i Insert the supplied Adder Installation CD-ROM into the CD player of the
computer.
ii Within Windows, use the My Computer
option (usually available as a desktop icon
or within the Start menu) to view the
contents of the CD-ROM. Double-click
the
Skew entry to display the standard
test pattern. If necessary, maximise the
application window so that the image fills
the screen.
The screen will show a series of fine red,
green and blue crosses which should all be
in line, vertically and horizontally. Skew affects the horizontal placement of
the colours and using this pattern it is much easier to discover which, if any,
colours are being adversely affected by the cable link.
Creating a skew test pattern
i Run any image creation/editing application, such as the Paint program
supplied with Windows.
ii Using the image application create three
stacked horizontal rectangles (one red,
one green and one blue) that fill the
width of the screen.
iii Draw a vertical black line down across
the coloured bars and then repeat this
vertical line at intervals along the width
of the coloured bars. These lines create
breaks across the colours and give you
more opportunities to view the horizontal
position of each colour relative to the others.
2 On the remote user keyboard (connected to an Adder X100AS/R or
X200AS/R extender), simultaneously, press the hotkeys (by default,
and
) along with
to enter configuration
mode.
The three keyboard indicators (‘Num Lock’,
‘Caps Lock’ and ‘Scroll Lock’) will now begin
to flash in sequence.
3 As appropriate, press either the R, G or B keyboard keys to
select the appropriate colour channel. Corresponding
keyboard indicators will flash rapidly to show which
channel is currently selected for adjustment:
Num Lock for Red, Caps Lock for Green and
Scroll Lock for Blue.
Advance
colour
timing
Retard
colour
timing
Restore
default
skew
settings
Exit image
controls
and save
settings
Num
Loc
k
Caps
Loc
k
Scroll
Loc
k
Num
Loc
k
Caps
Loc
k
Scroll
Loc
k
Num
Loc
k
Caps
Loc
k
Scroll
Loc
k
4 Press the and keys to retard or advance the timing of the selected
colour channel respectively. On screen you will see a change in the position
of the selected colour crosses (or colour bars) in relation to the other two.
5 When the selected colour crosses (or colour bars) are correctly positioned,
press
to exit that colour channel. The keyboard indicators will return to
flashing in sequence.
6 If required, repeat steps 3 to 5 to select and adjust any colour channel until
the vertical lines of the red, green and blue crosses are all aligned.
7 When all colours are correctly aligned on all video channels, press
to exit
configuration mode and permanently save all settings.
Note: Once you have made the skew adjustments, it may be necessary to
re-adjust the image controls to attain optimum screen images.