Warning, Rivers edge® spin shot – Rivers Edge RE637 Spin Shot User Manual
Page 10
Check for parts online at
www.HuntRiversEdge.com or call 800-450-EDGE (3343) M-F 8-5
10
Operator's Manual
Rivers Edge® Spin Shot™
SETUP AND USE INSTRUCTIONS
During installation and removal of ladder treestands, you must
always and properly use the included Full Body Harness (Fall Arrest
System). Refer to the Full Body Harness instructions included with
this product for proper use.
1. With assembled product lying on the ground in assembled position,
position one person at bottom end of ladder lying on the ground.
This person has to prevent the ladder end from tilting up when platform
end is lifted and prevent the ladder from skidding across ground.
2. a. Position (2) people at the platform end of the ladder, lift the
platform end, and continue uprighting by walking toward bottom
end of ladder and moving hands along ladder legs. Stand ladder
up against chosen straight tree on dry, level ground. Use caution
when ladder comes over center against tree.
b. Step back and look at ladder top to see that it is level. Adjust as
needed to achieve a level platform at top. Be sure that both tree
blades are contacting tree. Adjust as needed so both tree blades
are contacting tree.
c. Step down hard on bottom step to push ladder legs into the
ground.
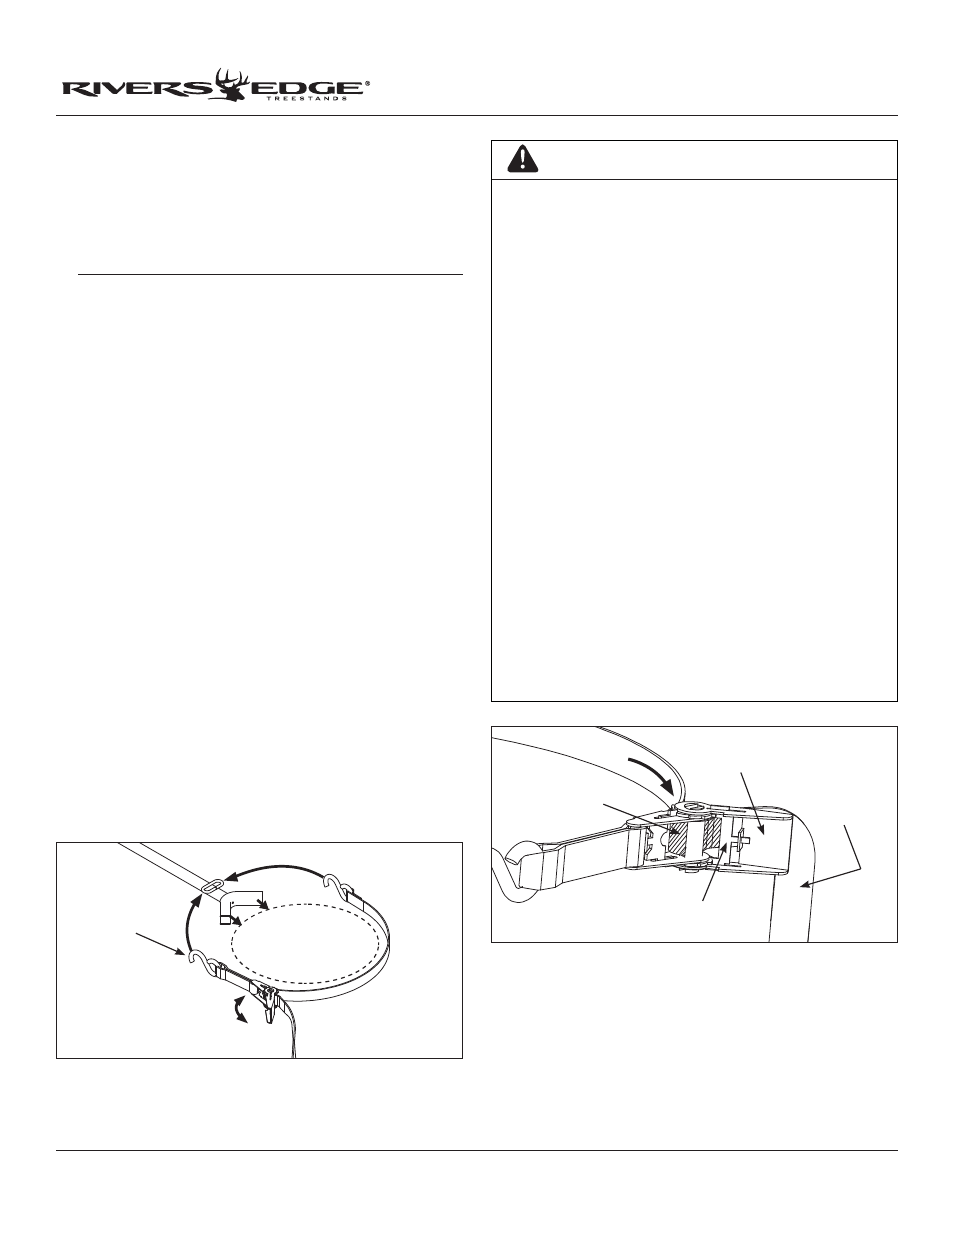
d. With ratchet strap now in hand, hook “S” hook with long strap to the
stabilizer bar link welded on stabilizer bar. Feed the long strap through
the center (slot) of ratcheting mechanism and back around through
tightening lever. SEE FIGURES 12 AND 13. Secure the ladder tight
so the stabilizer bar is at a right angle to the tree. Adjust stabilizer bar
length as necessary so it contacts tree. Be absolutely sure the tree
blades at top and the stabilizer bar are all contacting tree.
NOTE: Be sure you feed the long strap correctly so there are no
twists in the strap.
e. Wrap entire ratchet assembly around tree and hook other “S” hook
through opposite side of stabilizer bar link. Pull tail of long strap until
most of the slack is taken out. Be sure entire strap is even and at the
same level all around tree. "Ratchet" tight to tree, this will securely
attach stabilizer bar to tree. SEE FIGURE 12. Be absolutely sure the
tree blades at top and stabilizer bar are all contacting tree.
NOTE: To release ratchet, simply pull the release lever and open
tightening lever wide open (flat).
WARNING
DOUBLE CHECK ASSEMBLY STEPS TO BE CERTAIN YOU HAVE
CORRECTLY ASSEMBLED THIS PRODUCT.
STUDY YOUR NEW STAND TO BECOME FAMILIAR WITH ALL
OF ITS FEATURES AND DESIGN. AT GROUND LEVEL, FOLLOW-
ING PROVIDED USE INSTRUCTIONS, PRACTICE ATTACHING
STAND TO TREE AND REMOVING STAND FROM TREE. PRAC-
TICE SITTING, STANDING, AND USING THIS PRODUCT BE-
FORE ATTACHING OVERHEAD. SAVE THESE INSTRUCTIONS
FOR FUTURE REFERENCE. YOU MUST ALWAYS USE THE PRO-
VIDED FULL BODY HARNESS (FALL ARREST SYSTEM) THAT
MEETS TMA STANDARDS WHILE USING THIS PRODUCT.
ALWAYS USE THREE PEOPLE FOR SET-UP AND TAKE-DOWN.
BE ABSOLUTELY SURE THE TREE BLADE(S) ON PLATFORM
AND THE STABILIZER BAR ARE CONTACTING TREE BEFORE
CLIMBING LADDER.
STABILIZER BAR MUST ALWAYS BE CORRECTLY AND SECURELY
ATTACHED TO LADDER AND TREE BEFORE CLIMBING LADDER.
SOME MODELS INCLUDE A MULTI-PIECE STABILIZER BAR
SYSTEM. BE SURE SPRING LOCK PIN GOES THROUGH BOTH
THE EXTENSION TUBE AND THE STABILIZER BAR.
BE CERTAIN SPRING LOCK PINS ARE LATCHED SECURELY TO
PREVENT ACCIDENTAL REMOVAL.
BE SURE YOUR DOUBLE KNOTS ARE ALL SECURE ON ALL
ROPE CONNECTIONS.
NEVER ASCEND OR DESCEND LADDER WITHOUT TIE-OFF
ROPES SECURELY HOLDING LADDER TO TREE AND STABI-
LIZER BAR SECURELY ATTACHED. FAILURE TO CORRECTLY
PERFORM THESE STEPS CAN CAUSE THE LADDER TO COL-
LAPSE/BUCKLE-OVER BACKWARDS DURING THE INITIAL
ASCENT TO ATTACH RATCHET STRAP RESULTING IN SERI-
OUS INJURY OR DEATH
pull tail to take
out slack
tightening lever
release lever
feed through
slot
FIGURE 13
TREE
FIGURE 12
ratchet
back and forth
"S" hook