Warning, 540 rpm speed range only – Farm Star T55-74 User Manual
Page 16
15
28
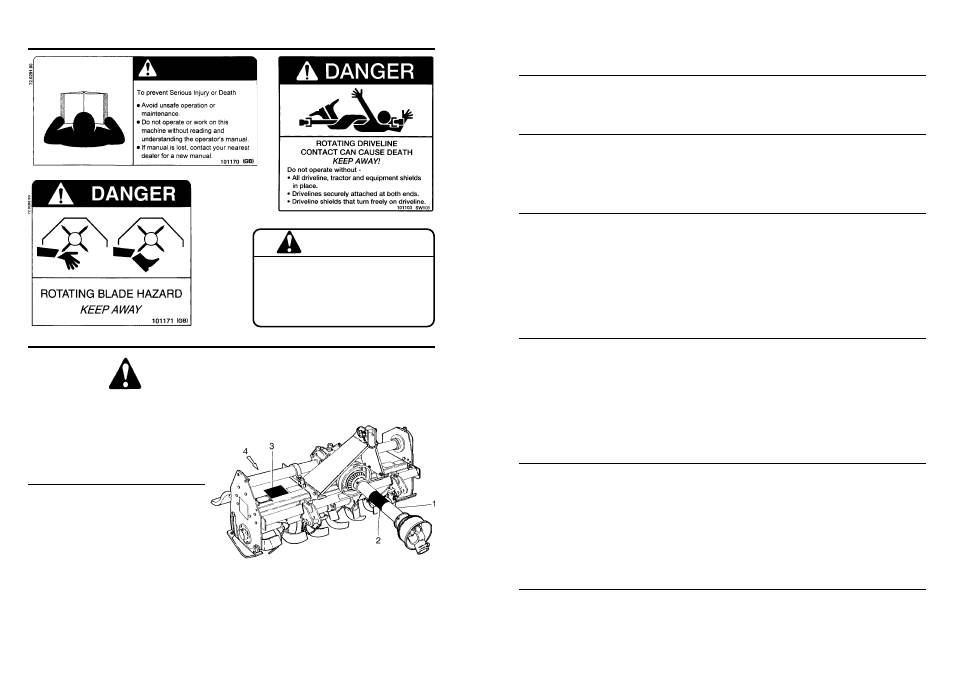
The types of Safety Sign and locations on the equipment are shown in the illustration below. Good safety requires
that you familiarize yourself with the various Safety Signs, the type of warning and the area, or particular function
related to that area, that requires your SAFETY AWARENESS.
REMEMBER: If Safety Signs have been damaged, removed, become illegible or parts replaced without Signs, new
Safety Signs must be applied. New Safety Signs are available from your authorized distributor or factory.
S A F E T Y S I G N L O C AT I O N S
SAFETY SIGN LOCATIONS
NO.
PART NO.
DESCRIPTION
1
101101
Warning (540 RPM)
2
101103
Danger (Keep Away)
3
101170
Warning (Prevent Injury)
4
101171
Danger (Rotating Blades)
WARNING
540 RPM SPEED
RANGE ONLY
HIGHER PTO SPEEDS CAN CAUSE
PERSONAL INJURY AND
EQUIPMENT FAILURE
101101
S A F E T Y S I G N S
T R O U B L E S H O O T I N G G U I D E
P R O B L E M
P O S S I B L E C A U S E
P O S S I B L E R E M E D Y
Machine makes intermit-
tent clicking noise.
1. Loose parts.
2. Chain damaged.
3. Gearbox gear tooth damaged.
Check that all nuts and bolts are
properly tightened.
Replace damaged chain link.
Replace damaged gear.
Excessive vibration
and/or machine jumps
over ground.
1. Wrong PTO RPM.
2. Excessive trash wrapped on rotor.
3. Broken or worn blades.
4. Incorrectly mounted blade/blades
with dull side cutting first (blades on
backwards).
5. Damaged or bent main rotor.
Place PTO lever in 540 RPM position.
Remove trash.
Replace blades.
Correctly remount the blades.
Replace rotor shaft.
PTO vibrates.
1. Worn universal joint.
2. Machine lifted too high.
3. Excessive trash wrapped on rotor.
4. PTO driveline bent.
5. PTO driveline hitting front of tiller or
swinging drawbar.
Replace universal joint.
Lower machine and readjust tractor
3 point lift stop.
Remove trash.
Replace PTO driveline.
Adjust machine lift height and/or
remove drawbar.
Rotor will not turn.
1. PTO not engaged.
2. Broken drive chain.
3. Driveline shearbolt sheared.
4. Clutch slipping.
5. Rock or stump wedged between
tine and housing.
Engage PTO.
Repair drive chain.
Replace shearbolt.
Reduce load (slow forward speed).
Adjust clutch.
Remove material wrapped or
wedged.
Tillage depth insufficient
or tiller will not pene-
trate ground.
(CONTINUED)
9. Tiller at wrong attitude.
10. Excessive forward speed.
Adjust toplink of 3 point hitch to
correct tiller attitude.
Reduce ground speed.
WARNING