Service and adjustments, Storage, Assembly – Poulan Pro PR625P_115587827 LAWN TRACTOR User Manual
Page 5
32
SERVICE AND ADJUSTMENTS
22PLUS REAR WHEEL DRIVE MODELS:
1. Remove screws securing rear baffl e.
2. Turn lawn mower on its side with air
fi lter and car bu re tor down.
3. Remove rear baffl e from mower.
4. Remove blade bolt, lockwasher, hard-
ened washer and blade.
5. Remove debris shield.
6. Remove gearcase belt keeper.
7. Remove drive belt.
2. Reinstall gearcase belt keeper. Be
sure the new drive belt is inside the
tabs of the gearcase belt keeper.
3. Position the blade adapter on the en-
gine crank shaft. Be sure key in adapter
and crankshaft keyway are aligned;
and that the drive belt is inside the tabs
of the belt retainer.
4. Place rear baffl e in mower housing.
5. Reinstall debris shield.
6. Reinstall blade.
7. Return mower to upright po si tion.
8. Reinstall rear baffl e screws.
ENGINE
CARBURETOR
The carburetor has been preset at the fac-
tory and ad just ment should not be neces-
sary. However, minor ad just ment may be
required to compensate for differences in
fuel, temperature, altitude or load.
• The air fi lter must be assembled to the
car bu re tor when running engine.
• Best carburetor adjustment is obtained
when fuel tank is 1/4 full.
• In order for the engine to run, the opera-
tor presence control bar must be held
in the operating position. There fore,
and assistant will be required to hold
the control bar in the operating position
when making fi nal adjustment to the
car bu re tor.
See the ADJUSTMENT section of your
engine manual for further instructions.
ENGINE SPEED
The engine speed has been factory set.
Do not attempt to increase engine speed
as it may result in personal injury. If you
believe the engine is running too fast
or too slow, take your lawn mower to an
authorized engine service center for repair
and adjustment.
THROTTLE CONTROL
If it becomes necessary to adjust or re-
place the throttle control, see the ADJUST-
MENT section of your engine man ual.
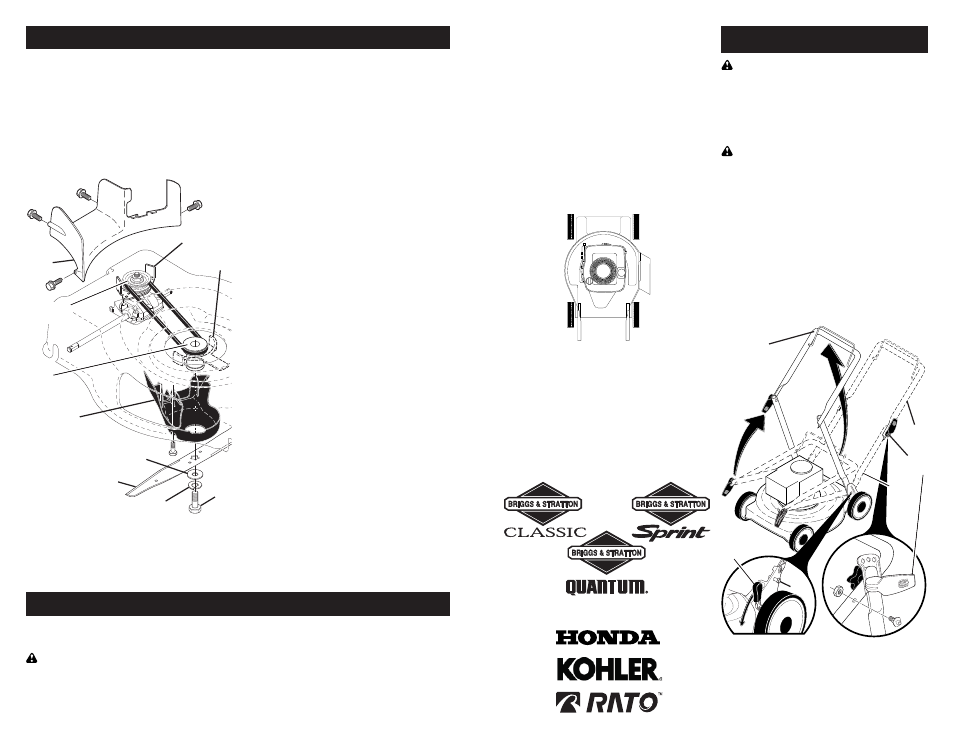
TO REPLACE DRIVE BELT
1. Place new drive belt on gearcase pul-
ley.
NOTE: Always use factory approved belt
to assure proper fi t and long life.
Blade
bolt
Hardened washer
Lockwasher
Blade
adapter
Blade
Belt
retainer
Gearcase
belt keeper
Debris
shield
Rear
baffl e
Gearcase
pulley
STORAGE
Immediately prepare your lawn mower for
storage at the end of the season or if the
unit will not be used for 30 days or more.
CAUTION: Never store the lawn mower
with gaso line in the tank inside a build ing
where fumes may reach an open fl ame
or spark. Allow the engine to cool before
storing in any enclosure.
LAWN MOWER
When lawn mower is to be stored for a pe-
riod of time, clean it thor oughly, remove all
dirt, grease, leaves, etc. Store in a clean,
dry area.
• Clean entire lawn mower (See “CLEAN-
ING” in the Maintenance section of this
manual).
5
LEFT
HAND
SIDE
RIGHT
HAND
SIDE
FRONT
BACK or REAR
(Op er at ing Position)
OTHER ENGINES
What kind of engine is on my lawn
mower?
When learning how to operate your new
lawn mower, you will need to know what
kind of engine powers the mower. A decal
on the engine will indicate the man u fac tur-
er and type or brand name of the engine.
BRIGGS & STRATTON ENGINES
Do I have a mulching lawn mower?
Look for the grass discharge opening on
your mower. Raise the discharge guard
(rear door on rear discharge mowers). If
the opening is closed off by a plate, then
your lawn mower is mulcher ready. To
convert to a discharging mower, see the
Operation section of this manual.
What is the right and left side of the
lawn mower?
When right hand (RH) or left hand (LH) is
mentioned in this man ual, it means when
you are in the operating po si tion (stand ing
be hind the handle).
ASSEMBLY
CAUTION: Do not operate this lawn
mower without the discharge guard or an
entire approved grass catcher in place.
These guards are for your protection and
are required by the American National
Standards Institute and Consumer Prod-
ucts Safety Com mis sion.
CAUTION: Disconnect spark plug wire
from spark plug and place wire where it
cannot come in contact with plug.
HOW TO SET UP YOUR MOW ER
UNFOLD HANDLE
IMPORTANT: Unfold handle carefully so
as not to pinch or damage con trol cables.
“QUICK RELEASE” HANDLES
(ON 18" HI-VAC MODELS ONLY)
• Move height adjustment lever forward to
raise mower to highest position.
• Tighten handle bolts (on both sides).
MOWING
POSITION
Lower
handle
LIFT
UP
Operator
presence
control bar
Upper
handle
LIFT
UP
Handle
lever
LEVER FORWARD TO RAISE MOWER
Height
adjuster
lever
Bolt