Poulan Pro PB38 LAWN TRACTOR User Manual
Page 18
18
RIDING MOWER
Always observe safety rules when per form ing
any main te nance.
BRAKE OPERATION
If riding mower requires more than four (4)
feet to stop at highest speed in high est gear
on a level, dry concrete or paved surface,
then brake must be serviced at your nearest
authorized service center.
TIRES
• Maintain tire pressure at 12 PSI.
• Keep tires free of gasoline, oil, or insect
control chemi cals which can harm rubber.
• Avoid stumps, stones, deep ruts, sharp
objects and other hazards that may cause
tire damage.
NOTE: To seal tire punctures and pre vent
flat tires due to slow leaks, tire sealant may
be purchased from your local parts dealer.
Tire sealant also pre vents tire dry rot and
corrosion.
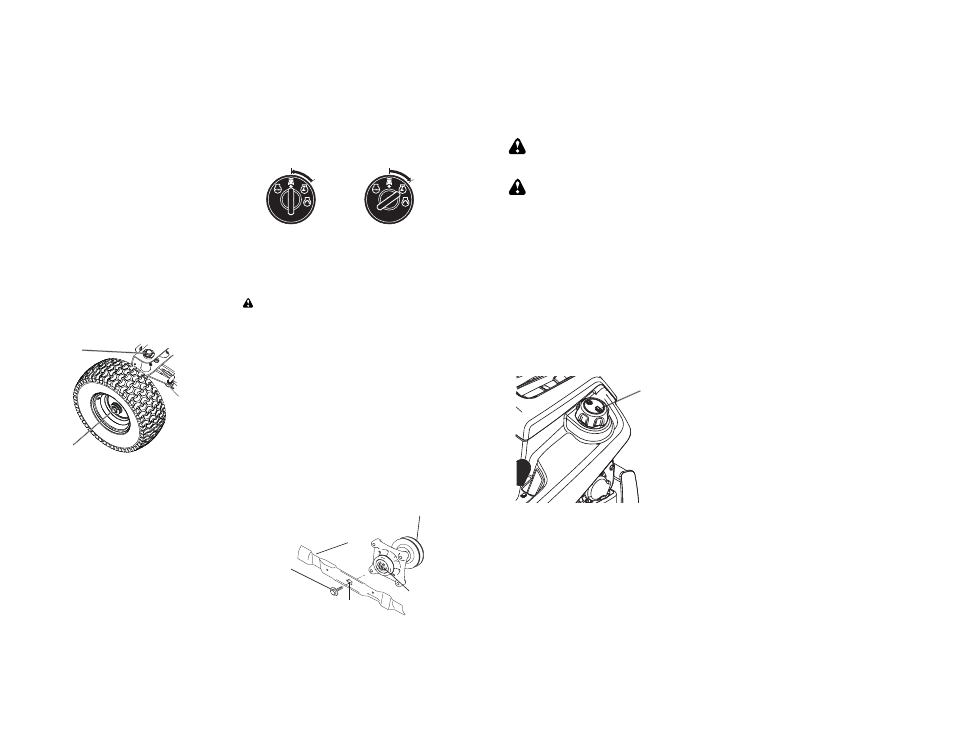
AXLE AND SPINDLES
• Front wheel axles and front spindles should
be properly lubricated.
• Wheel axles and spindles should be
lubricated with grease.
Wheel Axle
Spindle
OPERATOR PRESENCE SYS TEM AND
REVERSE OPERATION SYSTEM (ROS)
Be sure operator presence and reverse
operation sys tems are work ing properly.
If your riding mower does not function as
described, repair the problem immediately.
• The engine should not start unless the
brake pedal is fully de pressed, and the deck
clutch lever is in the dis en gaged position.
CHECK OPERATOR PRESENCE SYSTEM
• When the engine is running, any attempt
by the op er a tor to leave the seat without
first setting the parking brake should shut
off the engine.
• When the engine is running and the deck
clutch lever is engaged, any attempt by
the operator to leave the seat should shut
off the engine.
• Never operate the deck clutch lever unless
you are seated in the seat.
BLADE CARE
For best results mower blades must be sharp.
Re place worn, bent or damaged blades.
CAUTION:
Use only a replacement blade
approved by the manufacturer of your riding
mower. Using a blade not approved by the
manufacturer of your riding mower is hazard-
ous, could damage your riding mower and
void your warranty.
CHECK REVERSE OPERATION (ROS)
SYSTEM
• When the engine is running with the ignition
switch in the engine "ON" position and the
deck clutch lever engaged, any attempt by
the operator to shift into reverse should
shut off the engine.
• When the engine is running with the ignition
switch in the ROS "ON" position and the
deck clutch lever engaged, any attempt by
the operator to shift into reverse should
NOT shut off the engine.
BLADE REMOVAL
1. Raise mower to highest position to allow
access to blade.
NOTE: Protect your hands with gloves and/
or wrap blade with heavy cloth.
2. Remove blade bolt by turning coun ter-
clock wise.
3. Install new blade with stamped "THIS
SIDE UP" facing deck and mandrel as-
sembly.
IMPORTANT: To ensure proper as sem bly,
center hole in blade must align with star on
mandrel assembly.
4. Install and tighten blade bolt securely
45-55 Ft. Lbs. (62-75 Nm).
IMPORTANT: Special blade bolt is heat
treated.
025
45
Blade
Center Hole
Star
Mandrel
Assembly
Blade Bolt
(Special)
ROS "ON"
Position
Engine "ON" Position
(Normal Operating)
43
PRECAUCIÓN: Los combustibles mezcla-
dos con alcohol (llamados gasohol o que usan
etanol o metanol) pueden atraer la humedad, lo
que provoca la separación y for ma ción de ácidos
durante el almacenamiento. El gas ácido puede
dañar el sistema de combustible de un motor mien-
tras se encuentra en almacenamiento. Para evitar
problemas con el motor, el sistema de combustible
se debe vaciar antes del alma cemaniento durante
30 días o más. Drene el tanque de gasolina,
arranque el motor y hágalo funcionar hasta que
las líneas de combustible y el carburador estén
vacíos. Use combustible nuevo en la próxima
temporada. Consulte las In struc ciones de Alma-
cenamiento para obtener información adicional.
Nunca use productos limpiadores para motor o
carburador en el tanque de combustible porque
puede ocurrir un daño permanente.
CÓMO AGREGAR GASOLINA
• Llene el tanque de combustible hasta la parte
inferior del cuello de relleno. No lo llene de
más. Use gasolina sin pl o mo regular nueva
y limpia con un mínimo de 87 octanos. (Usar
gasolina con plomo incrementará los depósi-
tos de carbono y óxido de plomo y reducirá
la vida de la válvula). No mezcle aceite con
gasolina. Compre combustible en can ti dades
que se puedan usar en 30 días para asegurar
la frescura del combustible.
PRECAUCIÓN: Limpie cualquier derrame
de aceite o combustible. No almacene, derrame
ni use gasolina cerca de una flama abierta.
Combustible
de tapa
PARA HACER ARRANCAR EL MOTOR
Al hacer arrancar el motor por la primera vez o
si se ha acabado el combustible del motor, se
necesitará tiempo para el arranque extra para
mover el combustible desde el estanque hasta
el motor.
• Siéntase en el sillón en la posición de oper-
ación, suelte el pedal del freno y ponga el
freno de estacionamiento.
• Ponga la palanca de control de movimiento
en la posición de neutro.
• Mueva el embrague del accesorio a la
posición "DESENGANCHADO".
• Mueva la palanca de control de la aceleración
a la posición de estrangulación.
AVISO: Antes de arrancar, lea las instruccio-
nes siguientes para el arran que en clima frío y
templado.
• Inserte la llave en la ignición y gire la llave
en el sentido que giran las manillas del reloj
a la posición de arranque start, y suelte la
llave tan pronto como arranque el motor. No
haga funcionar el arrancador continuamente
por más de quince segundos por minuto. Si
el motor no arranca después de varios inten-
tarlos, mueva el control de la ace le ra ción a
la posición de rápido, espere unos cuantos
minutos y trate de nuevo. Si el mo tor sigue sin
funcionar, mueva el control de la aceleración
a la posición de es tran gu la ción y intente de
nuevo.
ARRANQUE CON TIEMPO TEMPLADO
(50° F/10°C Y MÁS)
• Cuando arranque el motor, mueva el control
de la ace le ra ción a la posición de rápido.
• Ahora puede usar el mecanismo de desplaza-
miento. Si el motor no acepta la carga, vuelva
a encender el motor y permítale que se cali-
ente durante un minuto usando el ahogador
conforme se describe arriba.
ARRANQUE CON TIEMPO FRÍO
(50° F/10°C Y MENOS)
• Al hacer arrancar el motor, mantenga el
control de la aceleración a la posición de es-
trangulación hasta que el motor se caliente y
empieze funcionar mal. Una vez que empieze
a funcionar mal, mueva inmediatamente el
control de la aceleración a la posición rápida.
El calentamiento del motor puede tomar a
partir de varios segundos a varios minutos
(cuanto más fría es la temperatura, más largo
es el calentamiento).