Step 3set up, Step 4, Step 3 set up – Hydrotech Precision-PWS 5-3 OWNERS GUIDE User Manual
Page 7
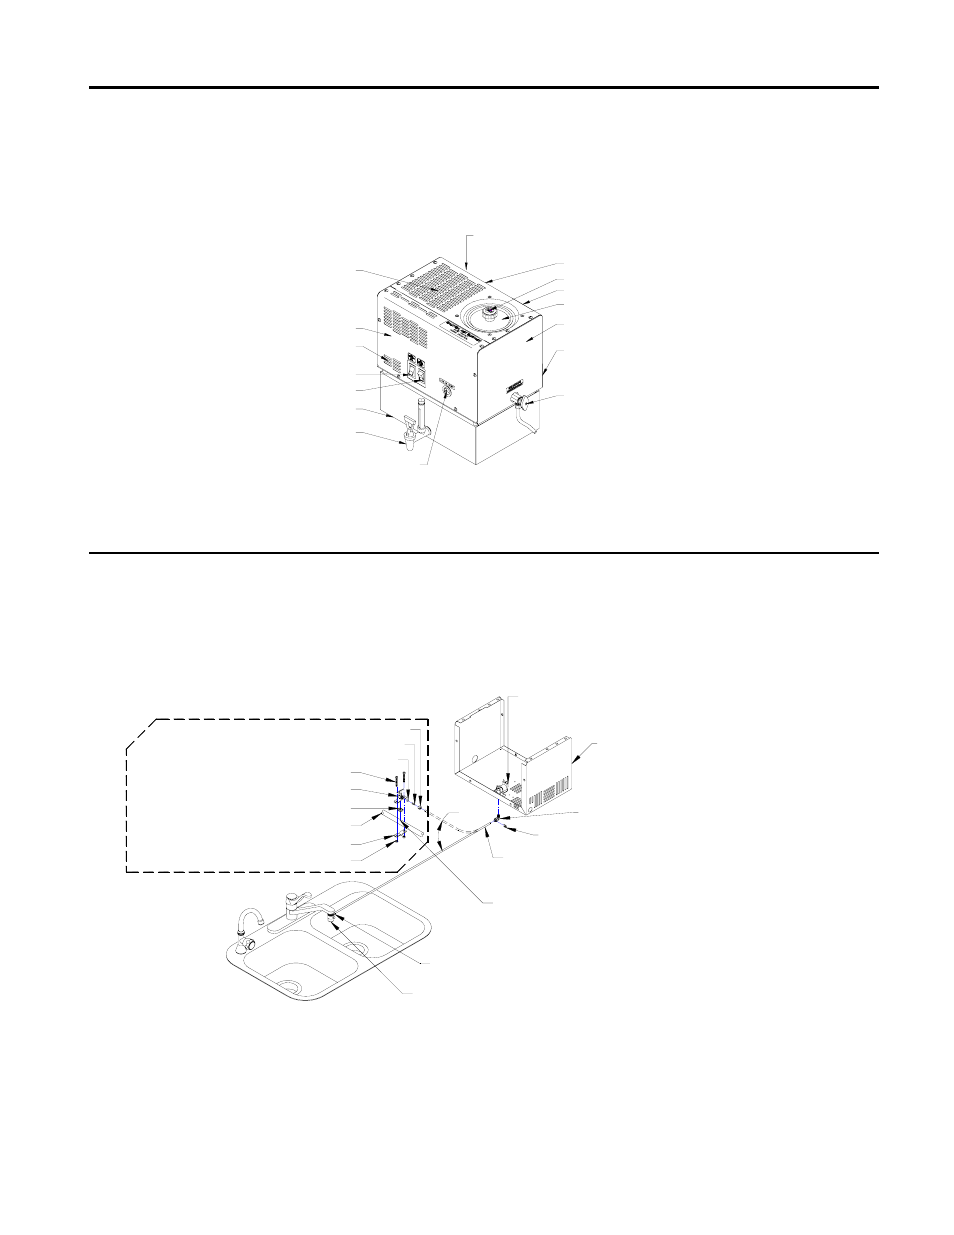
STEP
3
SET
UP
Place the distiller head on the storage tank. Place the head over the feet on the top of the
storage tank and position the back of the distiller over the storage tank float post. Be sure that
the sight gauge faucet and the distiller control switches are facing the same direction. Note
there is a steam sterilizing tube inserted in the charcoal filter area. Be sure it is in place and
inserted into the storage tank. This will be important during the steam sterilization cycle.
Condensing Coil (inside)
Gas Release Vent (hidden)
Boiling Tank Knob
Boiling Tank Lid
Fan (inside)
Canister Filter (inside)
Fan Switch
Sight Gauge And Drain Valve
Manual Drain Valve
Water Fill Connection (hidden)
Boiling Tank (inside)
Storage Tank Lid (hidden)
Reset Switch
Water switch (hidden)
Power Switch
Storage Tank
STEP 4
Remove the ¼” feed line and the faucet adapter kit and install onto the household water
faucet. Run the feed line to the distiller. Before inserting the line into the distiller’s ¼” plastic
fitting, remove the red locking clip, push the line into the fitting and reinstall the locking clip.
Please Note: Saddle Valve Kit is optional, see optional accessories on page 12.
Turn the water supply on. Plug the distiller into a proper-grounded wall receptacle. Turn the
distiller Power and Fan Switch on by pushing on top of the switches. Please note the water
switch is located at the rear of the distiller. You will turn this switch on as well. At this time,
your distiller will start to fill with water until the water level is above the heating element. At this
point you should get ready for steam sterilization. See step 5.
Nuts
Distiller Body
Or
Compression Nut
Insert
Ferrule
Rubber Seal
Solenoid Valve
1/4"O.D. Water Feedline
Kitchen Faucet
Copper Tube-No Driiling
*Steel Tube-Drill 1/8"Ø
*Brass Tube-Drill 1/8"Ø
*Shut Off Water Supply
Faucet Adapter, 1/4" HB
Bolts
Saddle Valve
Water Supply Tube
Saddle Valve Lower Clamp
Optional Saddle Valve Kit
Ferrule, 1/4"
Elbow 90° 1/8MPT X 1/4"JG
Locking Clip, 1/4"JG
04/08/04
7