Cyclone, Offset bend instructions for mini-eegor, Eegor – Gardner Bender Guide to Profitable Bending User Manual
Page 4: And ultra eegor, Benders, Stub-up bending, Table b
Cyclone
®
Stub-up Bending
1. Table B shows minimum length (inches).
2. Mark #1 is stub length, deduct from this as per table B, and
obtain Mark #2.
Conduit
Stub-Up
Size
Set-Back
1
⁄
2
Rigid
7
3
⁄
4
"
1
⁄
2
IMC
7
3
⁄
4
"
1
⁄
2
EMT
7
5
⁄
8
"
3
⁄
4
Rigid
9"
3
⁄
4
IMC
9"
3
⁄
4
EMT
8
1
⁄
2
"
1
Rigid
10
1
⁄
8
"
1
IMC
10
1
⁄
8
"
1 EMT
10
3
⁄
8
"
1
1
⁄
4
Rigid
12
3
⁄
4
"
1
1
⁄
4
IMC
12
1
⁄
2
"
1
1
⁄
4
EMT
13"
1
1
⁄
2
Rigid
13
1
⁄
2
"
1
1
⁄
2
IMC
13
1
⁄
2
"
1
1
⁄
2
EMT
13
1
⁄
2
"
2
Rigid
15
3
⁄
4
"
2
IMC
15
1
⁄
2
"
2
EMT
15
1
⁄
2
"
Shoe
Min. 2˝
Front Edge of
Clamp Mark #2
Stub Length
Set Back
Mark #2
Mark #1
Stub To Bottom
of Pipe
53
Table B
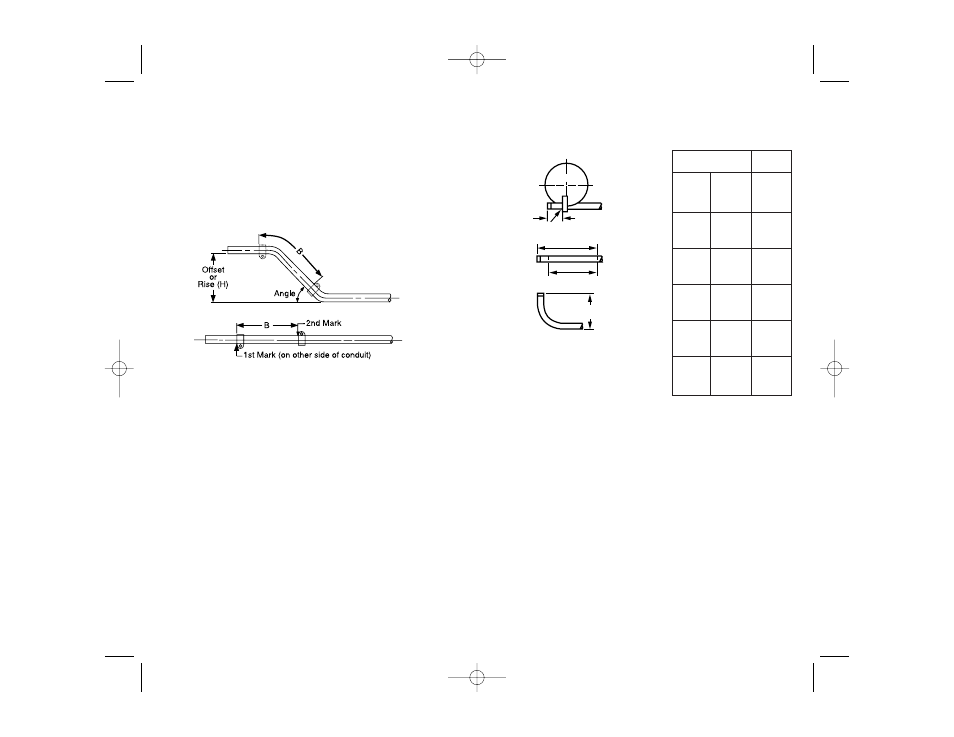
Offset Bend
Instructions for
Mini-Eegor
™
, Eegor
™
and
Ultra Eegor
™
Benders
1. Make first mark at location determined either by edge of
obstacle, or by following “Kick Bend” Instructions for Mini-Eegor™
and Eegor™ Benders (see pages 8 - 9).
2
From the “Offset Chart” for the size conduit to be bent, obtain mea-
surement (B) for offset height (H) and bend angle desired (see
pages 5 - 7).
3. Make second mark at distance (B) beyond first mark, and on oppo-
site side of conduit, as illustrated above.
4. Place conduit in bender with first mark aligned with leading edge
of U-strap (see figure above), and make first bend to the
desired angle.
5. Advance the bent conduit through the frame assembly of the bender,
and rotate the conduit 180°, so the second mark aligns with the
leading edge of the U-strap.
6. Complete offset by making second bend to the exact some angle as
the first bend.
4
E-507 Guide to Profitable Bending rA.qxd 10/19/09 3:17 PM Page 7