Pulse - ref. pls300 front panel description – Analog Way Pulse User Manual
Page 2
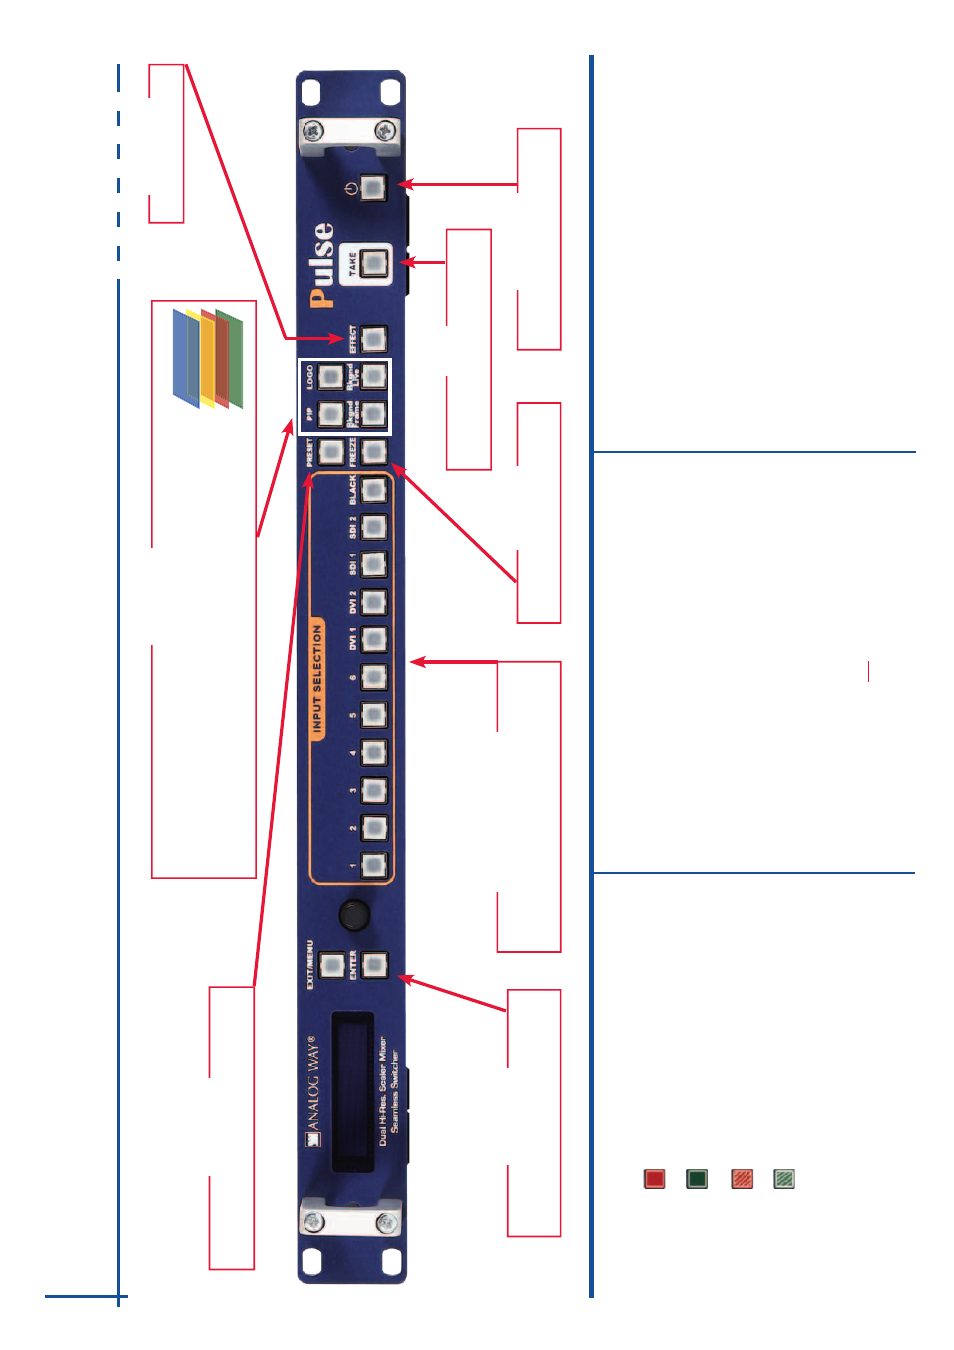
Pulse - Ref. PLS300 Front Panel Description
EXIT/MENU:
Home Menu or back one level
EN
TE
R
: V
al
id
at
es
th
e
m
en
u
or
c
om
m
an
d
Select a custom transition
Press to select a layer
, then choose an input.
LOGO:
Display a partial screen Logo
PIP:
D
isp
la
y
a
liv
e
so
ur
ce
Bkgnd Live:
Display a live source
Bkgnd Frame:
Display full screen frame in this layer
Recall a custom stored preset (4 memories available). To store a preset, use Menu -
> Preset.
#1 to #6:
Press to access analog source #1 to #6
DVI 1 to DVI 2:
Press to access DVI #1 or DVI #2
SDI 1 to SDI 2:
Press to access SDI #1 or SDI #2
BLACK:
Clear the active layer
Hold for 3 seconds for stand-by Mode
Freeze the input linked to the current layer on MAIN
CONTROL
EFFECT
LA
YERS
PRESET
INPUT
SELECTION
ST
AND-BY
FREEZE
IN
P
U
T
S
E
T
U
P
1
-
Press
the
[EXIT/
M
ENU
]
button
from
the
Home
menu
(all
functions
must
be
confirmed by the
[E
NTER
]
button)
2
-
P
re
ss
IN
PU
T
a
nd
A
U
TO
SE
T
A
LL
3
-
If
th
e
ac
qu
is
iti
on
h
as
fa
ile
d,
c
he
ck
a
ll
co
nn
ec
tio
ns
a
nd
p
er
fo
rm
a
m
an
ua
l s
et
up
4
-
For a comprehensive Input Setup, please refer to user
’s Manual
5
-
For a manual input setup, press the
[EXIT/
M
ENU
]
button:
a)
Select
INPUT
menu,
b)
Select an input from Input #1 up to SDI #2, then
c)
Select
Ty
PE
.
N
O
TE
: T
o
ad
ju
st
in
pu
t S
iz
e
or
P
os
, u
se
th
e
La
ye
r M
en
us
.
To
a
dj
us
t B
la
nk
in
g,
u
se
th
e
A
ut
o-
C
en
te
rin
g
or
B
la
nk
in
g
ad
ju
st
m
en
ts
in
th
e
Im
ag
e
m
en
u.
Transition
the
pre-selected
sources
onto
the MAIN output with the selected ef
fects
TAKE
O
P
E
R
A
T
IO
N
S
O
V
E
R
V
IE
W
WORKING IN MIXER MODE
1-
Select Background Live button then select your input.
2-
On the preview screen, the input appears
3-
Select an
[EFFECT]
(open/close)
4-
Press
[
TAKE
]
to view the result on the Main screen
5-
T
ry
e
na
bl
in
g
th
e
‘P
re
se
t
To
gg
le
’ f
ro
m
t
he
C
on
tro
l m
en
u
to
h
av
e
yo
ur
p
re
vi
ew
re
pl
ac
ed
b
y
pr
og
ra
m
d
ur
in
g
ea
ch
T
ak
e
WORKING WITH PIPs IN MIXER MODE
1-
Press the
[PIP]
button. On the preview screen, the PIP
(layer) appears as a
color rectangle
2-
S
el
ec
t a
n
in
pu
t.
O
n
th
e
pr
ev
ie
w
s
cr
ee
n,
th
e
in
pu
t a
pp
ea
rs
in
th
e
la
ye
r r
ec
ta
ng
le
3-
Ad
ju
st
th
e
PI
P
(la
ye
r)
w
ith
La
ye
r m
en
u
(P
os
&
S
iz
e
or
Z
oo
m
)
4-
Select a transition
(open/close) or an ef
fect into “Layer menu”
5-
Press
[T
AKE]
to view the result on
the main screen
6-
T
o remove layer
, press
[BLACK]
then
[T
AKE]
7-
For another PIP
setup, repeat from step #1
O
U
T
P
U
T
S
E
T
U
P
1
-
Press
the
[EXIT/
M
ENU
]
button
from
the
Home
menu
(all
functions
must
be
confirmed by the
[E
NTER
]
button)
2
-
Select
O
UTPUT
menu,
3
-
Select
O
UTPUT
FORMA
T
menu,
4
-
On Format line, select the display’
s native resolution
5
-
Control or adjust your display device (Monitor or V
ideo Projector)
6
-
If necessary
, select
TEST
P
ATTERN
in the Output menu
B
U
T
T
O
N
C
O
L
O
R
U
S
A
G
E
#1 = Source is on the main
outputs
Solid red:
#2 = Freeze enable
#3 = Stand-by button
#4 = Preset Selection
So
lid
g
re
en
:
#1 = Source is on Preview
#2 =
Function available for modification
Blinking red:
Layer/source selected, and is currently active on
the main output
B
lin
ki
ng
g
re
en
:
La
ye
r/s
ou
rc
e
se
le
ct
ed
, a
nd
is
n
ot
c
ur
re
nt
ly
a
ct
iv
e
on
e
th
e
m
ai
n
ou
tp
ut
LA
yER HIERARCH
y
Logo
Live PIP
Live Background
Background Frame