Eikos - ref. eks500 front panel description – Analog Way Eikos User Manual
Page 2
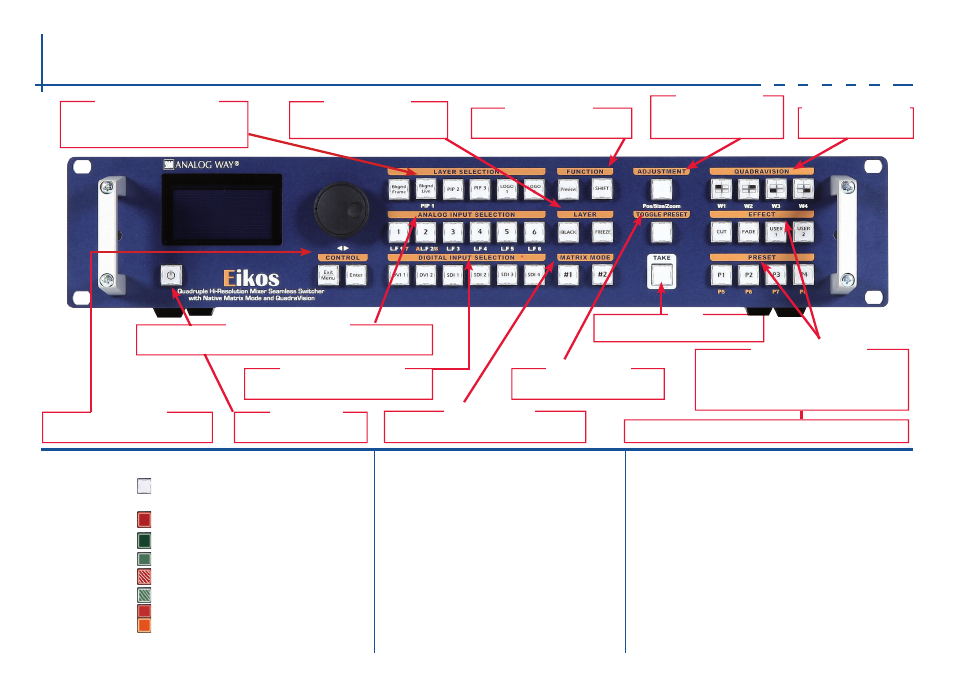
Eikos - Ref. EKS500
Front Panel Description
OUTPUT #1-2: Select the output #1-2, a layer and a
source, then press TAKE
MATRIX #1 & #2
DVI 1 to DVI 2: Press to access DVI #1 or DVI #2
SDI 1 to SDI 4: Press to access SDI #1 to SDI #4
BLACK: Change the active layer to Black
FREEZE: Freeze the input linked to the
current layer on MAIN
PREVIEW: Toggle preview functionality
SHIFT: Secondary function selection button
Background Frame: Display or change Frame
Background Live/PIP1: Change active Layer
PIP2 to PIP3: Change active layer to a PIP
Logo1 to Logo2: Display or change Logo
POS: Adjust PIP or Logo Position
SIZE: Size active layer
ZOOM: Zoom active layer PIP
4 sources with a choice of
8 customized templates
ADjuSTMENT
QuADRAVISION MODE
Transition the pre-selected sources onto the
MAIN output with the selected effects
Copy the previous Current Preset in the
Next Preset at the end of a TAKE
EXIT/MENU: Home Menu or back one level
ENTER: Validates the menu or command
STAND-BY: Hold for 3 seconds for
stand-by Mode
TAKE
DIgITAL INPuT Selection
ANALOg INPuT Selection
LAYER
FuNCTION
LAYER SELECTION
TOggLE PRESET
CONTROL
STAND-BY
Preset section: Stores and recalls 8 presets available
CUT: Select Cut as the current transition type
FADE: Select Fade as the current transition type
USER 1: Select user #1 as a customized transition
USER 2: Select user #2 as a customized transition
P#1-4 / P#5-8: Select P #1-4 as a customized preset or P #5-8 by SHIFT function
EFFECT / PRESET
B U T TO N C O L O R U S A G E
#1 = Input not available on autolock
No light:
#2 = Frame or Logo not available
#3 = Layer not available
#4 = Button not available depending on the user mode
#1 = Source, Layer or Window is on Main
Solid red:
#2 = Mosaic Preview enable
#3 = Freeze enable
#1 = Source or Layer is on Preview
Solid green:
#2 = Function available for modification
#3 = Current output on Matrix Mode
Dim green:
Button available for selection
Blinking red:
Active Layer or Source for modification on Main
Blinking green:
Active Layer or Source for modification on Preview
Dim red:
Stand-by button
Solid orange:
#1 = Shift button
#2 = Function available by Shift button
#1-7 L / F 1-7: access source #1-7, Display Frame or Logo #1-7
#8 AL / F 8: access source #8, Display Frame #8 or Logo #8 or Animated Logo
O U T P U T S E T U P
1
-
Press the EXIT/MENu button from the Home menu [all functions must be
confirmed by the ENTER button]
2
-
Select [
Output
]
3
-
Select [
Output format
]
4
-
On Format line, select the display’s native resolution
5
-
Control or adjust your display device (Monitor or Video Projector)
6
-
If necessary, select [
Test Pattern
] in the Output menu
I N P U T S E T U P
1
-
Press the EXIT/MENu button from the Home menu [all functions
must be confirmed by the Enter button]
2
-
Press [
Input
] and [
Autoset ALL
]
3
-
If the acquisition is successful the source appears on Preview.
Please Toggle the Preview button to display the Mosaic Mode
4
-
If the acquisition has failed, check all connections and perform a
manual setup
5
-
For a comprehensive Input Setup, please refer to user’s Manual
6
-
For a manual input setup, press the EXIT/MENu button:
a)
Press [
Input
],
b)
Select the right input from Input #1 up to SDI #4, then
c)
Select [
Type
].
NOTE: To adjust input Size or Pos, use the [Layer] Menus.
To adjust Blanking, use the Auto Centering or Blanking
adjustments in the Image menu.
HOW TO USE THE MOSAIC PREVIEW FEATURE
To have a full vision of the aspects of your inputs two modes are available. When
the Mosaic Preview button is activated (Red light solid button):
-
One live source mode:
select your Layer and the source you want to put on it.
The input selected will be automatically refreshed on your Mosaic Preview
- Random live source mode:
Selecting this mode will let an automatic refresh on
your mosaic preview.