Cla-val – Cla-Val PV30 User Manual
Page 2
CLA-VAL
Copyright Cla-Val 2005 Printed in USA Specifications subject to change without notice.
P.O. Box 1325
• Newport Beach, CA 92659-0325 • Phone: 949-722-4800 • Fax: 949-548-5441 • E-mail: [email protected] • Website cla-val.com
©
N-PV 30 (R-5-06)
MAINTENANCE
Cla-Val PV30 Pinch Valves have no moving parts, and are
maintenance free except for the replacement of rubber sleeve
as required.
A spare sleeve and a set of diamond seal gaskets should
always be ordered when the valve is placed in service.
1. The process line should be drained.
2. Valve sleeve should be fully open and air supply turned off.
3. Remove air supply from the valve body.
4. Remove valve from the line.
5. Remove body bolts & nuts. Check for fitness.
6. Before separating the two body halves, reference mark one end
of each of the body halves. This will allow for same orientation
reassembly.
7. Separate the housing and remove the sleeve and diamond
seal gaskets.
8. Clean diamond seal gasket and recess. Carefully inspect the
gasket for damage or deformation. It is recommended that a new
gasket be used each time the valve is serviced. A damaged or
deformed gasket will not allow for a proper seal.
9. Clean all housing mating surfaces giving special attention to
mating flanges. Do not clean the surfaces with rough abrasive
wheels. This may remove the machined grooves in the flange
causing leakage. Do not use "Permatex" or "RTV Silicone" on the
metal flange surfaces. These compounds will fill in the grooves,
causing leakage.
10. Place the new sleeve in the body. If applicable see Note: 2 Way
"Bubble Tight" Closure in the Operation section. Be sure to line up
the flange bolt holes.
11. Replace the Diamond Seal gaskets in their grooves with the "Tail"
towards the inside of the valve. Some Silicone may be applied
to the gasket for it to stay in its groove while the castings are
being bolted. It should be noted that 1/8" of the gasket will
extrude to allow for a proper seal.
12. Replace the top half of the housing (be sure to match the reference
marks on each end of both halves). Line up the body bolt holes.
13. Replace the bolts and tighten the nuts.
14. Re-install the valve in pipeline and re-connect the air supply.
15. Once the valve is in operation, recheck all hardware for tightness
and fitness and periodically thereafter.
1
2
2
4
3
4
3
5
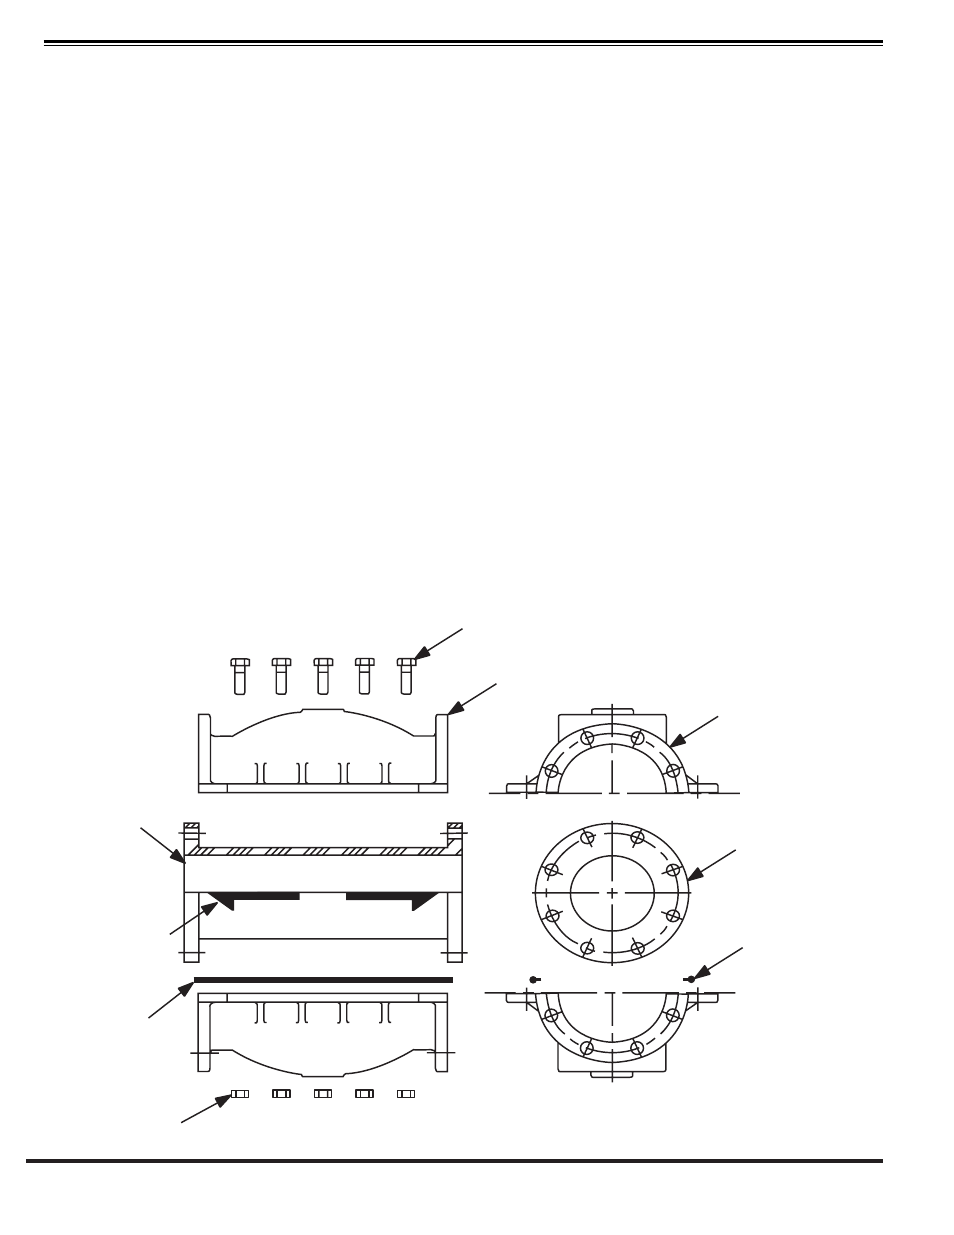
ARROWS FOR
5" AND UP
2 WAY CLOSURE
MAINTENANCE PARTS
1.
Body Bolts.
2.
Body (half section).
3.
Diamond Seal Gasket.
4.
Rubber Sleeve.
5.
Body Nuts.