Installation and operation, cont’d, Front panel features – Extron Electronics VSC 75 User Guide User Manual
Page 8
VSC 75 Installation and Operation
VSC 75 Installation and Operation
Installation and Operation, cont’d
2-5
controls. Adjustments can still be made via RS-232
control when executive mode is active.
3
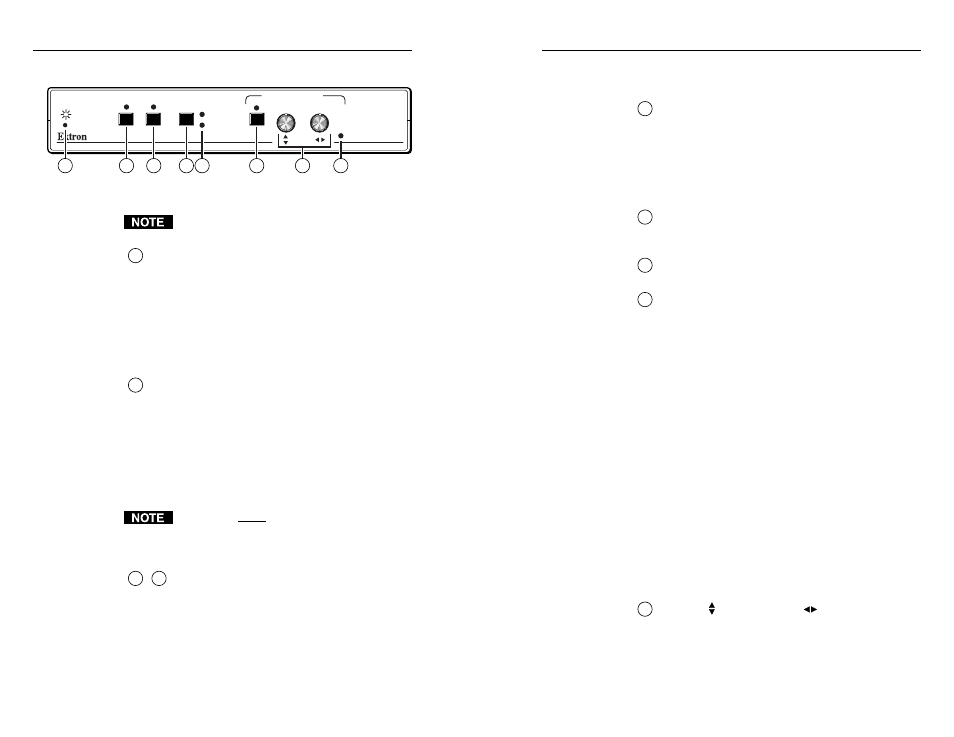
Test button and LED —
Press this button to display a
color bar test pattern on the output devices. The test
indicator LED lights while this control is active. The
test pattern continues to be displayed until you press
the Test button again.
This LED lights to indicate that the test feature is
active.
4
Flicker filter button —
Press this button to choose
one of the two levels of vertical filtering. Select the
setting that yields the least amount of flicker.
5
Flicker filter LEDs —
These LEDs light yellow to
indicate the selected level of vertical filtering.
6
Size button and LED
— Press this button to activate
the size feature. When Size is active, the picture can
be resized vertically and/or horizontally by rotating
the vertical and horizontal Centering/Pan/Size
rotary controls (10). Observe the picture on screen as
you adjust the controls. To zoom in, adjust the size
so the picture exceeds the screen’s limits. The Min/
Max LED (11) lights red when the minimum or
maximum limit of a control has been reached.
The LED lights green to indicate that the size feature
is active.
The size feature affects both display outputs
simultaneously. The local monitor loop-out is not
affected.
The size feature remains active for 8 seconds after the
rotary controls become inactive. The rotary controls
then default to the standard centering and pan
functions. To turn the size feature off, press the Size
button again.
See Freeze button (2) for information on using
executive mode.
7
Vertical ( ) and horizontal (
) Centering/Pan/Size
rotary controls
— Turn these knobs to adjust vertical
or horizontal centering (when the image size does
not exceed the screen size) and panning (when the
image size exceeds the screen size) in the regular
mode. Rotate these controls to adjust picture size
when the size feature is active.
2-4
Front Panel Features
Figure 3 — VSC 75 front panel
Adjustments to front panel features and controls do
not affect the local monitor.
1
Power/signal lock LED —
If this indicator...
• Lights amber yellow without blinking, the VSC 75
is receiving power, but no input signal is present.
• Blinks green, the unit is receiving power, but the
input signal has a resolution that is too low or
too high.
• Lights green without blinking, the input signal is
within range, and the VSC 75 has locked to that
particular resolution.
2
Freeze button and LED —
Press this button to
display (or record) a still image of the scan-converted
picture from both display outputs. The freeze
indicator LED lights while this control is active. To
turn this feature off, press the Freeze button again.
Freeze affects both outputs simultaneously. The
image on the local monitor will not be frozen.
The LED lights to indicate that the freeze feature is
active.
All controls except Freeze will be locked on the front
panel while freeze mode is active. Press the Freeze
button again to turn off freeze mode and unlock the
other controls.
2
+
6
Executive mode release (Freeze + Size) — Press
the Freeze button and the Size button
simultaneously for 2 seconds to release executive
mode. Executive mode, which can be activated only
by issuing an RS-232 command (see page 3-5),
prevents unauthorized or accidental adjustments to
the VSC 75’s settings via front panel controls by
locking all the front panel features except centering
MIN/
MAX
FREEZE
TEST
SIZE
FLICKER
FILTER
I
II
VSC 75
SCAN CONVERTER
CENTERING/PAN SIZE
2
3
4
5
6
7
8
1