Icwk im, Installation, Installing the icwk imac kit – Extron Electronics ICWK iMAC Kit User Manual
Page 2
Extron • ICWK iM
AC
Kit • Installation Guide
ICWK iM
AC
TM
Installation
The Extron ICWK iM
AC
when installed in an iM
AC
computer enables an Extron
interface to be connected to the iM
AC
. A projector or monitor may then be
connected to the interface to display the image seen on the iM
AC
monitor.
The following Extron universal interfaces are compatible with the ICWK iM
AC
.
RGB 118 Plus
RGB 120
RGB 124
RGB 202xi
RGB 302, 304
RGB 440
The ICWK iM
AC
kit consists of the following two items.
68-406-01 ICWK iM
AC
Installation Guide
70-076-01 ICWK iM
AC
Installing the ICWK iMac Kit
1. Power the iM
AC
OFF.
2. Disconnect all iM
AC
cables including the power cord.
3. Turn the iM
AC
upside down so that it sits on its top (use a soft pad to avoid
scratching the case), with the screen away from you as shown in Figure 2a.
NOTE: The iM
AC
must be upside down during the installation of the ICWK iM
AC
kit and in this position it is unstable due to the shape of the case. Be sure
that it is securely positioned to avoid possible damage.
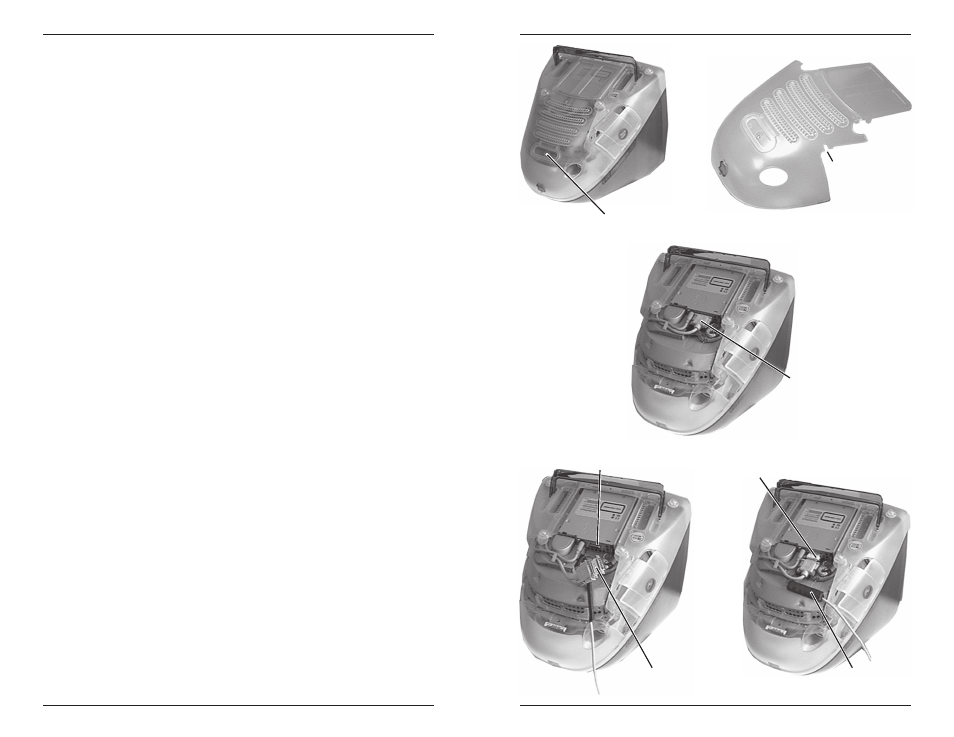
4. Loosen the bottom cover screw (Figure 2a) and remove the cover.
5. Create a quarter inch diameter notch in the bottom cover as shown in Figure
2b using a round file or other suitable tool.
6. Remove the iM
AC
monitor cable connector identified in Figure 2c and plug it
into the ICWK T 15-pin D sub female connector.
7. Plug the ICWK T 15-pin D sub male connector into the iMac computer video
output connector 15-pin D sub female connector. The ICWK cable/circuit
card must be routed under the iM
AC
monitor cable to allow the bottom cover
to fit properly.
8. Reinstall the iM
AC
bottom panel with the ICWK cable positioned through the
notch (Figure 3a) created in step 5 and the heat shrink insulated ICWK circuit
card positioned as far under the iM
AC
monitor connector as possible. A piece
of tape may prove helpful for holding a stubborn ICWK circuit card in place.
Carefully snap the bottom cover in place, when correctly positioned, tighten
the cover screw.
9. Turn the iM
AC
right side up and reconnect the cables removed in step 2. The
ICWK 9-pin connector/cable may be coiled and stored inside the connector
panel cover as shown in Figure 3b.
10. Power the iM
AC
ON and verify proper operation.
Installation
Extron • ICWK iM
AC
Kit • Installation Guide
Installation
Page 1
Page 2
Figure 2d
Figure 2e
iM
AC
computer video output
connector (15-pin D sub)
ICWK T connector
ICWK circuit card
ICWK T connector
Figure 2b
Notch for ICWK
cable exit point
Figure 2c
iM
AC
monitor
connector
Figure 2a
Cover screw