Attention, Upb 25 • installation guide (continued), Place washer on mounting point – Extron Electronics UPB 25 Installation User Manual
Page 2: Installing the upb 25, Mounting point on projector base
2
UPB 25 • Installation Guide (Continued)
b
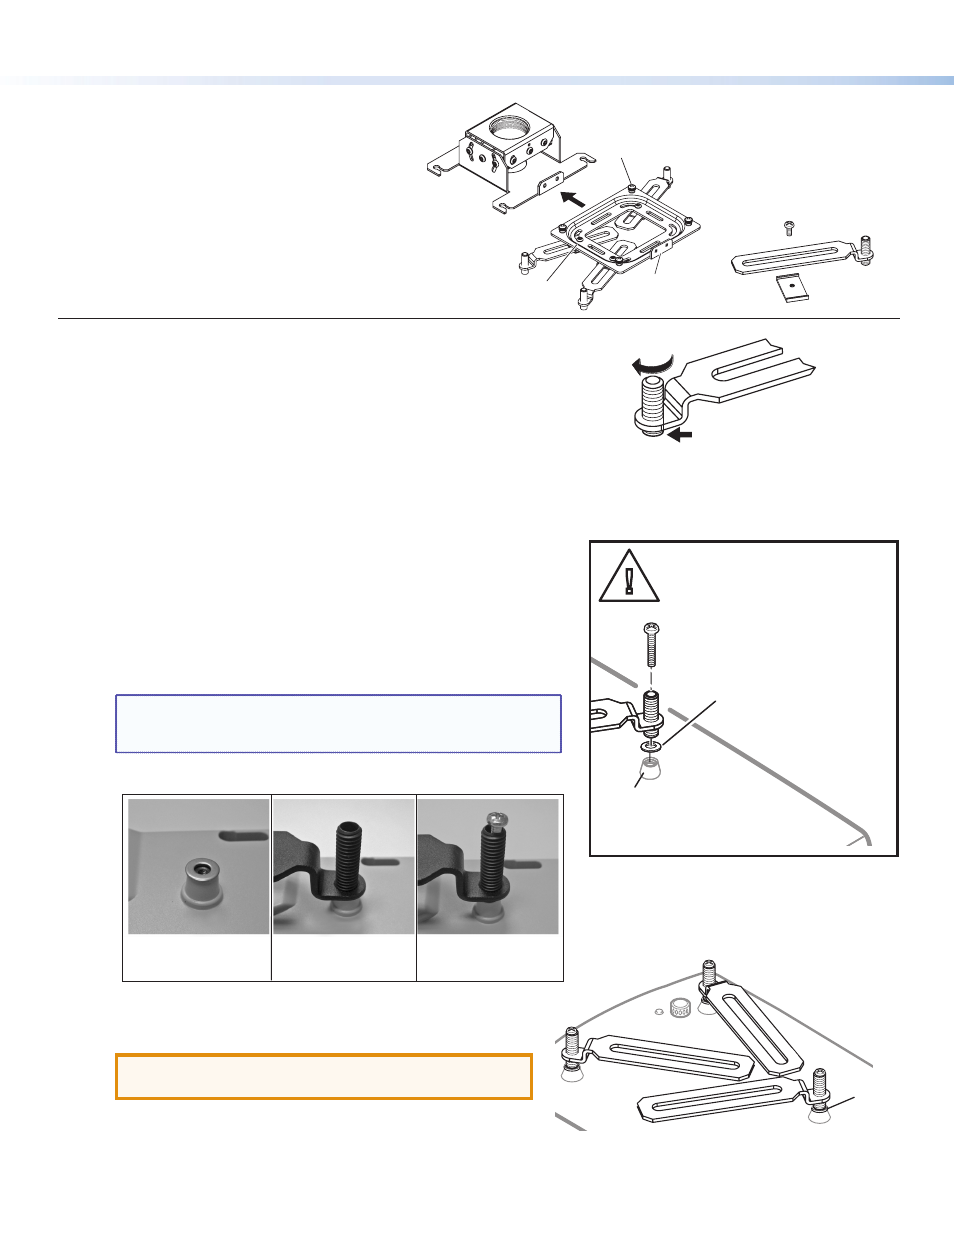
Rotate the barrel
until it just protrudes
below the arm.
Washer
Mounting Point
on Projector Base
Place washer on
mounting point.
ATTENTION:
Ü
This is critical as it provides a flat
surface for the bracket to sit on.
Projector
Bracket
Adjuster
Plate
Loosen the four locking
screws and slide the
Adjuster Plate away from
the Projector Bracket.
Arm Adjustment
Screws (4)
Security Flange
Adjustment
Clamp
Adjustment
Screw
Barrel
Arm
Installing the UPB 25
Preparation
1.
Separate the two main parts of the UPB 25
(see the figure at right).
2.
Remove the four arm adjustment screws and
clamps from the Projector Bracket and remove
the arms.
Installing the Projector Bracket on the Projector
Follow the steps below to install the UPB 25. Some steps have accompanying
images for clarification, with the applicable step number indicated.
1.
Invert the projector on a flat surface to access the mounting
points. Use a blanket or a similar item under the projector to
protect the projector and the surface.
2.
On each arm, rotate the barrel (on the end of the arm) so that it only
just protrudes from the base of the arm (see the figure at right).
3.
Select the correct sized mounting screws and the appropriately sized
washers that fit the projector mounting point inserts.
4.
To attach the arms to the projector:
The next step (4a) is critical as it provides a flat surface for the
bracket to sit on, and must be done for each mounting point.
a.
Place a washer on a mounting point (see the figure at right).
b.
Position the arm so the barrel is over the washer.
c.
Insert the mounting screw down through the barrel and washer,
and into the threaded insert. Lightly tighten the screw by hand.
NOTE: If using the 3- or 4-millimeter screws, place an additional
small washer under each screw head, on top of the
barrel, as well as one on the top of the mounting point.
d.
Repeat steps 4a through 4c for all projector mounting points.
4a
4b
4c
Place the washer
Align the barrel Insert the screw
5.
Pivot the arms so that they extend towards the center of the
projector (see the figure at right). Adjust the arms as needed
for your projector model.
ATTENTION:
Potential Damage to Property.
Avoid
overlapping the arms where possible
.