Ism sc configuration menu – Extron Electronics ISM SC Output Board User Manual
Page 2
ISM SC Output Board Installation Notes, cont’d
ISM SC configuration menu
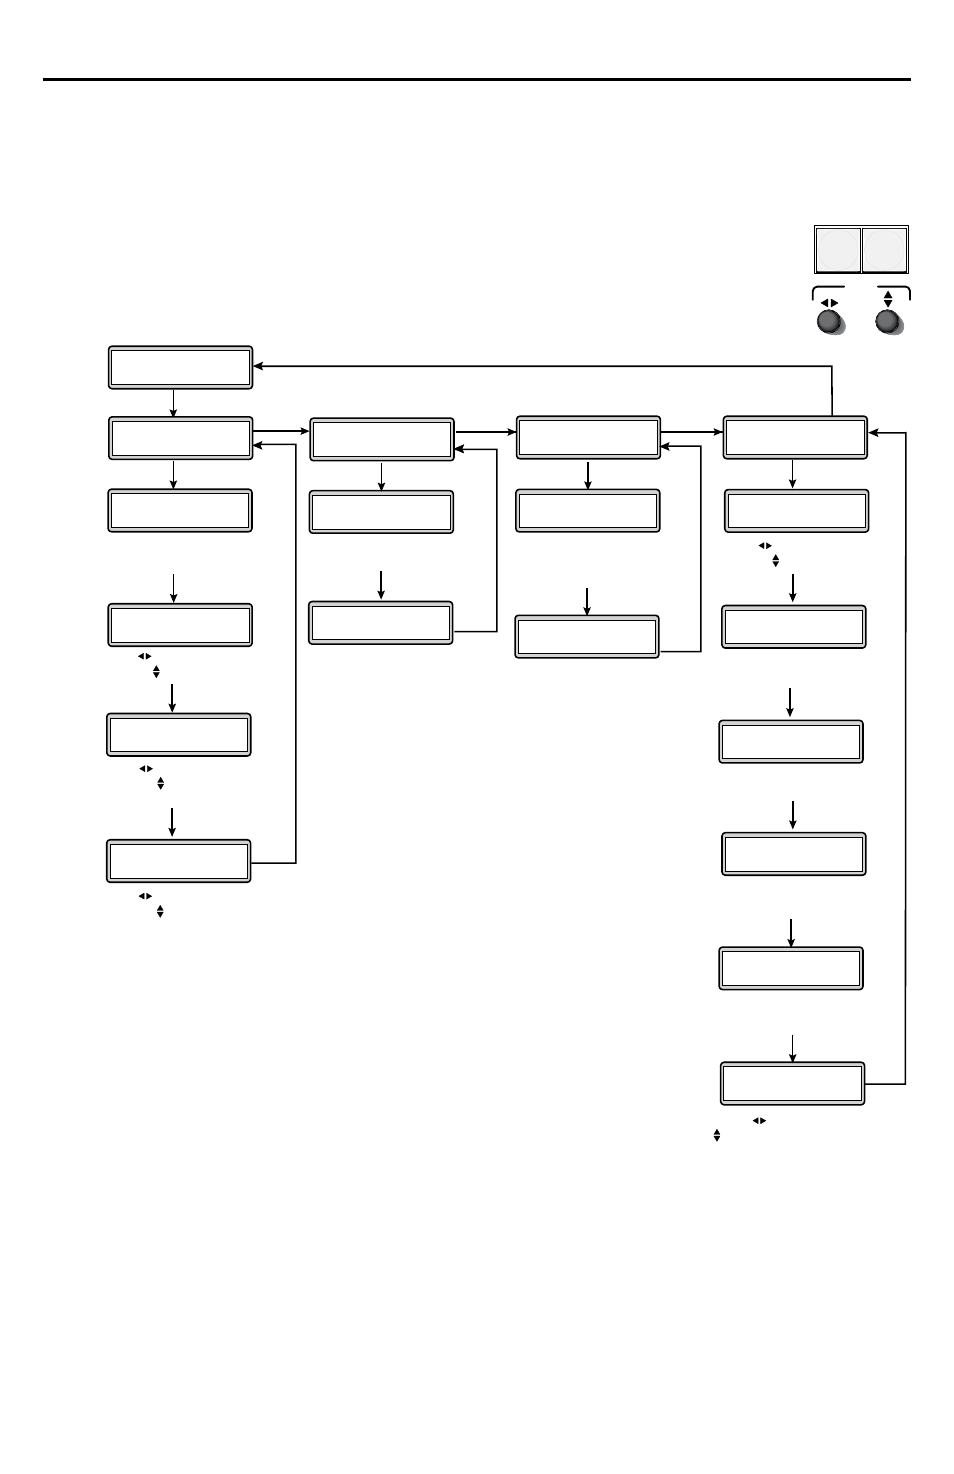
Using the front panel menu buttons (Menu and Next), the ISM SC board configuration menu
can be accessed. From the Output Configuration screen, press Next until reaching the #x
ScanConverter menu (see the image below). Press Menu and Next to navigate through the
menus and use the front panel adjustment knobs ({ [), to change the settings as desired.
For full menu details see the ISM 824 User’s Manual, online at
From the default cycle press Menu repeatedly to reach the Output Configuration
menu. Press Next (enters Select Output menu) and rotate either adjust knob to
select the Scan Converter menu. Follow the figure below to enter each menu and
use the Adjust knobs to change value as desired.
Select Output
#x ScanConverter
Next
Input Setup
#x ScanConverter
Aspect Ratio
4:3
Next
Rotate either encoder
to select (4:3 or 16:9)
Next
H
Start V
xxx
xxx
Rotate encoder to adjust H
start and to adjust V start
Next
Total Pix
Phase
xxxx xxxx
Rotate to adjust Total Pix
value and encoder to adjust
Phase value
Next
H
Active V
xxxx xxxx
Rotate to adjust H active
value and encoder to adjust
V active value
Menu
Next
Output Config
Next
Next
Rotate either encoder
to select standard
Next
Menu
User Presets
#x ScanConverter
Save Preset
Next
Rotate either encoder
to select a preset to
save current settings
Erase Preset
Next
Rotate either encoder
to select a preset
to erase
Advanced Config
#x ScanConverter
Next
Menu
Next
Next
Rotate encoder to select
input and encoder to turn
On or Off
Input #x Off
Auto Image
Next
None
Test Pattern
Rotate either encoder
to select a test pattern
Off
Next
Auto Memories
Rotate either encoder
to turn auto memories
On or Off
#x ScanConverter
YUV
Output Type
Rotate either encoder
to select format
NTSC
Output Standard
Next
x
Flicker Filter
Rotate either encoder
to set a value
Next
x
Encoder Filter
Rotate either encoder
to set a value
Menu
Input #x
Next
Full Screen
Rotate to select input # and
to turn full screen on or off
Output Standard
The Output Standard submenu displays and allows changes to the output standard. Use the
Adjust knobs to select between NTSC, NTSC 0 IRE, and PAL.
Flicker Filter
The Flicker Filter reduces the flicker in the connected output display. When this submenu is
active, rotate either Adjust knob to set the flicker filter value (0-3).
Encoder Filter
The Encoder Filter maintains the sharpness of the connected output display. When this
submenu is active, rotate either Adjust knob to set the encoder filter value (0-3).
MENU
NEXT
ADJUST
2
Input Setup
The Input Setup submenu allows configuration of aspect ratios.
horizontal and vertical start points, total pixels and phase value,
and the active horizontal and vertical area. Rotate one or both
Adjust knobs as required to change values.
Output Type
The Output Type submenu displays and allows changing the
format of the scan converted output. Use the Adjust knobs to
select RGsB, low resolution component video (YUV), or S-video.