2english – Factory Direct Hardware Toto CST474CEFG Vespin User Manual
Page 2
STEP 1 Piping and Rough-In Check
In order for your new
TOTO toilet to fit
correctly, check the
dimensions below.
2
ENGLISH
Supply Valve
Wall
"RI"
C/L
Closet
Flange
a) Distance between finished
wall to the center of the toilet
outlet, Rough-In "RI":
"RI"
12"
10"
14"
12"
Outlet Connection Part No.
TSU01W.12R
(Supplied)
TSU01W.10R
(Optional - Must be purchased separately)
TSU01W.14R
(Optional - Must be purchased separately)
TSU02W.12 (Supplied for CST794SF/CST794EF)
9"
7 "
11"
Please make sure that you have the correct outlet connection part.
b) Water supply must be approximately 8in. or 10in. to the left
(facing bowl) from center line of closet flange and approximately
4-½" above the floor.
Removing Existing Toilet (if necessary)
Turn off water supply. Flush the toilet, remove any remaining
water from tank and bowl.
Disconnect water connector. Remove tank and bowl. Remove
old wax seal and mounting bolts.
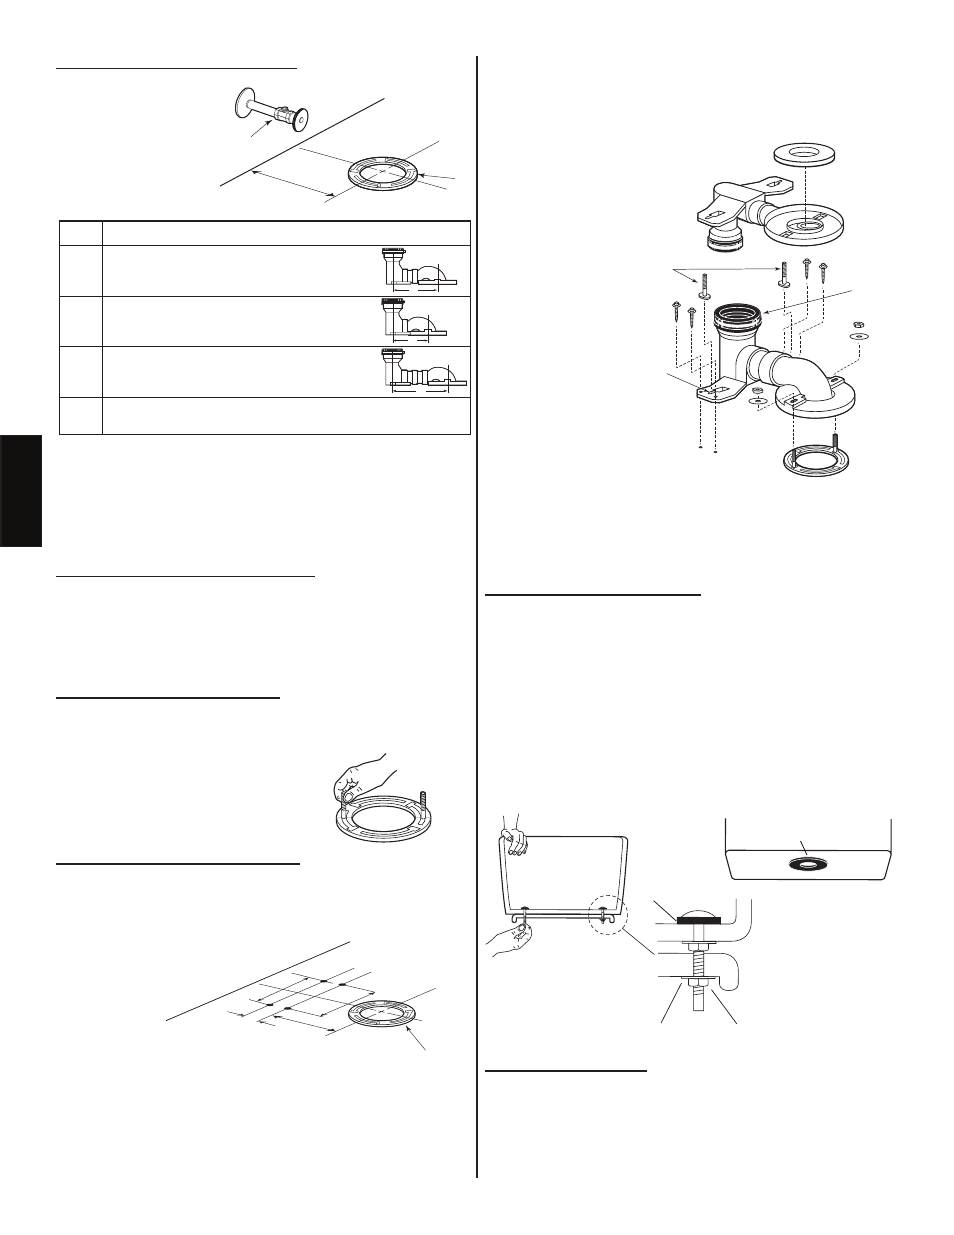
STEP 2 Installing Mounting Bolts
Clean any debris out of the closet flange, then install the mount-
ing bolts into the slots of the flange. The bolt should be inserted
into the slot with its
head down and threaded shank
pointed upward.
STEP 3 Installing Outlet Connection
Drill four
11
/
64
" holes on the floor at the location shown in the
Unifit Rough-In Installation Instruction found in the Rough-In
box. (
5
/
16
" holes are for concrete / tile floor anchors)
Wall
Closet
Flange
C
/
L
Floor
c
2"
B
A
Turn the PVC outlet connection upside down. Firmly press a new
wax seal onto the circular recess around the outlet opening.
Turn the outlet connection upright and lower it into position over
the closet flange. With the unit properly
aligned, press down firmly to set
the wax seal.
CAUTION: DO NOT move the
outlet connection after the wax
seal is set.
Insert washers and
thread nuts onto
mounting bolts and
hand tighten. Then
tighten bolts an
additional ½ turn.
Secure back side of
outlet connection to the
floor using the 4 screws
and washers.
Insert the T-bolts into the slots with
its head down and threaded shank pointed upward.
NOTE: Do not remove the white tie-wrap from rubber sleeve.
Level the PVC outlet. Do not use excessive force.
Wax seal
T-Bolts
nut
washer
slot
rubber
sleeve
STEP 4 Tank to Bowl Mounting
Make sure the large tank-to-bowl gasket is mounting over flush
valve outlet on underside of tank.
Make sure ball cock nut and flush valve nut are tightened prop-
erly . Pick up tank and carefully guide flush valve outlet into bowl
inlet on bowl inlet in bowl tank shelf.
Place washers on mounting bolts. Support tank and align mount-
ing bolts through ½" holes in tank base and bowl mount shelf.
Thread on nuts end, hand tighten before releasing the tank.
Tighten nuts evenly until tank sets snug on bowl.
CAUTION: Do not over tighten nuts, damage may result.
NOTE: Do not grab the overflow tube for handling the tank.
STEP 5 Installing Toilet
Lift the toilet and gently lower it into position over closet flange.
Make sure that the spigot outlet of toilet slips into rubber sleeve
and T-bolts fit through the openings in the base of toilet.
Insert washer and thread nuts on to bolts and hand tighten. Then
tighten bolts an additional ½ turn. Install cover plates.
Tank-to-Bowl Gasket
Rubber Washer
Tank
Bowl
Brass Washer
Brass Nut