Altronix ALTV2416ULCBX Installation Instructions User Manual
Page 2
- 2 -
ALTV2416UL Series
Overview:
These Altronix CCTV Power Supplies provide 24VAC/28VAC distributed via sixteen (16) fuse or PTC protected
outputs for powering CCTV Cameras, heaters and other video accessories.
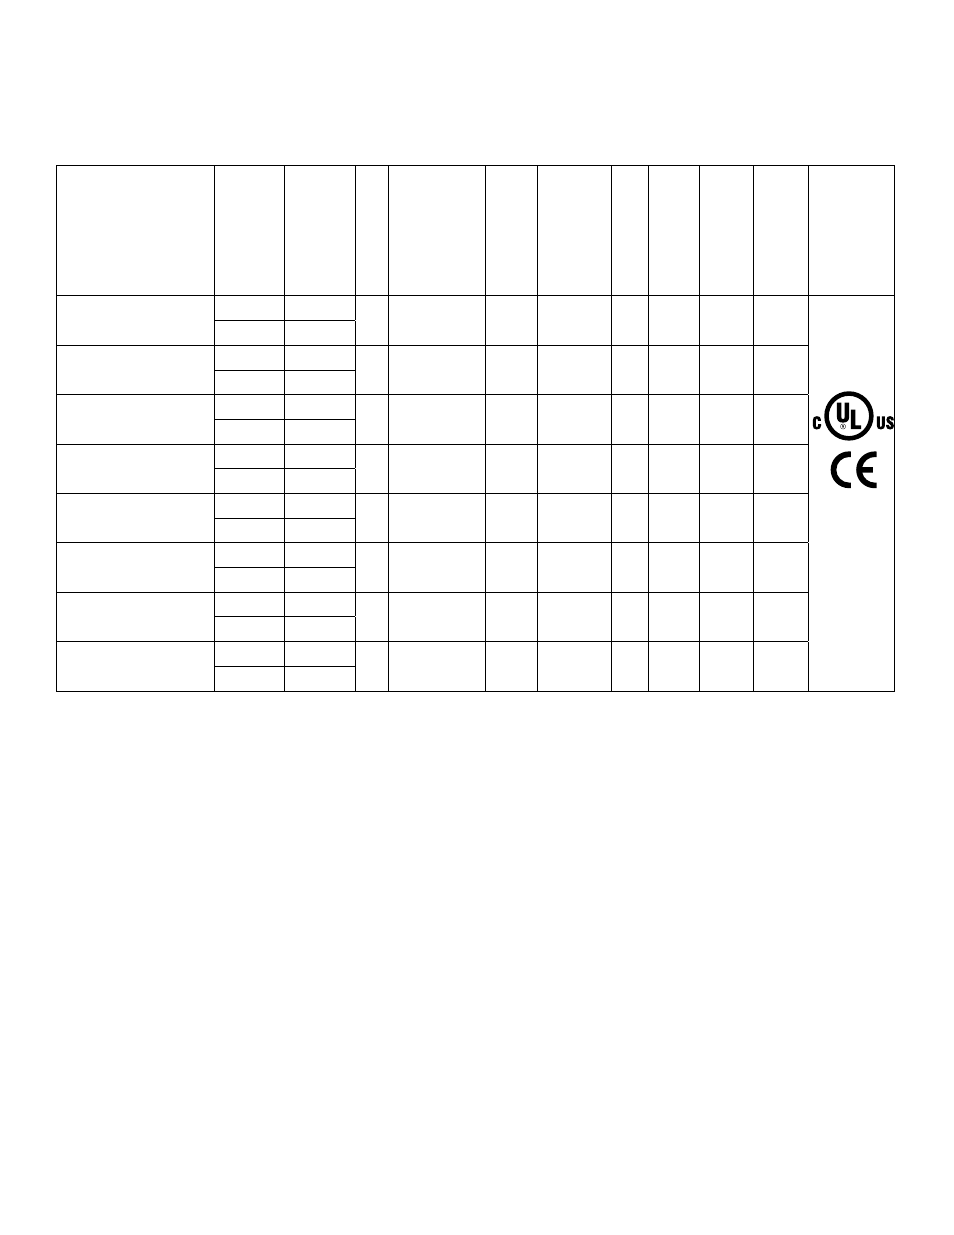
Sixteen (16) Output ALTV2416UL Reference Chart:
Altronix
Model Number
Output
Voltage
Total
Output
Current
(Power)
Number
of
Outputs
PTC
Protected
Outputs
(Class
2
power
limited
for
Dry
locations).
(Class
3
for
Wet
loca
-
tions).
Fuse
Protected
Class
1
Outputs
Individual
Output
Current
(max.
per
output
not
to
exceed
total
output
current).
Fuse
Rating
s
Main
Fuse
Ratings
Primary
In-line
Fuse
Rating
s
115VAC
60Hz
Input
Current
Agency
Listing
s
ALTV2416ULX
24VAC
7 amp
16
------
Yes
3.5 amp
3.5
amp
5A/
250V
3.5A/
250V
1.8
amp
28VAC
6 amp
ALTV2416ULCBX
24VAC
7 amp
16
Yes
------
2.5 amp
------
5A/
250V
3.5A/
250V
1.8
amp
28VAC
6 amp
ALTV2416300UL
24VAC
12.5 amp
16
------
Yes
3.5 amp
3.5
amp
15A/
32V
------
2.7
amp
28VAC
10 amp
ALTV2416300ULCB
24VAC
12.5 amp
16
Yes
------
2.5 amp
------
15A/
32V
------
2.7
amp
28VAC
10 amp
ALTV2416300ULM
24VAC
12.5 amp
16
------
Yes
3.5 amp
3.5
amp
------
2.7
amp
28VAC
10 amp
ALTV2416300ULCBM
24VAC
12.5 amp
16
Yes
------
2.5 amp
------
------
------
2.7
amp
28VAC
10 amp
ALTV2416600UL
24VAC
25 amp
16
------
Yes
3.5 amp
3.5
amp
15A/
32V
------
5.4
amp
28VAC
20 amp
ALTV2416600ULCB
24VAC
25 amp
16
Yes
------
2.5 amp
------
15A/
32V
------
5.4
amp
28VAC
20 amp
Specifications:
Installation Instructions:
Wiring methods shall be in accordance with the National Electrical Code/NFPA 70/NFPA 72/ANSI, and with all local
codes and authorities having jurisdiction. Product is intended for indoor use only.
1. Mount unit in desired location. Mark and predrill holes in the wall to line up with the top two keyholes in the
enclosure. Install two upper fasteners and screws in the wall with the screw heads protruding. Place the enclosure’s
upper keyholes over the two upper screws, level and secure. Mark the position of the lower two holes. Remove the
enclosure. Drill the lower holes and install the three fasteners. Place the enclosure’s upper keyholes over the two
upper screws. Install the two lower screws and make sure to tighten all screws (Enclosure Dimensions, pgs. 11-12).
Secure enclosure to earth ground.
• UL Listed for Commercial CCTV Equipment (UL 2044).
CUL Listed - CSA Standard C22.2 No.1-98, Audio,
Video and Similar Equipment.
• Surge suppression.
• AC power LED indicator.
• Power ON/OFF switch
(ALTV2416ULX, ALTV2416ULCBX).
• Illuminated power disconnect circuit breaker
with manual reset (all other models).
• Unit maintains camera synchronization.
• Ease of installation saves time & eliminates costly labor.
• Spare fuses included (on fuse protected models).
Enclosure Dimensions:
ALTV2416300ULM and ALTV2416300ULCBM:
8.5”H x 7.5”W x 3.75”D
ALTV2416ULX, ALTV2416ULCBX, ALTV2416300UL,
ALTV2416300ULCB, ALTV2416600UL and
ALTV2416600ULCB:
13.5”H x 13”W x 3.25”D