Velleman projects K7302 Assembly instructions User Manual
Page 8
8
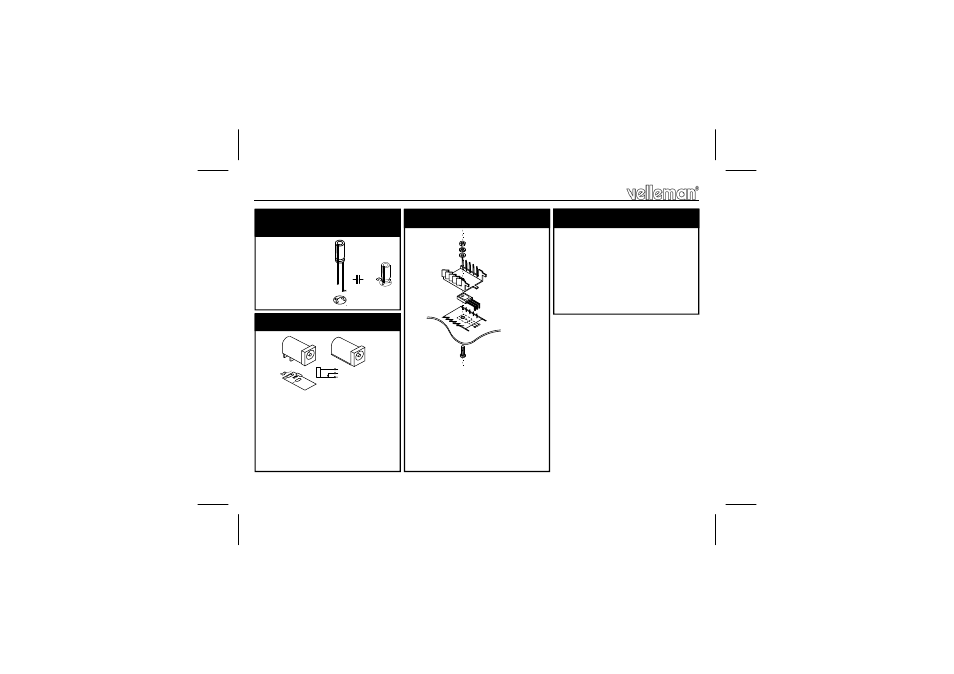
Construction
C1 : 220µF
6. Electrolytic Capacitor.
Watch the polarity !
C...
Remark: even if the DC adapter
jack is not used, it must be
mounted, due to the internal
switch.
SK1 : DJ-005
7. DC Jack
-
SK... +
SW
T1 : BD135
Mount the transistor together with
the heatsink on the PCB, bend
the leads as necessary. Take
care that the metal back of the
transistor touches the heatsink.
Check that the leads of the tran-
sistor do not touch the heatsink.
8. Transistor
TRANSISTOR
METAL SIDE UP
10mm M3 BOLT
PCB
M3 WASHER
HEATSINK
M3 LOCK WASHER
M3 NUT
The PCB can easily be mounted
into our housing type G403.
Due to heat dissipation, it is ad-
visable to make some 4mm venti-
lation holes into the housing.
Holes for the adapter jack and
wires will also be necessary.
9. Mounting in an housing
H7302IP'1.pub
page 8
Friday, July 06, 2012 14:20
- K7000 Assembly instructions (12 pages)
- K8042 Assembly instructions (12 pages)
- EDU10 Assembly instructions (24 pages)
- K2601 Assembly instructions (12 pages)
- K8039 Assembly instructions (20 pages)
- K8090 Assembly instructions (12 pages)
- K4305 Assembly instructions (14 pages)
- K8038 Assembly instructions (16 pages)
- K6714 Assembly instructions (16 pages)
- K8018B Assembly instructions (16 pages)
- K8050 Assembly instructions (20 pages)
- K8063 Infosheet (2 pages)
- VM152 Datasheet (1 page)
- K8006 Assembly instructions (16 pages)
- K8059 Infosheet (1 page)
- KA02 Datasheet (1 page)
- K2570 Assembly instructions (8 pages)
- K7102 Assembly instructions (12 pages)
- EDU08 Datasheet (1 page)
- K8092 Infosheet (1 page)
- K2543 Assembly instructions (12 pages)
- VMA03 Datasheet (1 page)
- MK179 Datasheet (1 page)
- K2579 Assembly instructions (12 pages)
- EDU05 (15 pages)
- K4040 Assembly instructions (28 pages)
- K7203 Assembly instructions (12 pages)
- K8027 Assembly instructions (12 pages)
- K8023 Assembly instructions (20 pages)
- MK195 Datasheet (1 page)
- K8008 Assembly instructions (16 pages)
- K5600R Assembly instructions (14 pages)
- VM110N Datasheet (1 page)
- MK180 Datasheet (1 page)
- MK176 Datasheet (1 page)
- MK190 Datasheet (1 page)
- VM179 Datasheet (1 page)
- K8049 Assembly instructions (12 pages)
- MK153 Assembly instructions (1 page)
- VM8095 Datasheet (1 page)
- VM134 Datasheet (1 page)
- K8077 Infosheet (1 page)
- K5201 Assembly instructions (16 pages)
- K8096 Assembly instructions (16 pages)