KC HiLiTES KC #6302 ATV Wiring Harness for 2 - 35 watt Lights Instructions User Manual
Wiring your lights, 23 year warranty, Wiring diagram
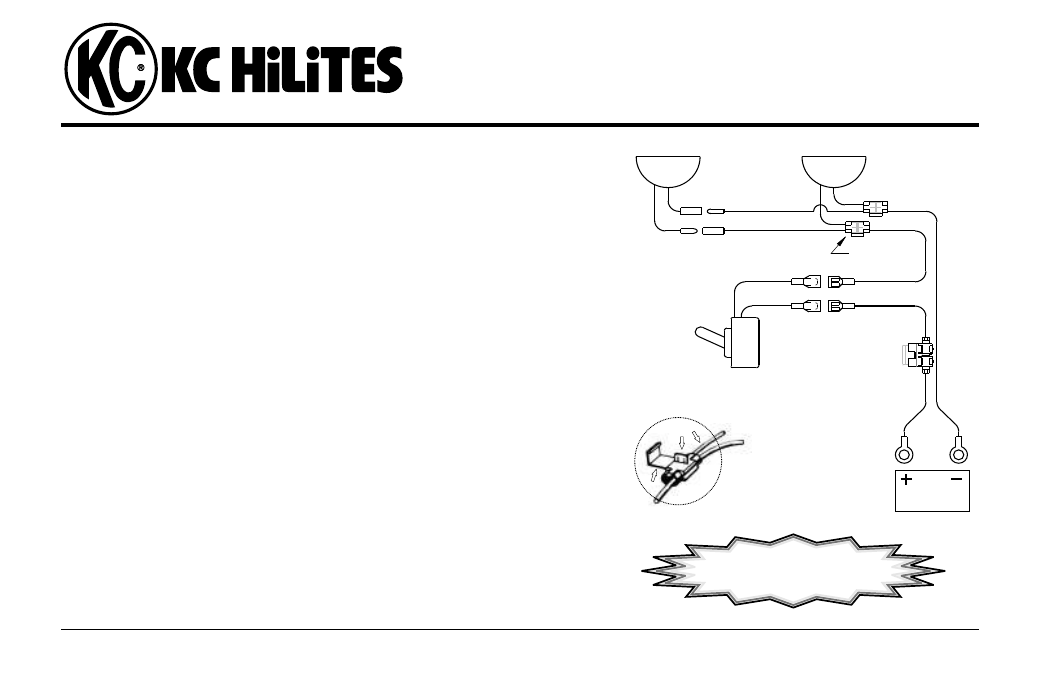
Wiring Your Lights...
1. Find a suitable flat surface that has an open space behind (like
the fairing), drill a 1/2” hole and mount the switch.
2. Remove the fuse from the red wire.
3. Plug the red and black wire set into the appropriate red and
black wires on the light furthest (#1) from the switch. (see
diagram)
4. Cut the terminals off of light #2. As you run the wire set past light
#2, attach light #2 red and black wires using the enclosed wire
splices.
5. Continue routing the red harness wire back to the switch and
plug it into one of the switch wires.
6. Attach the fused red wire to the other switch wire and route it
back to the positive (+) battery terminal.
7. Route the black wire back to the battery and attach to the
negative (-) post or other suitable ground.
8. Use the enclosed wire ties and protective tubing as needed to
secure and protect the wiring.
9. Replace the fuse in the red wire and test your lights.
10. Adjust lights as needed.
11.YOUR DONE!
IF YOU HAVE ANY PROBLEMS OR QUESTIONS, PLEASE CALL
CUSTOMER SERVICE AT 800-528-0950
KC HiLiTES, Inc. 2843 W. Avenida de Luces, Williams, Arizona 86046-0155 * 800-528-0950 * www.kchilites.com
KC3264TA - rev 042110
23 Year Warranty
See details on our website at
www.kchilites.com
Wiring
Diagram
Black Wire
Red Wire
Battery
Switch
10A Fuse
Wire
Splice
Light
No. 1
Light
No. 2
How to Use
Wire Splice
1. Insert wires
2. Press metal tab down
3. Fold plastic tab over
1
2
3
Instructions for #6302
ATV Wiring Harness
for 2 - 35 watt Lights