KC HiLiTES Roof Mount Light Bar Harness Installation User Manual
23 year warranty
KC HiLiTES, Inc. Post Office Box 155, Williams, Arizona 86046-0155 * 800-528-0950 * www.kchilites.com
KC3264C - rev 080805
Thanks for choosing a KC HiLiTES product. We take pride in
building the highest quality, best engineered systems
possible. Your satisfaction with our product is important, so
if you have any questions, please call our customer service
line at 800-528-0950.
PARTS INCLUDED IN YOUR WIRING KIT
1.WIRING THE LIGHT BAR …
2. WIRING THE RELAY AND SWITCH …
1 - Pre-terminated harness with relay and fuses
10 - Wire-ties
1 - Switch
a.Begin at the light that is farthest from your battery.
.
b.Find the 60” length of
and
wires and connect the
male and female bullet connectors to each of the lights.
c.Route the wires toward the door jam while at the same time
securing them to the underside of the light bar using a few of
the enclosed plastic adhesive clips.
f. The other end of the
wire can be attached to the high
beam or an ignition controlled circuit depending on how you
wish your lights to be controlled. DUE TO ELECTRICAL
CHANGES IN SOME LATE MODEL VEHICLES, THE LIGHTS
MAY NOT WORK WHEN ATTACHING THE WHITE WIRE TO
THE HEADLIGHT HIGH BEAM. IN THIS CASE, ATTACH THE
WHITE WIRE TO ANY 12 VOLT POWER SOURCE.
g.Connect the 10”
wire on the relay to chassis ground.
h.Attach the 18”
wire with fuse carrier coming from the
relay to your battery or other 12 volt source.
I. Insert the two fuses and turn on your lights.
j. If all is working OK, cover the wiring under the hood with the
protective tubing supplied and secure it with the enclosed ty-
raps.
k.If the lights do not work, after double checking all of your
connections and ensuring the
, call the number below and we will help
you in any way we can.
Since the lights you have mounted on
your light bar are off-road lights and are not legal on any public
road or highway, aiming your off road or competition lights is
entirely up to you. Most prefer the beam as far down the road as
possible, others adjust them slightly off to the sides.
IF YOU HAVE ANY PROBLEMS OR QUESTIONS,
PLEASE CALL CUSTOMER SERVICE AT 800-528-0950
5 - Screws
12 - Plastic adhesive clips
2 - Female bullet terminals
1 - Panel
17 ft. protective tubing 4 - Alcohol pads
ASSUMING YOU HAVE PURCHASED YOUR KC LIGHTS AND
KC LIGHT BAR AND HAVE THEM MOUNTED ON THE TOP OF
THE VEHICLE, WE WILL PROCEED WITH WIRING THEM USING
THE ENCLOSED INSTALLATION KIT.
a.Find a suitable location in your vehicle for your switch. Mark
and drill two 1/8” holes and loosely install the panel with the
enclosed screws. Fit switch in panel and tighten switch
b.Attach the
ground wire to the switch tab marked
Attach the other end to a metal surface that is a good chassis
ground.
c.Using a sheet metal screw, mount the relay under the hood
within 18” of the battery or other 12 volt power source.
d.Find the
and
wires coming from the relay This wire
pair must be routed so that it can be plugged into the wire pair
coming off the light bar. The easiest way to accomplish this is
to route it back toward the firewall, up along the crack
between the fender and windshield, into the door jam, under
the weatherstripping and follow up along the door jam until
you reach the point where the light bar wire is located. Plug
red to red and black to black to the wiring from the lights.
When you are happy with the length and fit, secure the wire to
the door jam with the plastic adhesive clips included in the
package.
e.Next, the
and
wires with the terminals on the end
must be attached to the switch inside the vehicle. Route these
two wires from the relay back (along existing wiring if possible)
toward the firewall and exiting the engine compartment
through the crack between the fender and windshield on the
driver side of vehicle. Open the driver side door and feed the
wires down the door jam, under the weatherstripping, back
under the dash and to the switch panel inside the vehicle. An
alternate method might be to route these two wires through the
firewall and along side the steering column. Attach the
wire to the switch terminal marked
(center tab on
switch). Attach the
wire to the switch terminal marked
(remaining tab on switch). With all three wires on
their proper terminals, the panel can now be secured to the
dash.
If your
battery is on the passenger side then start at the light on the
drivers side
If the
ground wire on your light has a ring terminal, unplug it so the
harness can be plugged in directly.
(CLEAN SURFACE WITH
ALCOHOL PADS BEFORE ATTACHING)
red
black
white
THE WHITE WIRE MUST BE ATTACHED TO A 12 VOLT
POWER SOURCE OR THE LIGHTS WILL NOT WORK.
black
yellow
3. AIMING YOUR LIGHTS -
NOTE - Ensure both fuses have been removed from
harness before proceeding.
white wire is connected to a 12
volt power source
(we will
remove panel when attaching wires).
(this is the tab on same side as the green LED light on switch).
Ensure
plug and wires are attached to relay.
.
(AGAIN, CLEAN SURFACE BEFORE ATTACHING)
brown
red
black
green
white
green
white
EARTH
LOAD
SUPPLY
IMPORTANT
23 Year Warranty
See details on our website at
www.kchilites.com
Installation Instructions
Roof Mount Light Bar Harness
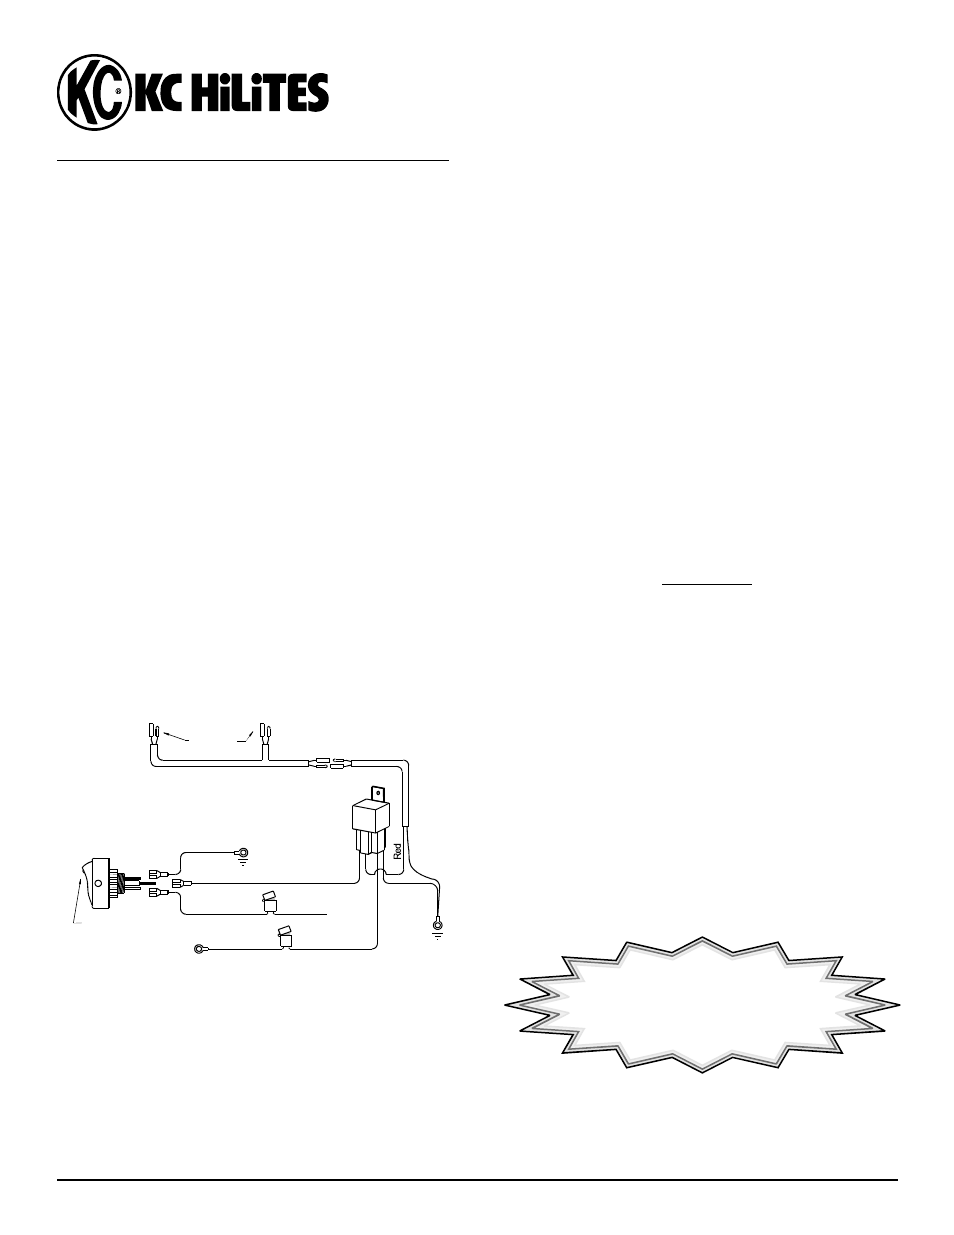
RELAY
+12 VDC
Battery
Brown
Ground
Hi
Low
Ign
Yellow
25A Fuse
Green
LED
To Lights
Green
White
Ground
Black
SWITCH
(Earth)
(Load)
(Supply)
3A Fuse