KC HiLiTES KC #775 Wide Beam Lights Installation User Manual
23 year warranty, Installation instructions kc 775 wide beam lights
Installation Instructions
KC 775 Wide Beam Lights
Thanks for choosing a KC HiLiTES product. We take pride in building
the highest quality, best engineered systems possible. Your satisfaction
with our product is important, so if there are any questions, please call
our customer service line at 800-528-0950.
1. PARTS INCLUDED IN YOUR PAIR PACK
2. MOUNT ‘EM UP...
3. GET YOUR LIGHTS WIRED...
4. AIMING YOUR LIGHTS
1 - Complete harness with relay for two lights
2 - Lights
1 - Switch
1 - Switch panel
5 - Screws
6 - Wire ties
1 - Wire splice connector
Please check that you have all the correct parts. If any are missing, please contact
KC HiLiTES Customer Service at 800-528-0950.
Where you mount your lights is extremely important, as well as aiming the units.
Too high and they will bounce right back at you and you’ll be trying to look
through the beam instead of down the road. Too low and they’ll skim across the
rocks on the roadway and not illuminate correctly where you are trying to see.
Fortunately, the bumper on most vehicles works out perfectly. Mounting right
under or on top of it is ideal. Try and place the lights as far back toward the grill as
possible; this will keep the front of the lens behind the bumper and minimize the
chance of breakage from impact.
Choose a location on your bumper for mounting your
lights, ensuring they measure an equal distance from each end of the bumper.
After marking the location for mounting, drill a 7/16” hole and attach the lights
using the bolts, nuts and washers provided.
The lenses are
marked LH and RH. Make sure the LH is at the top of the lens mounted on the
drivers side and the RH is at the top on the passenger side.
Proper aiming of your auxiliary lights is important.
This procedure is
accomplished by aiming your wide beam driving lights in relation to your
properly aimed headlights.
1. Place your vehicle approximately 25 feet and perpendicular to a flat
surface such as a garage door or a building. It is important that the vehicle be on
level ground.
2. With low beam headlights on, go over to the surface on which they are
shining and mark the vertical center on both left and right headlights with
something easily removable like masking tape. You may use a short piece of tape
to indicate vertical center and a longer piece to show the horizontal portion. Your
tape should appear as below.
3. Your WIDE BEAM lights are meant to increase side to side illumination
and should be aimed similar to fog lights. Using the diagram above, keep the top
cut off on or below the low beam marks on the wall. The side to side adjustment is
up to you. Too much center overlap of the beams will increase the light in the
center and reduce overall width. A slight center overlap will increase your side
lighting and give good even coverage overall.
BUMPER MOUNTING...
IMPORTANT -
(PLEASE ENSURE THE RELAY IS
MOUNTED SO THE TERMINALS ARE FACING DOWNWARD. THIS WILL
KEEP THE RELAY FROM RETAINING MOISTURE.)
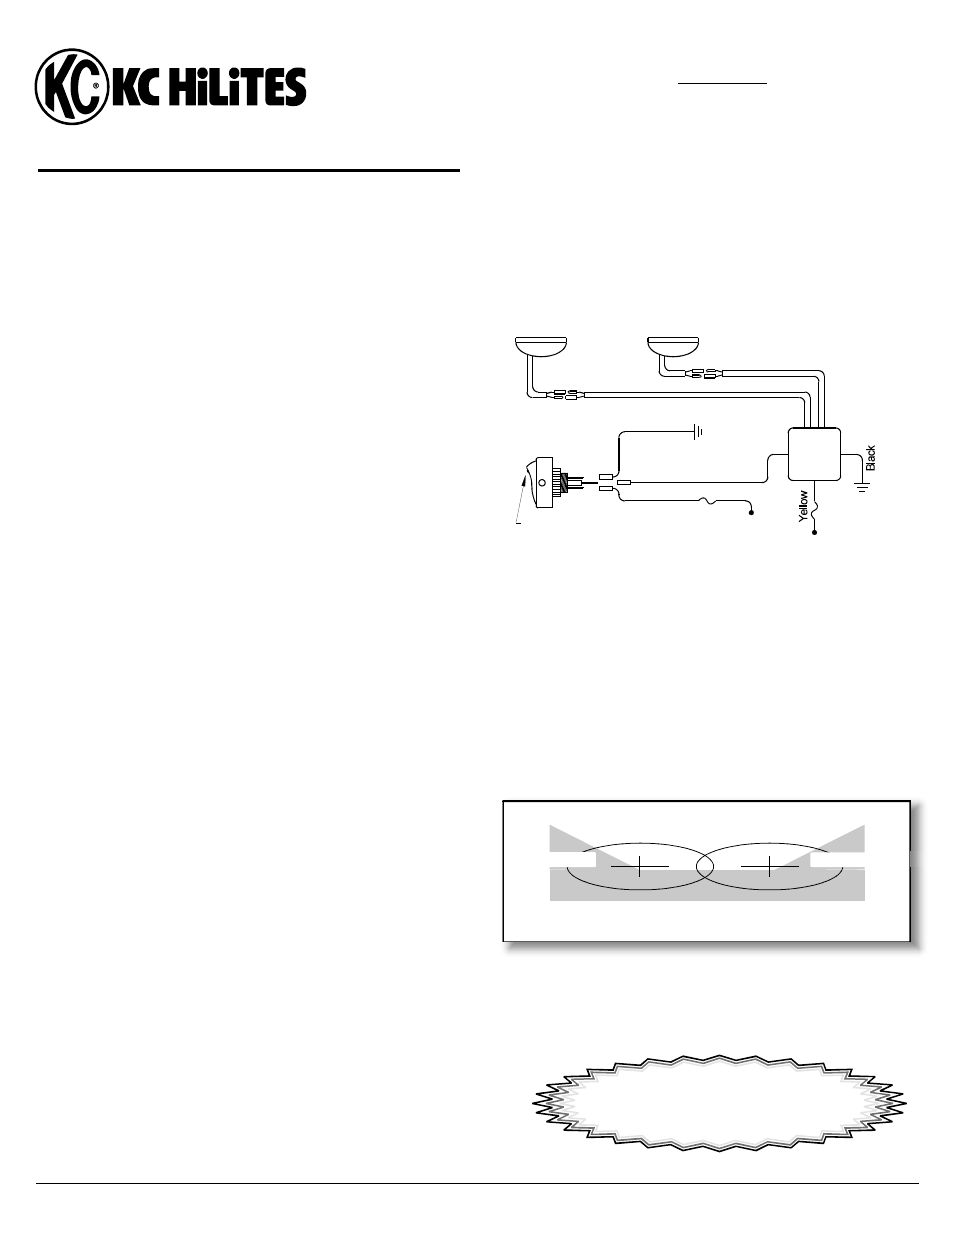
Wiring Diagram
Use This Diagram For Aiming Your Lights
23 YEAR WARRANTY
See details on our website at
www.kchilites.com
NOTE -Ensure both fuses have been removed from the
harness before proceeding.
96” red and black
48” red and
black
green
white
green
LOAD
white
SUPPLY.
brown
EARTH
white
Most 1999 and Earlier Vehicles
Most 2000 and Later Vehicles
black
yellow wire
a. Find a suitable location in your vehicle and mount the switch panel using the
enclosed screws.
b. Using a sheet metal screw, mount the relay under the hood within 24” of the
battery or other unfused 12 volt power source.
c. Route the
wire set to the light furthest from the relay and
plug them in to the appropriate wires on the light. Now route the
wire set to the closer light and plug them in.
d. Next, route the
wire from the relay and the
wire back along the
engine compartment firewall and into the vehicle toward the switch. Routing
these wires can be very simple. Open the drivers side door and the hood.
Route the wires along the crack between the fender and windshield, through
the door jam, down under the left side of the dash and then on to where your
switch is located. An alternate method might be to route these two wires
through the firewall along side the steering column.
e. Once the wires are inside the vehicle, pull them through the panel from the
back and attach the
wire to the switch terminal marked
. Attach
the
wire to the switch terminal marked
Attach one end of the
wire to the switch terminal marked
and the other end to a good
grounded metal surface under the dash.
f. Attach the other end of the
wire as follows:
Attach the white wire to high beam wire on your headlight. Your
KC driving lights will now only work when the KC switch and
your high beams are on.
Attach the white wire to the positive side of your battery or other
12 volt accessory lug on your vehicle.
- If you choose to activate your lights through your headlight
system, please contact your car dealer to ensure compatibility with
your vehicle. Many vehicles manufactured after 1999 have circuits
that are controlled by on-board computer systems and may not allow
additional electrical accessories to be tied into factory wiring.
g. Connect the 6”
wire from the relay to chassis ground.
h. Attach the 24”
from the relay to your battery or other 12 volt
source.
i. Insert the two fuses (3A white wire, 25A yellow wire) and turn on your lights.
j. If the lights do not work, after double checking all of your connections, call the
number below and we will help you in any way we can.
Option
THE WHITE WIRE MUST BE ATTACHED TO A 12 VOLT POWER SOURCE
OR THE LIGHTS WILL NOT WORK.
NOTE - Some states require fog lights work only with low beams and driving
lights only work with high beams.
IMPORTANT
Your wide beam lights should be aimed so that the top cut-off is on or
below your horizontal low beam wall marks.
Left Low Beam
Right Low Beam
KC HiLiTES, Inc. 2843 W. Avenida de Luces, Williams Arizona 86046 * 800-528-0950 * www.kchilites.com
KC 3264A - rev 031904
Load
Supply
Green
White
To
Ground
Earth
Brown
Fuse
3A
+12 VDC
Battery
Fuse
20/25A
To
Ground
LED
LIGHTS
SWITCH
RELAY
Hi beam
Low beam
or battery