Rmc 7130 – Acnodes RMC 7130 User Manual
Page 39
661 Brea Canyon Rd., Suite 3
Walnut, CA 91789
tel: 909.598.7388, fax: 909.598.0218
© Copyright 2009 Acnodes, Inc.
All rights reserved. Product description and product specifications
are subject to change without notice. For latest product information,
please visit Acnodes’ web site at www.acnodes.com.
RMC 7130
1U Rackmount System
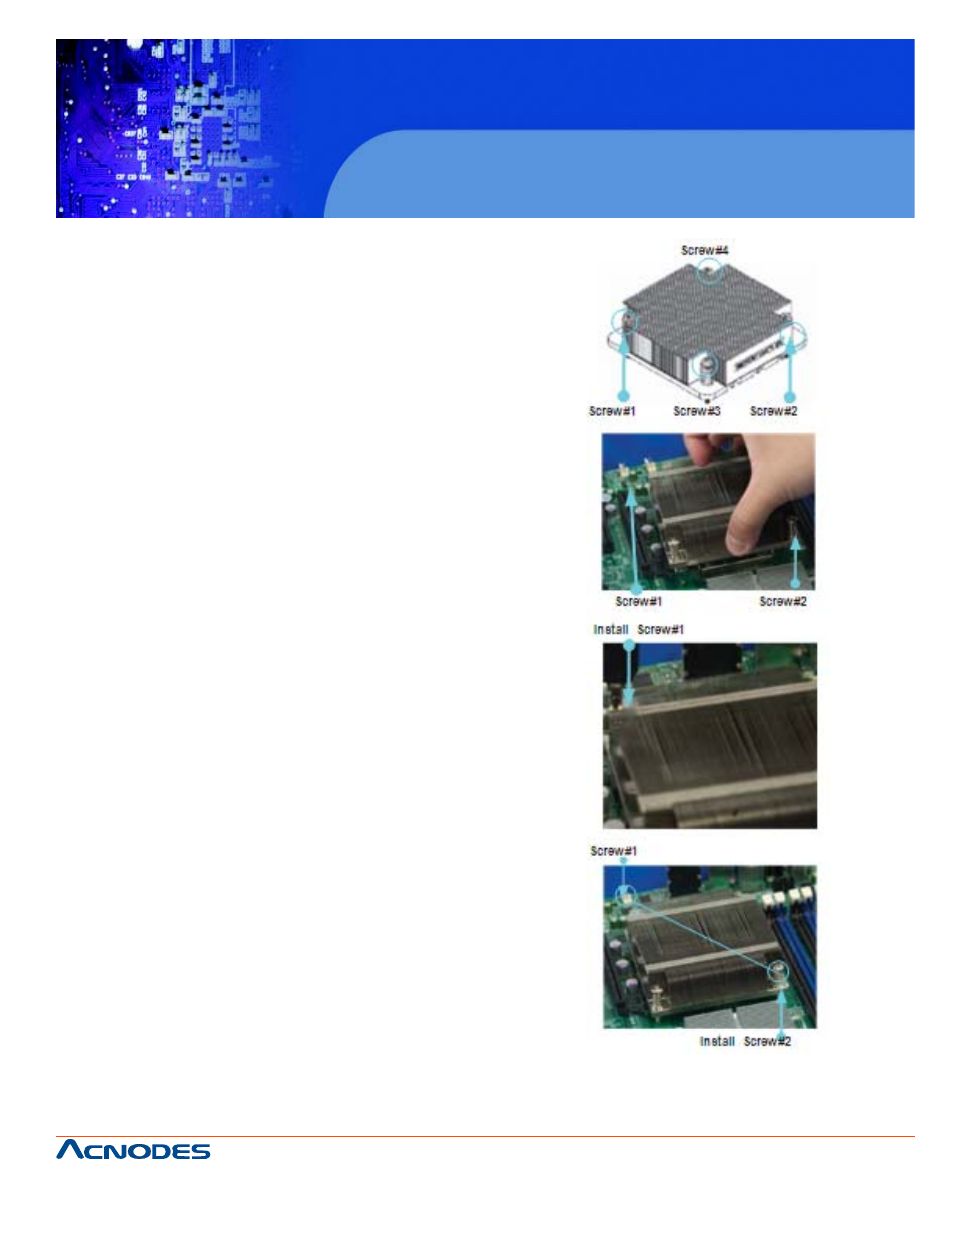
Installing a Passive CPU Heatsink
Notes: The motherboard comes with a heatsink
bracket pre-in- stalled on the reverse side of the
board. Do not apply any thermal grease to the
heatsink or the CPU die; the required amount has al-
ready been applied.
1. Place the heatsink on top
of the CPU so that the four mounting holes are aligned
with those on the retention mechanism.
2. Install two diagonal screws
(i.e. the #1 and the #2
screws) and tighten them until just snug (do not fully
tighten the screws to avoid damaging the CPU.)
3. Repeat step 2 with the #3
and #4 screws. Make sure all screws are snug.
- RMC 7182 (103 pages)
- PC 6170 (75 pages)
- PC6172 (66 pages)
- RMC 7132 (98 pages)
- RMC 7155 (5 pages)
- RMC 7150 (66 pages)
- PC 6152 (77 pages)
- PCH 5120 (82 pages)
- PC 8150 (72 pages)
- RMC 7130 (8 pages)
- PC 8120 (7 pages)
- PC 8120 (51 pages)
- KD 6176 (3 pages)
- RMC 7155 (67 pages)
- FPC-8057 (57 pages)
- FPC 6084 (105 pages)
- FPC 7150 (80 pages)
- FES 6831 (50 pages)
- FES 5312 (117 pages)
- PCH 3982 (87 pages)
- PCH 7591 (99 pages)
- PC 5153 (97 pages)
- FPC 7919 (104 pages)
- FPC 5105 (47 pages)
- FPC 6120 (114 pages)
- FPC 7615 (88 pages)
- PCH 7791 (99 pages)
- FES 2213 (57 pages)
- FES 2236 (49 pages)
- PCH 7991 (99 pages)
- PC 6408 (98 pages)
- FPC 7617 (88 pages)
- FPC 1015 (13 pages)
- FES 7510 (107 pages)
- PCH 3598 (82 pages)
- FPC 7161 (40 pages)
- PC 6172 (48 pages)
- PC 8153 (46 pages)
- FES 8730 (71 pages)
- PC 5192 (104 pages)
- PCH 3991 (77 pages)
- FES 6911 (58 pages)
- FES 2215 (37 pages)
- PC 6412 (107 pages)