Warning, Lift handles, Step plate – Wayne-Dalton 8500 User Manual
Page 7: Vertical tracks
Please Do not Return This Product To The Store. Contact your local Wayne-Dalton dealer. To find your local Wayne-Dalton dealer,
refer to your local yellow pages business listings or go to the find a Dealer section online at www.wayne-dalton.com
8300-8500 Windload Strutting Schedule—Windload option code 0132
5
Bottom
x
Lock
x
Intermediate
Intermediate II
x
Top
x
(2) 1/4”-20 x 5/8”
Self drilling screws
End hinge
Intermediate
hinge
Fasten u-bars at all end hinge and intermediate hinge
locations, as well as locations between hinges.
U-bar
U-bar
(2) 1/4”-20 x 5/8”
Self drilling screws
(2) 1/4”-14 x 5/8” Self
drilling screws between
hinge locations
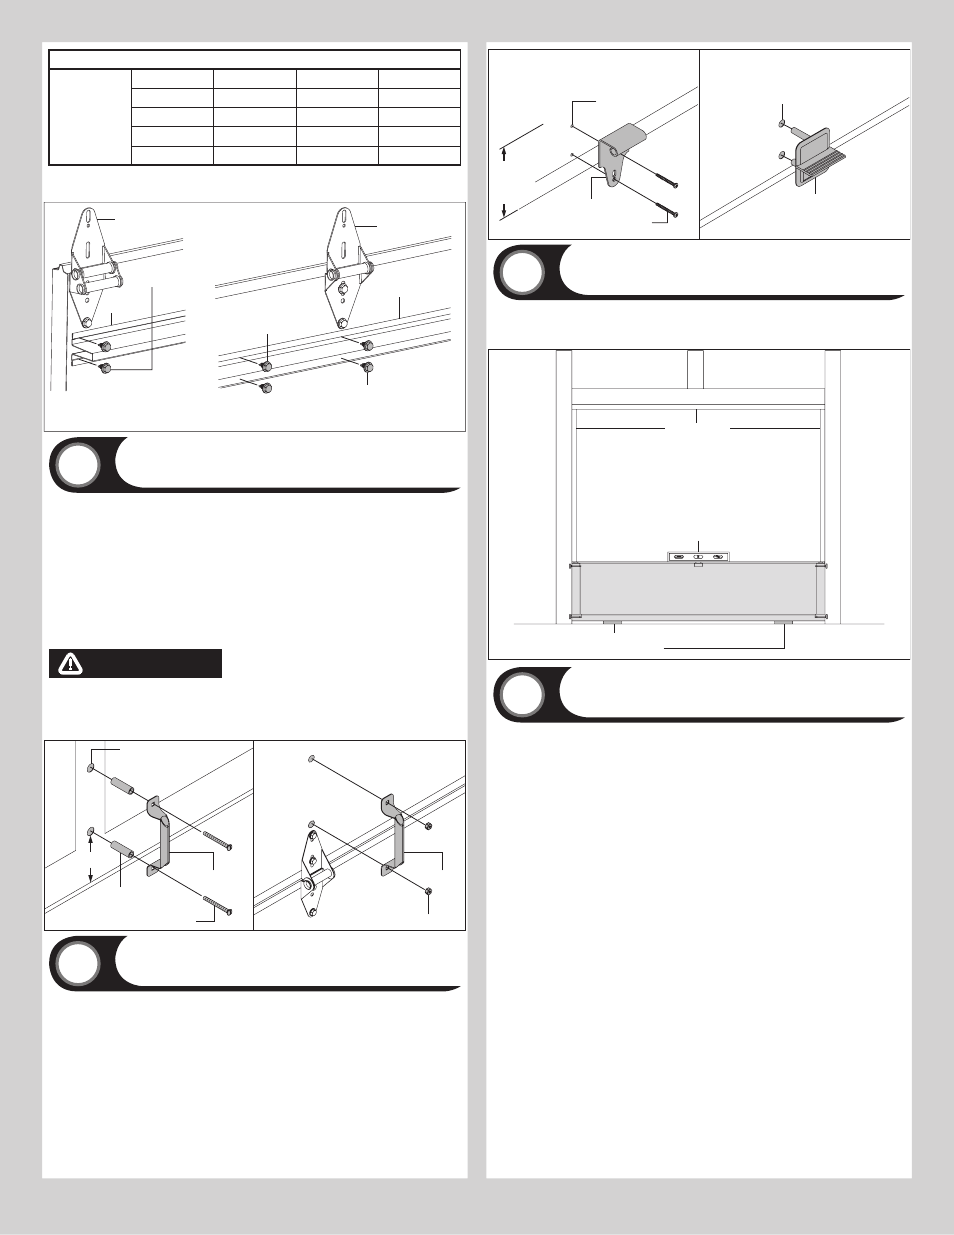
Lift handles
8
Tools: Tape Measure, Power Drill, 9/32”, 1/2” Drill Bit, 7/16” Wrench
NOTE: Refer to door section identification, located in the pre-installation section of this
manual.
Locate the vertical center of the lock (second) section of the door and position the lift
handle’s bottom hole 4” from the bottom of the lock section along the vertical center on the
outside of the door. use the holes in the lift handle as a template to mark the hole locations.
IMPORTANT: THE LIfT HAnDLE AnD THE STEP PLATE nEED TO BE VERTICALLY ALIGnED.
Drill 9/32” diameter holes through the section at each marked location. Enlarge the holes
from outside the door to 1/2” diameter through the section. Assemble the outside and inside
lift handles to the section using (2) 1/4” x 2-1/2” carriage bolts and (2) 1/4”-20 hex nuts and
spacers.
WARNING
WARNING
TO AvOID POssIBLE INjuRy, LIfT hANDLEs ThAT ARE INsTALLED WIThIN
4 INChEs (102MM) Of A sECTION INTERfACE shALL PROMOTE vERTICAL
ORIENTATION Of ThE hAND.
(2) Spacers
1/2” Diameter holes
(2) 1/4” x 2-1/2” Carriage bolts
Lift handle
Lock section
outside
Lock section
inside
4”
Lift handle
(2) 1/4”-20 hex nuts
step Plate
9
Tools: Power drill, 7/16” Drill bit, Phillips screwdriver, Tape measure
On the bottom door section, locate the vertical center of the door.
On the inside of the door, center the inside step plate’s second top most hole and bottom
hole vertically over the pre-punched holes in the bottom section no higher than 8” from the
bottom of the door to the top of the step plate. Drill 7/16” diameter holes through the entire
section at these hole locations. Be careful to keep drill straight.
IMPORTANT: Do noT MoUnT THe STeP PLATe HigHeR THAn 8” fRoM BoTToM of Sec-
TIOn.
Insert the outside step plate into the holes through the front of the door, and mount the two
step plates back to back with two no. 8 x 1-1/2” screws through the inside step plate and
into the outside step plate.
Outside step plate
Bottom section outside
Holes enlarged
to 7/16” diameter
Inside step plate
Bottom section inside
Pre-punched
holes
(2) #8 x 1-1/2” screws
8” Max.
mounting
height
Bottom section
10
Tools: Level, Wooden shims (if necessary)
Center the bottom section in the door opening. Level the section using wooden shims (if
necessary) under the bottom section.
Weather seal
Level
Bottom section
Wooden shims
(If necessary)
vertical Tracks
11
Tools: Power Drill, 3/16” Drill bit, 7/16” Socket driver, Tape measure,
Level, Step ladder
IMPORTANT: THE TOPS Of THE VERTICAL TRACKS MuST BE LEVEL fROM SIDE TO SIDE.
If THE BOTTOM SECTIOn WAS SHIMMED TO LEVEL IT, THE VERTICAL TRACK On THE
SHIMMED SIDE MuST BE RAISED THE HEIGHT Of THE SHIM.
Position the left hand vertical track assembly over the rollers of the bottom section. Make
sure the counterbalance cable is located between the rollers and the door jamb. Drill 3/16”
pilot holes into the door jamb for the lag screws.
Loosely fasten jamb brackets and flag angle to the jamb using 5/16” x 1-5/8” lag screws.
Additional jamb brackets will be fastened to track after sections are stacked so that their
location can be easily determined. Tighten lag screws, securing the bottom jamb bracket to
jamb, maintain 3/8” to 5/8” spacing as shown between the bottom section and vertical track.
Hang cable drum over flag angle. Repeat for other side.
7