Hinge attachment, U-bars – Wayne-Dalton 8500 User Manual
Page 6
Please Do not Return This Product To The Store. Contact your local Wayne-Dalton dealer. To find your local Wayne-Dalton dealer,
refer to your local yellow pages business listings or go to the find a Dealer section online at www.wayne-dalton.com
Repeat for other side.
NOTE: Verify astragal (bottom seal) is aligned with door section. If there is more than 1/2”
excess astragal on either side, trim astragal even with door section.
Counterbalance
cable loop
(2) 1/4”-14 x 7/8”
Self drilling screws
Bottom section
1/4”-14 x 5/8”
Tamper resistant
self drilling screw
Roller
Milford pin
Bottom
bracket
End cap
Spacer
Bottom section
(4) 1/4”-14 x 7/8”
Self drilling screws
1/4”-14 x 5/8”
Tamper resistant
self drilling screw
Counterbalance
cable loop
Cotter pin (attached into
place from opposite
side of bottom bracket)
Clevis pin (inserted through
cotter pin and bent into place)
Washer
Roller
Bottom
bracket
End cap
Spacer
Counterbalance
cable loop
(5) 1/4”-14 x 7/8”
Self drilling screws
Bottom section
Roller
Milford pin
Bottom
bracket
End cap
Spacer
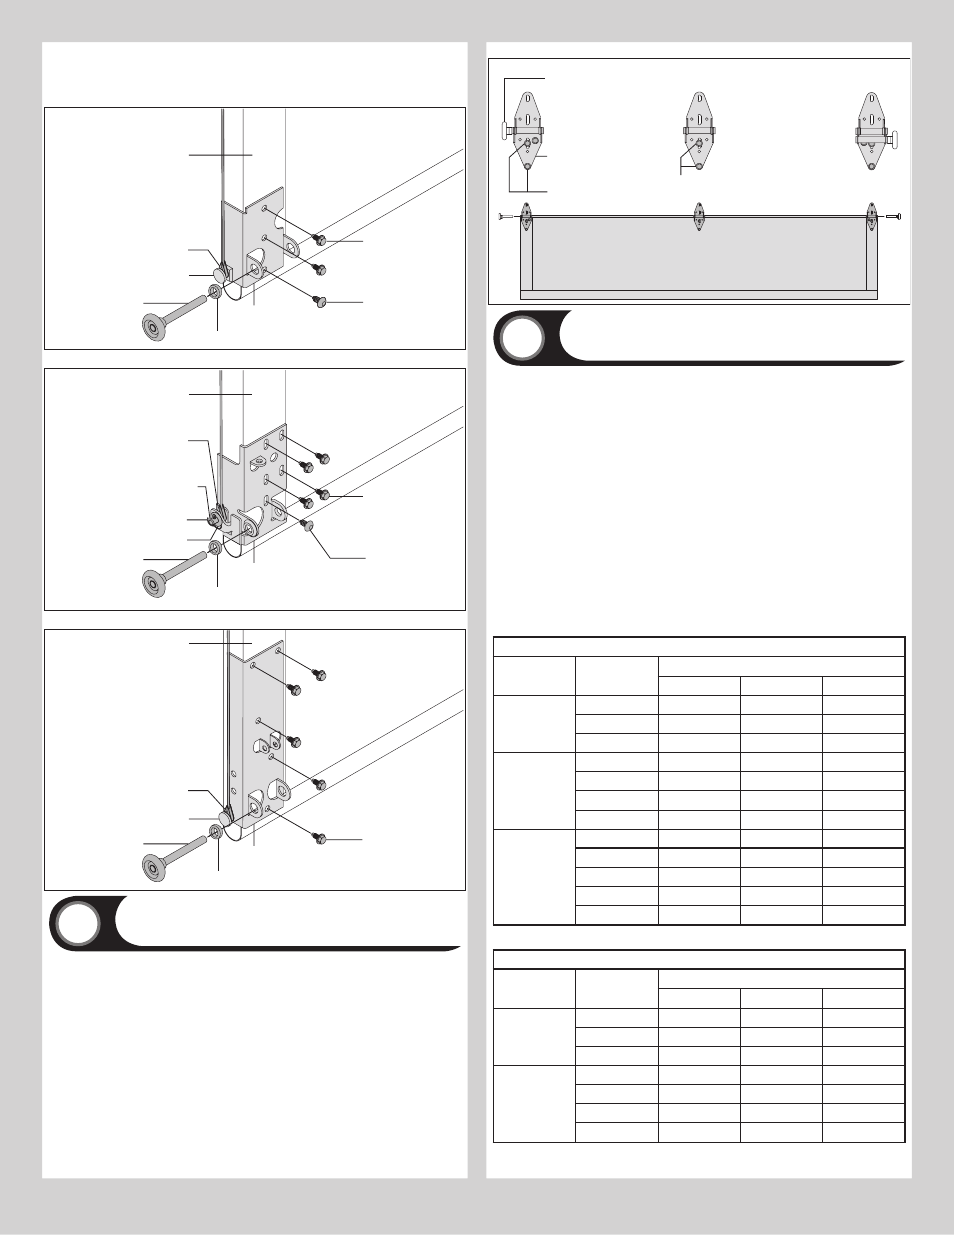
hinge Attachment
6
Tools: Power drill,7/16” Socket driver
NOTE: Refer to door section identification.
NOTE: Hinges can be identified by the number stamped onto their lower leaf.
Align the lower leafs of the #1 end hinges over the holes at the top of the end caps of the
bottom section, and align the lower leafs of the #1 intermediate hinges with the dimples at
the intermediate locations at the top of the section. Attach lower leafs of end hinges to sec-
tion with (3) 1/4”-14 x 7/8” Self drilling screws and attach lower leafs of intermediate hinges
with (2) 1/4”-14 x 7/8” Self drilling screws.
IMPORTANT: PuSH & HOLD THE HInGE LEAf SECuRELY AGAInST THE SECTIOn WHILE
SecURing WiTH 1/4”-14 x 7/8” SeLf DRiLLing ScReWS. THeRe SHoULD Be no gAP
BETWEEn THE HInGE LEAf AnD THE SECTIOn.
Place a roller into each end hinge.
Repeat hinge attachment for all remaining sections except the top section, using #2 end
hinges for the lock section, #3 end hinges for the intermediate section, and #4 end hinges
for the intermediate II section, if such a section was provided.
#1Intermediate
hinge(s)
#1 End hinge
Roller
Lower leaf
#2 End hinge
(roller inserted into tube
furthest from section)
(3) 1/4”-14 x 7/8” Self
drilling screw locations
(2) 1/4”-14 x 7/8” Self
drilling screw locations
u-bars
7
Tools: Power drill, 7/16” Socket driver, Tape measure
NOTE: Refer to strutting schedules to determine placement of u-bars. strutting
schedules are separated by windload option codes; X’s represent where a u-bar
will be placed.
u-bars will either be attached at the top, middle, or bottom of a section; if placed
across the top of a section the u-bar will be placed just below the hinge leaf at
the top of the section (except for u-bar placement on top section, which is simply
the top of the section); if placed across the bottom of a section, the u-bar will be
placed high enough on the section to ensure the hinge leafs of an adjoining section
will have clearance once sections are stacked and fastened together.
To attach a u-bar to a section: Place u-bar against section (refer to strutting schedule to
determine placement) and align it horizontally with section. Attach to section using (2) 1/4”-
20 x 5/8” self drilling screws at each end and intermediate hinge location and (2) 1/4”-14 x
5/8”self drilling screws between all hinge locations.
for windload option code 0124:
The u-bar that is to be attached across the bottom of the bottom section will need
to be installed across the bottom brackets. Remove and keep the (2) 1/4”-20 x 7/8”
self drilling screws from each bottom bracket. Place u-bar across section and attach to bot-
tom brackets with the (2) 1/4”-20 x 7/8” self drilling screws in the same location. Attach the
additional fasteners as stated above.
8300-8500 Windload Strutting Schedule—Windload option code 0124
Door
Section quantity
Section
Placement (top, middle, or bottom of section)
Top
Middle
Bottom
3
Bottom
x
x
Lock
x
x
Top
x
x
4
Bottom
x
x
Lock
x
x
Intermediate
x
x
Top
x
x
5
Bottom
x
x
Lock
x
x
Intermediate
x
x
Intermediate II
x
x
Top
x
x
8300-8500 Windload Strutting Schedule—Windload option code 0132
Door
Section quantity
Section
Placement (top, middle, or bottom of section)
Top
Middle
Bottom
3
Bottom
x
Lock
x
Top
4
Bottom
x
Lock
x
Intermediate
Top
x
6