Configuring the dv-sp506 —continued – Onkyo DV-SP506 User Manual
Page 52
52
Configuring the DV-SP506
—Continued
Linear PCM Out
With this setting you can configure the DV-SP506 to out-
put digital audio with higher sampling rates (e.g., 88.2
kHz, 96 kHz) as it is or to down sample it to 48 kHz or
below.
If the AV component you connect to the DV-SP506’s
digital audio outputs supports 96 kHz digital audio,
select Down Sample Off. Otherwise, select Down Sam-
ple On.
Down Sample Off (default):
Sources are output as
they are.
Down Sample On:
192 kHz and 96 kHz sources are
down sampled to 48 kHz, and 176.4 kHz and
88.2 kHz sources are down sampled to 44.1 kHz.
Notes:
• With some discs, even if you select Down Sample Off,
the digital audio will be down sampled, and in some
cases may not be output by the DV-SP506’s digital
audio outputs.
• Even if Down Sample Off is selected, sources at 176.4
kHz and 192 kHz are not output by the OPTICAL and
COAXIAL outputs. In addition, sources at lower sam-
pling rates that use copy protection may not be output.
• When the SACD Audio Setup setting is set to DSD,
nothing is output by the OPTICAL and COAXIAL
outputs during SACD disc playback.
Speaker Configuration
With these settings, you can specify which speakers are
connected and their sizes. These settings only apply to
the DV-SP506’s analog multichannel output. If you con-
nect to only the D.MIX/FRONT L/R jacks, set the Sub-
woofer, Center Speaker, and Surround Speaker settings
to Off.
Notes:
• The Speaker Configuration settings have no effect on
192 kHz and 176.4 kHz DVD-Audio.
• To use the Speaker Configuration settings for SACD
playback, in the SACD Audio Setup, select PCM
(page 53).
■
Subwoofer
On (default):
Select if a subwoofer is connected.
Off:
Select if no subwoofer is connected.
■
Front Speaker
Large (default):
Select if the front speakers are
large.
Small:
Select if the front speakers are small.
Note:
• If the Subwoofer setting is set to Off, this setting is
fixed at Large and cannot be changed.
■
Center Speaker
Large (default):
Select if the center speaker is large.
Small:
Select if the center speaker is small.
Off:
Select if no center speaker is connected.
Notes:
• If the Front Speaker setting is set to Small, the
Large option cannot be selected.
• The Center Speaker and Surround Speaker settings
can only be set to the same size.
■
Surround Speaker
Large (default):
Select if the surround speakers are
large.
Small:
Select if the surround speakers are small.
Off:
Select if no surround speakers are connected.
Notes:
• If the Front Speaker setting is set to Small, the
Large option cannot be selected.
• The Center Speaker and Surround Speaker settings
can only be set to the same size.
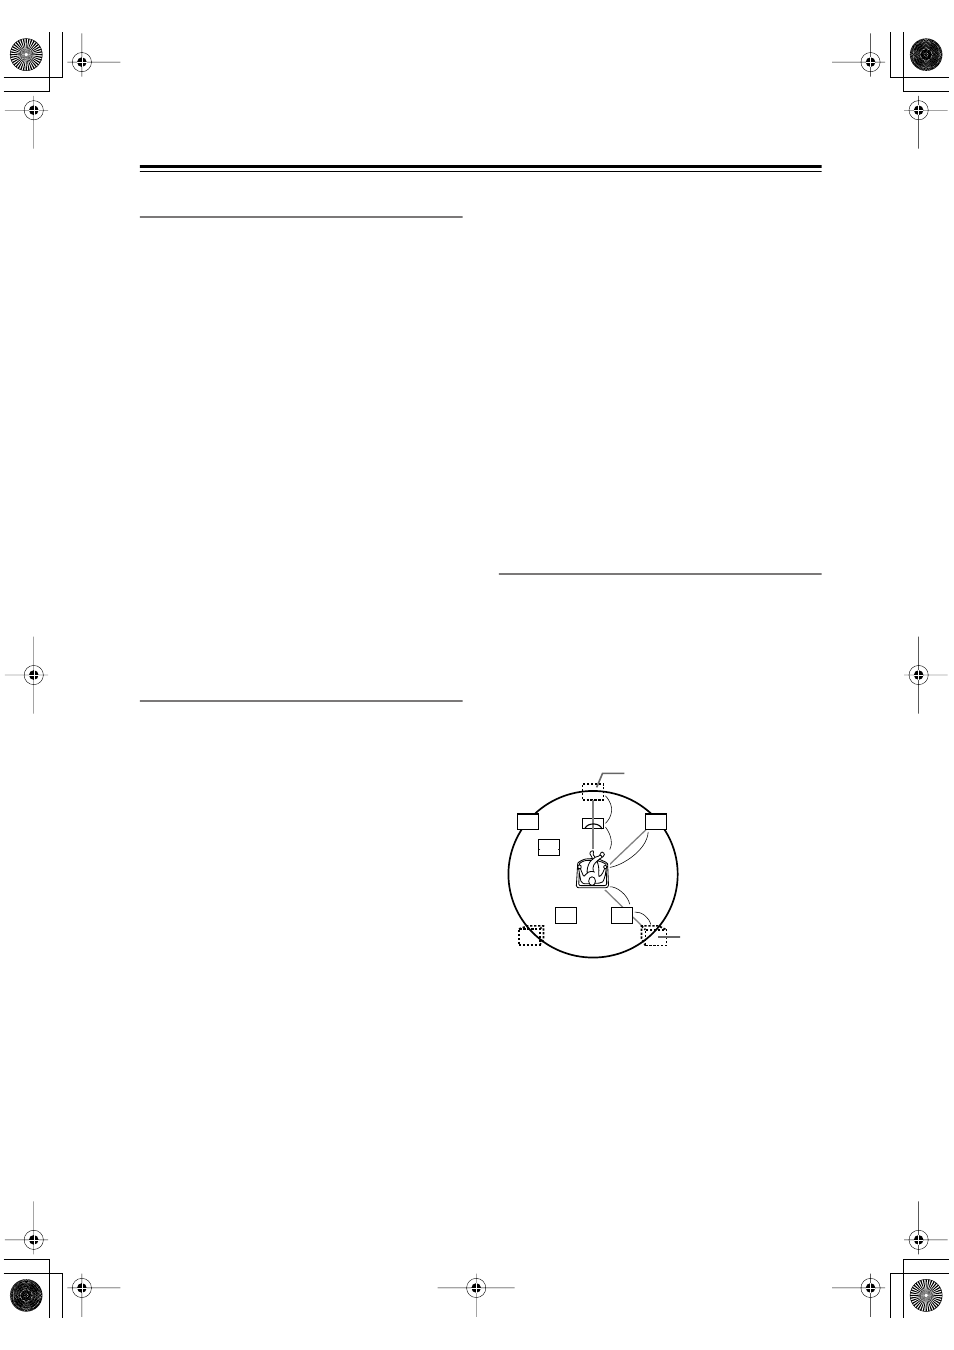
Center Delay and Surr. Delay
With these settings, you can adjust the multichannel out-
put signals relative to the listening position.
For 5.1-channel surround playback, ideally your speak-
ers should all be the same distance away from the listen-
ing position, but this isn’t always practical. By setting a
delay time for the center and surround speakers, you can
adjust their virtual positions without having to physically
move them, creating the ideal listening environment. The
diagram below shows the ideal locations for the center
and surround speakers.
■
Center Delay
Center Delay (A) = Df – Dc
No Delay (default):
When Df equals Dc.
1msec:
When (A) is approx. 1 ft. (0.3 m)
2msec:
When (A) is approx. 2 ft. (0.6 m)
3msec:
When (A) is approx. 3 ft. (0.9 m)
4msec:
When (A) is approx. 4 ft. (1.2 m)
5msec:
When (A) is approx. 5 ft. (1.5 m)
FL
SW
FR
SL
SR
(A)
(B)
Ds
Df
Dc
Ideal location of center speaker
All speakers should be
located within the circle
with a radius of Df.
Ideal location of a
surround speaker