Connecting the ht-r520 —continued, Connecting onkyo components, Video s video – Onkyo HT-R520 User Manual
Page 30: Video 1, Dvd in, Rout
30
Connecting the HT-R520
—Continued
With
(Remote Interactive) you can control your
-compatible Onkyo CD player, DVD player, and so
on with the HT-R520’s remote controller, and use the
following special
functions:
Auto Power On/Standby
When you start playback on a component connected via
, if the HT-R520 is in Standby, it will turn on and
select that component as the input source automatically.
Similarly, when the HT-R520 is set to Standby, all com-
ponents connected via
also enter Standby. This func-
tion will not work if the component’s power cord is
connected to the HT-R520’s AC OUTLET.
Direct Change
When playback is started on a component connected via
, the HT-R520 automatically selects that component
as the input source. If your DVD player is connected to
the HT-R520’s multichannel input, you must press the
[MULTI CH] button to enjoy all channels (see page 33).
This is because the Direct Change
function only
selects the FRONT DVD IN sockets.
Remote Control
You can use the HT-R520’s remote controller to control
other
-compatible Onkyo components.
Notes:
• Push plugs in all the way to make good connections.
• Use only
cables for
connections.
cables
are supplied with Onkyo players (DVD, CD, etc.).
• Some components have two
sockets, you can con-
nect either one to the HT-R520. The other is for con-
necting additional
-compatible components.
• Connect the HT-R520’s
socket to only Onkyo
components. Connecting to other manufacturer’s
components may cause them to malfunction.
• Some components may not support all
functions.
Refer to the manuals supplied with your components.
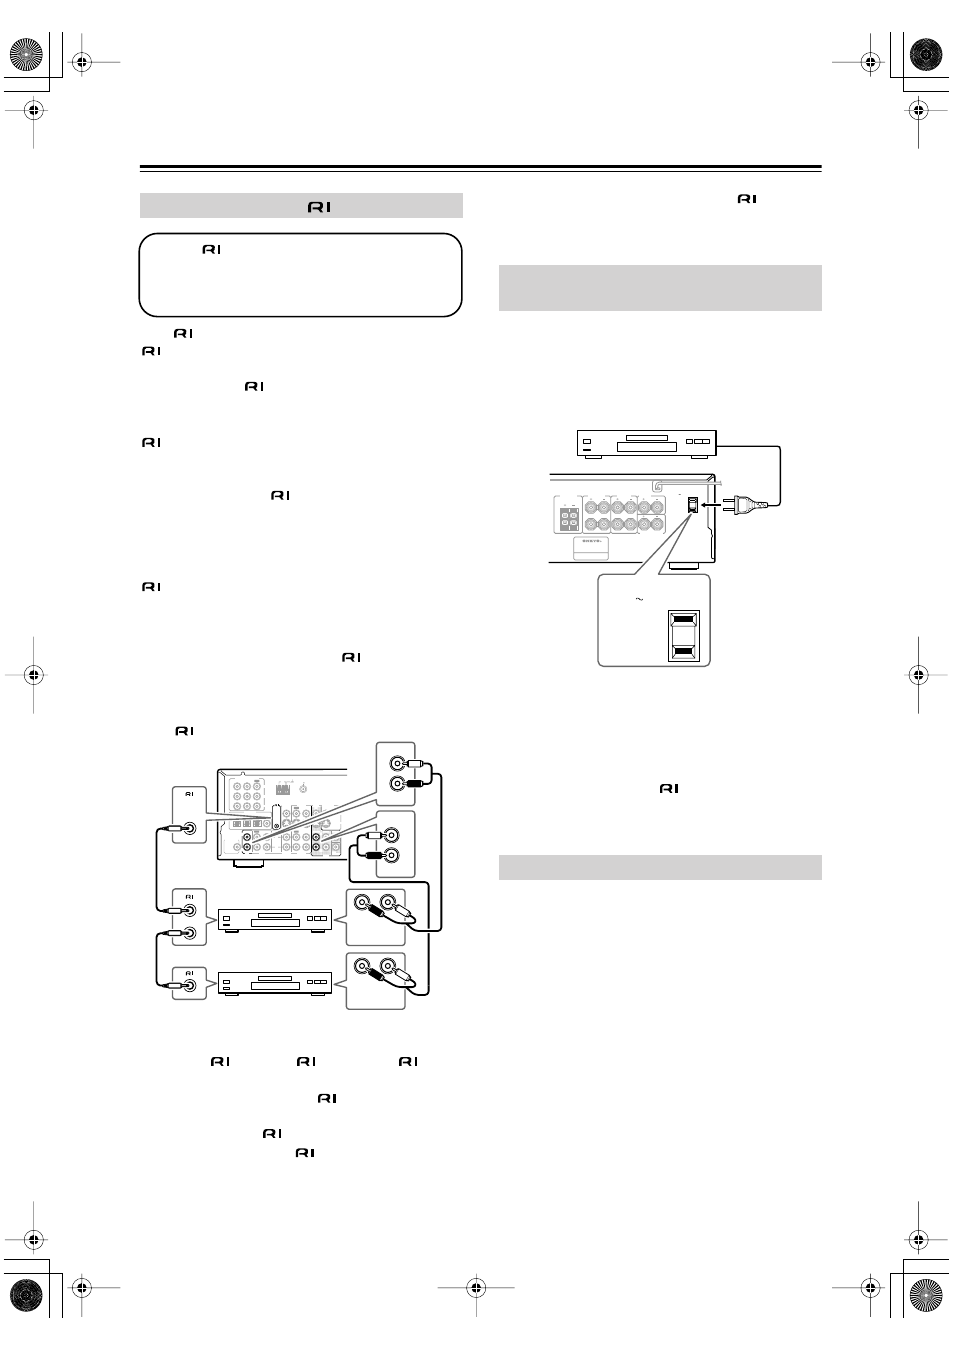
The HT-R520 has AC outlet on its rear panel for con-
necting the power cord of another AV component. The
other component’s power switch can be left in the ON
position so that it turns on or off when the HT-R520 is
set to On or Standby.
Caution:
• Make sure that the capacity of the component that you
connect to the AC OUTLET does not exceed the stated
capacity (e.g., 100 W).
Note:
• Onkyo components with
sockets should be con-
nected to regular wall outlets.
Notes:
• Before connecting the power cord, connect all of
your speakers and AV components.
• Turning on the HT-R520 may cause a momentary
power surge that might interfere with other electrical
equipment on the same circuit. If this is a problem,
plug the HT-R520 into a different branch circuit.
Connecting Onkyo
Components
To use
, you must make an analog audio
connection (RCA) between the HT-R520 and
the other component, even if they are con-
nected digitally.
L
R
ANTENNA
FM
75
AM
OPTICAL
COAXIAL
1
2
3
DIGITAL IN
REMOTE
CONTROL
IN
IN
IN
IN
IN
IN
IN
IN
FRONT
SURR
CENTER
SUB
WOOFER
OUT
OUT
OUT
VIDEO 2
VIDEO 1
DVD
MONITOR
OUT
VIDEO
S VIDEO
DVD
TAPE
CD
L
R
VIDEO 2
VIDEO 1
SUBWOOFER
PRE OUT
VIDEO 1
/ 2 / 3IN
DVD IN
COMPONENT VIDEO
Y
P
B
P
R
OUT
L
R
L
R
FRONT
DVD
L
R
IN
CD
L
R
REMOTE
CONTROL
ANALOG
AUDIO OUT
L
R
ANALOG
AUDIO OUT
e.g., CD player
e.g., DVD player
Connecting the Power Cords of Other
Components
Connecting the Power Cord
AV RECEIVER
MODEL NO.
HT-R
520
AC OUTLET
AC 120 V 60 Hz
SWITCHED
120 W 1 A MAX.
R
L
R
L
FRONT
SPEAKERS A
Class 2 Wiring
SURROUND
SPEAKERS
CENTER
SPEAKER
SURROUND BACK
SPEAKER
FRONT
SPEAKERS B
R
L
AC OUTLET
AC 120 V 60 Hz
SWITCHED
120 W 1 A MAX.