Installation, Caution – Rinnai 37AHB SERIES User Manual
Page 19
Rinnai Corporation Hydronic Furnace (37AHB) Manual
19
START-UP PROCEDURE (HEATING ONLY):
The following conditions must be met prior to unit start
-up.
Debris from soldering and/or other installation
activities can cause equipment failure. Ensure that all
associated lines and appurtenances are free of debris.
Check to ensure that unit is secure.
Check that blower wheel rotates freely within the scroll
housing.
Check all wiring to ensure that connections are tight.
Check all ductwork and pipe connections to ensure
proper seal.
Check to ensure that all packaging wraps are removed
from equipment.
Ensure that front access doors are properly installed.
Check to ensure proper connections to the appropriate
blower speed tap (Heat /Cool – High and Low). Refer
to Air Delivery and Capacity Charts and/or the
appropriate wiring diagram in this manual.
Perform all safety and start-up checks for Tankless
Water Heater as per manufacturer’s instructions.
Having verified all preceding checks, the Furnace’s
Start-Up Procedure is as follows:
STEP 1:
Purge and fill system; follow appropriate
purging procedure as laid out in this manual in section
titled “Purging and Priming the System”.
STEP 2:
Turn on power supply to Furnace. Caution:
blower and/or circulator may start to operate if
thermostat is on and a call is present.
STEP 3:
Turn thermostat on and switch system to the
heating mode. The thermostat shall be set higher than
the actual room temperature; this will cause the
circulator to energize and initiate the heating cycle. (If
the pump does not start, or the Furnace is not
producing heat, refer to the Troubleshooting Section in
this manual).
STEP 4:
Program room thermostat as desired by
homeowner.
START-UP PROCEDURE (COOLING SYSTEM)
Refer to field supplied evaporator coil and outdoor unit
manufacturer’s Installation Instructions for system
hook-up, start-up instructions and refrigerant charging
method details.
TROUBLESHOOTING BLOWER AND/OR PUMP
MOTOR AND CONTROLS
If blower and/or pump motor does not run:
Turn off power and check the following:
1. Check that door switch is in the CLOSED position.
2. Check 3 amp fuse on Printed Circuit Board (PCB).
3. Check for 24 VAC between COM and 24 VAC on
PCB. If no voltage is present, check transformer.
4. Check all connections for kinks which could cause
loose connections. Ensure connections are secure.
5. Verify that approximately 120 VAC is present
across L1 and L2 (refer to wiring diagrams).
If system still fails to start, refer to Figures 20 through
23 for additional help.
Installation
High voltage is at all times present at motor.
Disconnect power to the Hydronic Furnace before
removing or replacing or servicing motor. Wait at
least 5 min after disconnecting power before opening
motor. Failure to follow this CAUTION could result in
minor personal injury or product and property
damage.
CAUTION
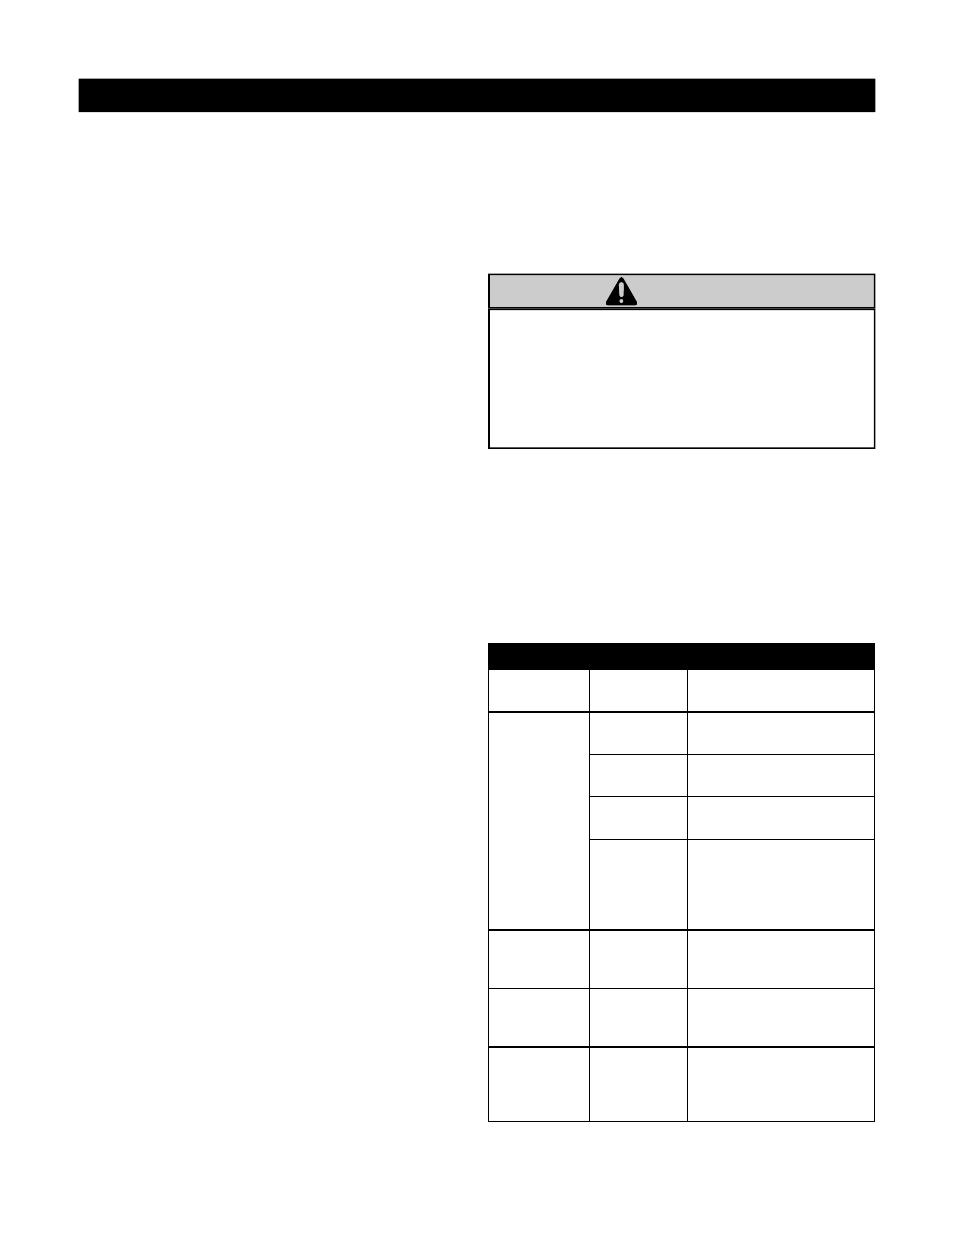
TABLE 2.1: BLOWER MOTOR TROUBLESHOOTING
SYMPTOM
POSSIBLE
CAUSES
CORRECTIVE ACTION
Blown fuse
Turn off motor. Replace
fuse
Incorrect
voltage
Verify motor voltage
matches system voltage
Improper
connections
Turn off motor. Verify
connections
Blower wheel
obstruction
Verify blower wheel is not in
contact with the blower
housing. Readjust blower
wheel position on motor
shaft.
Motor does
not come up
to full speed
Not applied
properly
Check speed taps as per
wiring diagram.
Motor stalls
during
operation
Overload
motor
Check for duct blockage
and/or verify that ducting
system is not restrictive.
Motor vibrates
or is
excessively
noisy
Loose or
defective fan
Turn off motor. Tighten fan
set screw or replace fan.
Motor fails to
start