Finishing – Napoleon Fireplaces PARK AVENUE GD82PT User Manual
Page 17
17
W415-0536 / B / 07.20.06
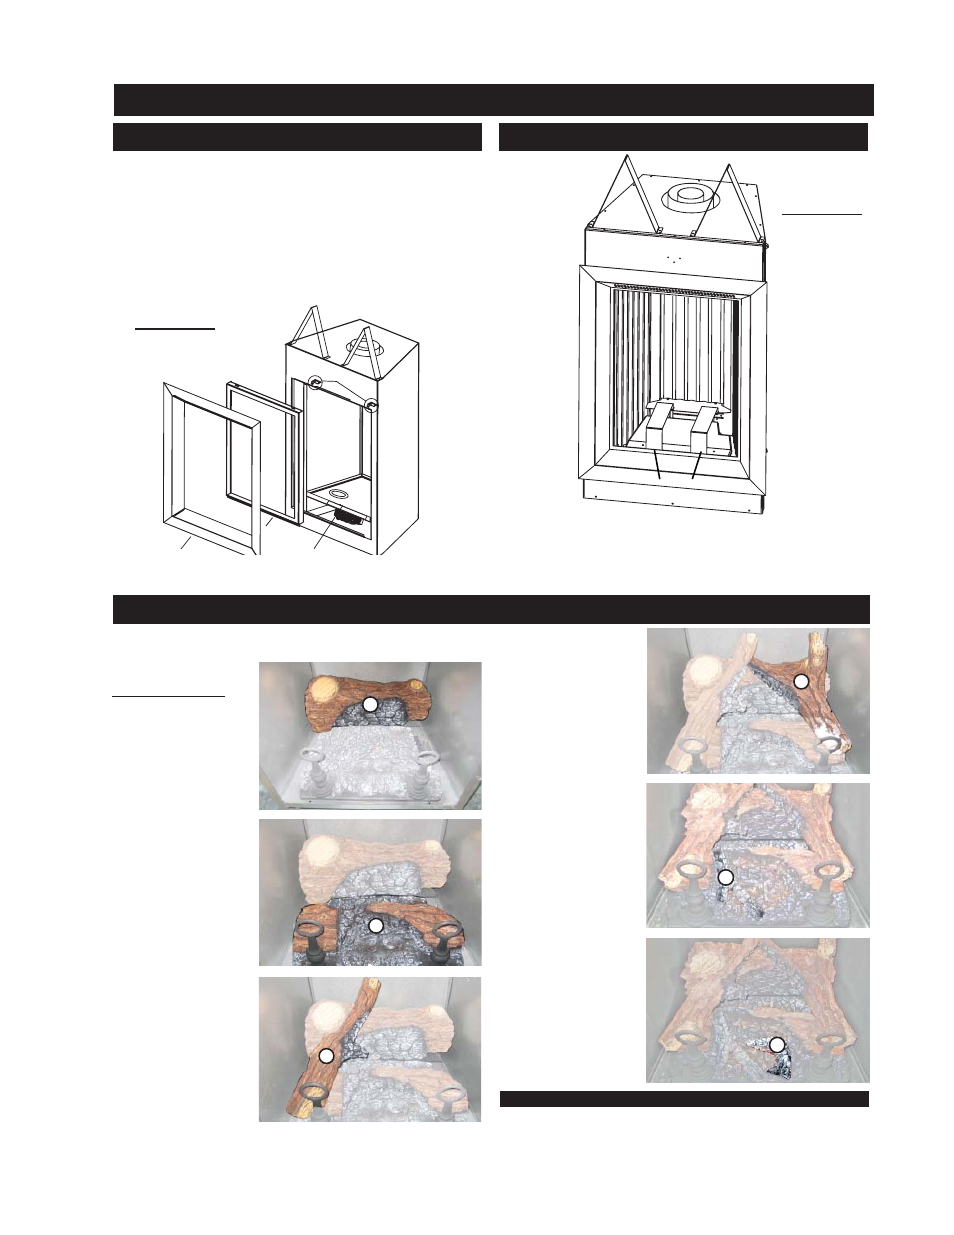
4. Place log #4 with the
charred branch facing
inward. Position the pin
in log #4 into the hole
on the right of log #2.
5. Place log #5 so
the locating hole on
the botttom of the log
sits on the screw and
spacer.
6. Finally, align the
rectangular peg on log
#6 with the notch on
the front right portion
of the burner.
Optional Front
Glass Door
Latches
Retainer
Before the glass door can be removed, the optional front
must be removed.
The glass door is secured to the top front edge of the fi rebox.
Pull the handles of the latches forward, then lift the hooks out
from the slots in the door frame to release the top of the door.
Next, pivot forward until the top edge of the door clears the
front of the fi replace. Next gripping the sides of the door lift
the door out from the retainer along the bottom of the door.
LOG SHIPPING
BRACKET
Before installing the logs, you must fi rst remove the log ship-
ping brackets. Lift up to remove.
LOG SHIPPING BRACKET
DOOR REMOVAL
FINISHING
Decorative brick panels must be installed before the logs.
See installation instructions supplied with the panel kit.
LOG PLACEMENT
PHAZER
TM
logs, exclusive to Napoleon Fireplaces, provide
a unique and realistic glowing effect that is different in every
installation.
1. Place the rear log #1
onto the locating studs
along the back edge of
the PHAZERAMIC™
burner.
2. Position log #2 in the
2 locating holes behind
the andirons.
3. Place log #3, with
the charred branch fac-
ing inward. Position the
pin in log #3 into the
hole on the left of the
log #2.
GLOWING EMBERS
2
3
4
1
FIGURE 36 A-F
FIGURE 34
FIGURE 35
Glowing embers are NOT recommended. The burner has
been designed to achieve maximum glow without embers.
5
6