Other speaker setup options, Optional connections, Attaching to a wall – Panasonic SC-HT830V User Manual
Page 43: Fitting speaker stands (not included)
43
RQT7921
Other speaker setup options
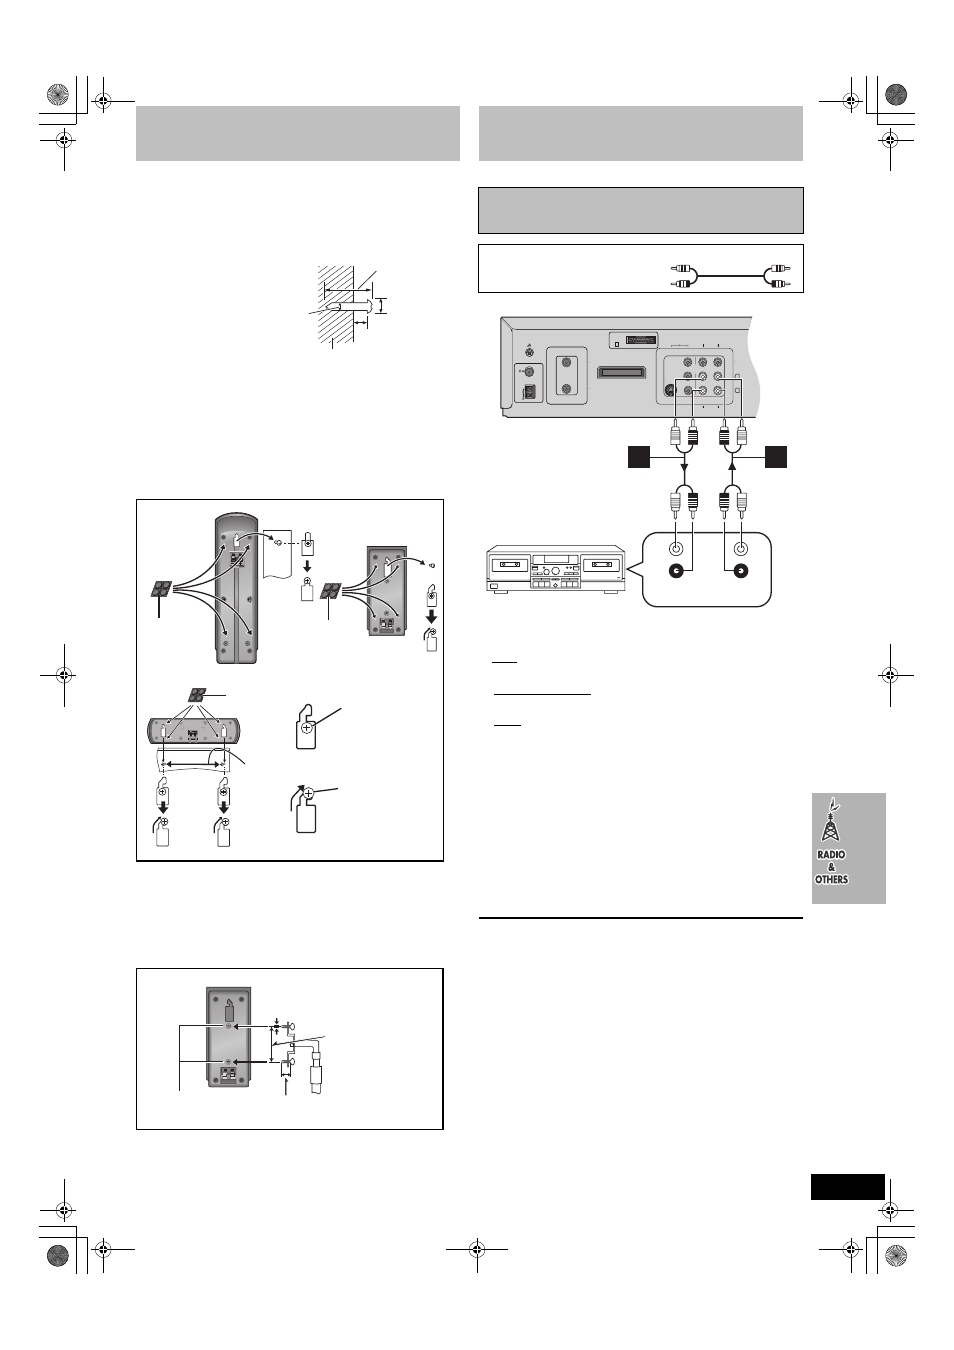
∫ Attaching to a wall
1 Drive a screw (not included) into a wall.
2 Attaching 4 rubber pads to the rear of the speaker.
3 Fit the speaker securely onto the screw(s) with the
hole(s).
[Note]
≥The wall or pillar on which the speakers are to be attached should be
capable of supporting 10 k
g (22 Ibs) per screw.
Consult a qualified building contractor when attaching the speakers to
wall. Improper attachment may result in damage to the wall and
speakers.
≥Use of optional speaker cables is recommended for wall-mounted
front speakers. (You can also remove the speaker cables from the
pipes supplied with this system).
∫ Fitting speaker stands (not included)
Ensure the stands meet these conditions before purchasing them.
Note the diameter and length of the screws and the distance between
screws as shown in the diagram.
≥The stands must be able to support over 10 kg (22 Ibs).
≥The stands must be stable even if the speakers are in a high
position.
30–35 mm
(1
3
/
16
q–1
3
/
8
q)
‰7.5–9.4 mm
(
19
/
64
q–
3
/
8
q)
7.0–9.0 mm
(
9
/
32
q–
11
/
32
q)
Wall or pillar
‰3.0–4.0 mm
(
1
/
8
q–
5
/
32
q)
Center speaker
e.g.
In this position, the
speaker will likely fall
if moved to the left or
right.
Move the speaker
so that the screw is
in this position.
Surround speaker
.....
180 mm
(7
1
/
16
z)
Front speaker
Rubber pads
Rubber pads
Rubber pads
Speaker stand
(not included)
Plate thickness plus 7 mm to
10 mm (plus
9
/
32
q to
13
/
32
q)
Surround speaker
e.g.
5 mm (
3
/
16
q),
pitch 0.8 mm (
1
/
32
q)
Attach the stands to
these metal screw holes.
60 mm (2
3
/
8
q)
Optional connections
[A] You can record sound from discs, video cassette
tapes, or radio, etc., to a tape deck.
1 Discs
Press [DVD/VHS] to select “DVD/CD” as the source.
Video cassette tapes
Press [DVD/VHS] to select “VHS” as the source.
Radio
Press [FM/AM] to select “FM” or “AM”.
2 Start recording and play.
Refer to the manual of the other unit for details.
[B] You can play back the sound from a tape deck/laser
disc player, etc., through this unit’s speakers.
1 Press [VHS] to put the remote control in VHS mode.
2 Press [DVD/VHS] to select “VHS” as the source.
3 Press [
W CH] or [X CH] to select “AV” channel.
4 Start playback from the external source. (For details, refer to
external unit’s operating instructions manual.)
When connecting a record player
We recommend using a record player with a built-in phono equalizer. If
your player doesn’t have a built-in equalizer, connect it first to a
separate equalizer and then to the unit.
Listening to an external source/
Recording to other equipment
Audio cable (not included)
White
(L)
Red
(R)
RF IN
RF OUT
LOOP
EXT
75
AM
ANT
FM
ANT
LOOP
ANT
GND
A
DIGITAL
TRANSMITTER
DVD/VHS
EXT
DVD
L
R
COMPONENT
VIDEO OUT
Y
P
B
/
C
B
P
R
/
C
R
S-VIDEO
OUT
IN
OUT
VIDEO
TO
SB-WA830
PLAY
OUT
REC
IN
A
B
L
R
RQT7921-P_ENG.book 43 ページ 2005年2月4日 金曜日 午後4時58分