Setting the receiver, Setti ng the re ceiv er, En gl is h – Panasonic Sa-xr57 User Manual
Page 32: Changing the digital input settings, Setting input signals, Making bi-amp settings
32
RQT8552
Setting the receiver
See page 30 for receiver operations.
AUTO SPEAKER
DETECTOR
ADVANCED
DUAL AMP BI-AMP
SPEAKERS
A
B
AUTO SPEAKER
DETECTOR
MULTI CH
SURROUND
AUX
S VIDEO IN VIDEO IN
L
AUDIO IN
R
MENU
SETUP
RETURN
INPUT SELECTOR
ENTER
VOLUME
HDMI
TUNE
MENU
SETUP
RETURN
INPUT SELECTOR
ENTER
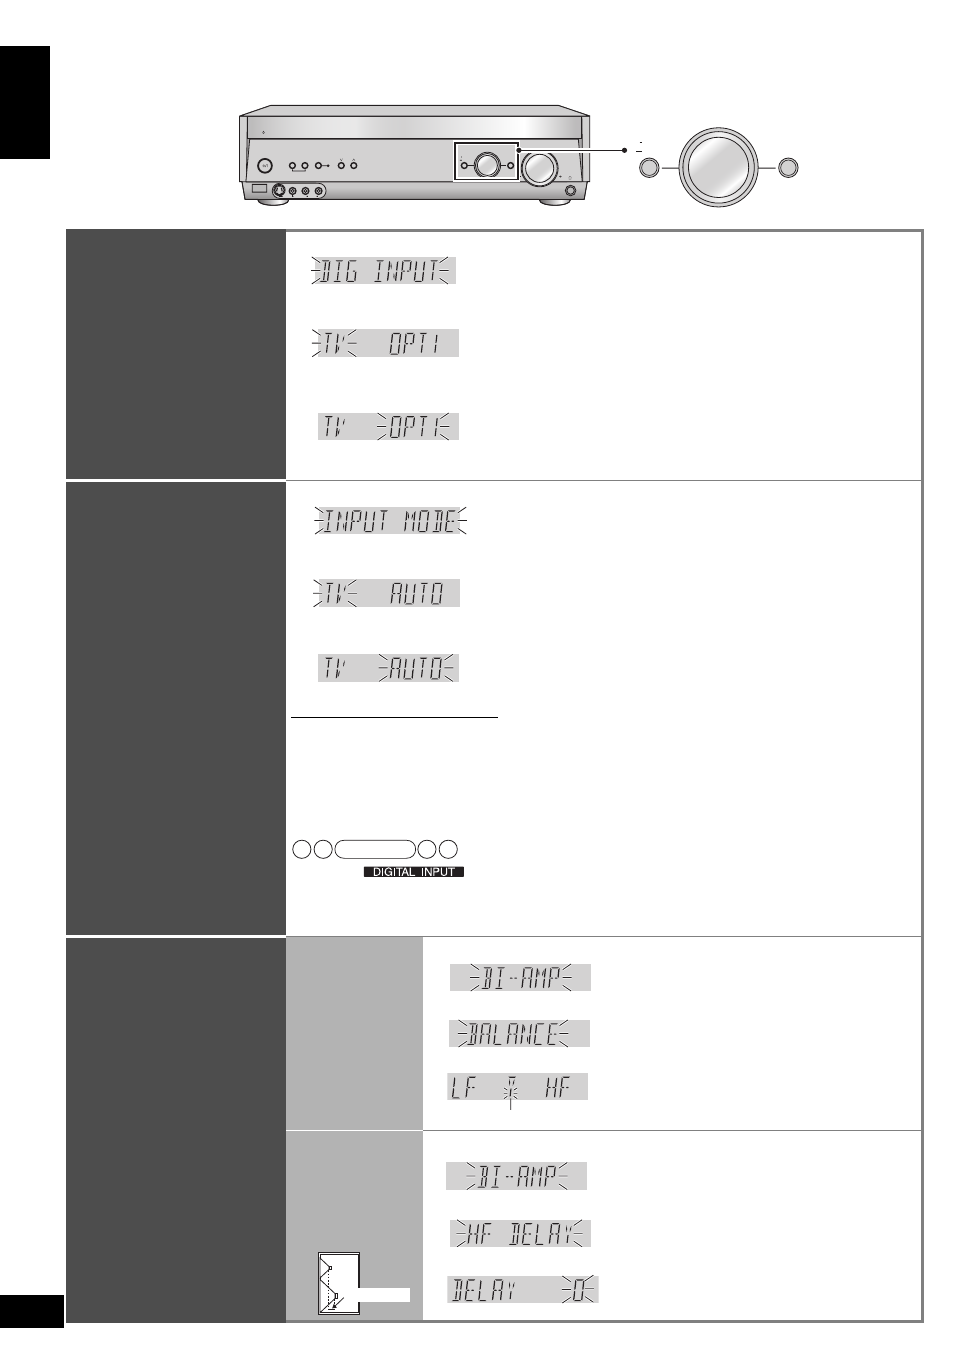
Changing the digital
input settings
• Change these settings to suit
the connections you have made
to the optical (OPT) and coaxial
(COAX) digital input terminals.
(á pages 6, 7, 9 and 13)
• You can only allocate one piece
of equipment per terminal.
(Example) “OPT 1 ” becomes the
only digital terminal you can use
for connecting the DVD player to
the unit when you change the
DVD setting to the terminal.
1 Select and confirm the choice.
2 Select the equipment connected to the digital
input terminal and confirm the choice.
3 Change the digital input setting and confirm the
choice.
Repeat steps 2 and 3 to change settings.
TV : TV
DVR : DVD recorder
DVD : DVD player
CD : CD player
Factory setting:
TV : OPT1 (OPTICAL 1)
DVR : OPT2 (OPTICAL 2)
DVD : COAX1 (COAXIAL 1)
CD : COAX2 (COAXIAL 2)
Setting input signals
• This unit automatically
detects whether input is
digital or analogue, but you
can fix the input mode.
• Select “AUTO ” when it is
not necessary to fix the
signal.
1 Select and confirm the choice.
2 Select the equipment connected to the digital
input terminal and confirm the choice.
3 Select the method for identifying input signals
and confirm the choice.
Repeat steps 2 and 3 to change settings.
Note regarding PCM FIX mode
• In rare cases, the unit may have trouble recognizing the digital signals on discs.
• With the PCM signals on CDs, this may cause the beginning of a
track to be cut off. Engage the PCM FIX mode if this occurs.
• This setting is not necessary when playback is normal.
• When PCM FIX mode is on, the unit cannot process other signals.
This may cause noise to be output. Select another mode in this case.
TV : TV
DVR : DVD recorder
DVD : DVD player
CD : CD player
AUTO : Automatic identification of
digital and analogue signals
(HDMI takes priority when
the input signal is digital.)
ANALOG : Fixes the input signal
to analogue and plays.
DIG : Fixes the input signal to
digital and plays.
PCMFIX : Fixes the input signal
to PCM and plays.
Factory setting:
TV, DVR ,DVD, CD : AUTO
• The sign “
” appears constantly on the display when you fix the input signal as digital.
• The sign “
PCM” appears on the display when you set the input signal as “PCMFIX ”.
• When an input position is set to PCM FIX, and the input signals are not from a PCM source,
“
PCM FIX ” flashes on the display.
Making bi-amp settings
• Bi-amp settings appear on
the display and become
selectable only when you
make bi-wiring settings for
the front speakers
(á page 31).
• You can adjust HF (high
frequency) and LF (low
frequency) output balance
of the bi-wired speakers.
• You can reduce the delay
time due to the difference in
size of the HF and LF units.
Adjusting the
balance
1 Select and confirm the choice.
2 Select and confirm the choice.
3 Make adjustment and confirm the choice.
The bar shows the standard balance.
LF : Low frequency
HF : High frequency
Correcting the
HF and LF
difference
1 Select and confirm the choice.
2 Select and confirm the choice.
3 Make adjustment and confirm the choice.
Adjustment range:
0 to 30 cm
• You can select differences at
1 cm intervals.
Factory setting:
0 cm
Note
Difference
Speaker
(Side view of a speaker
in cross section)
cm
Setti
ng
the re
ceiv
er
E
N
GL
IS
H