Radio, Station preset, Preset station calling – Panasonic CQ-C1300U User Manual
Page 6: Radio mode, Band, Tuning, Display change
18
CQ-C1300U
CQ-C1300U
19
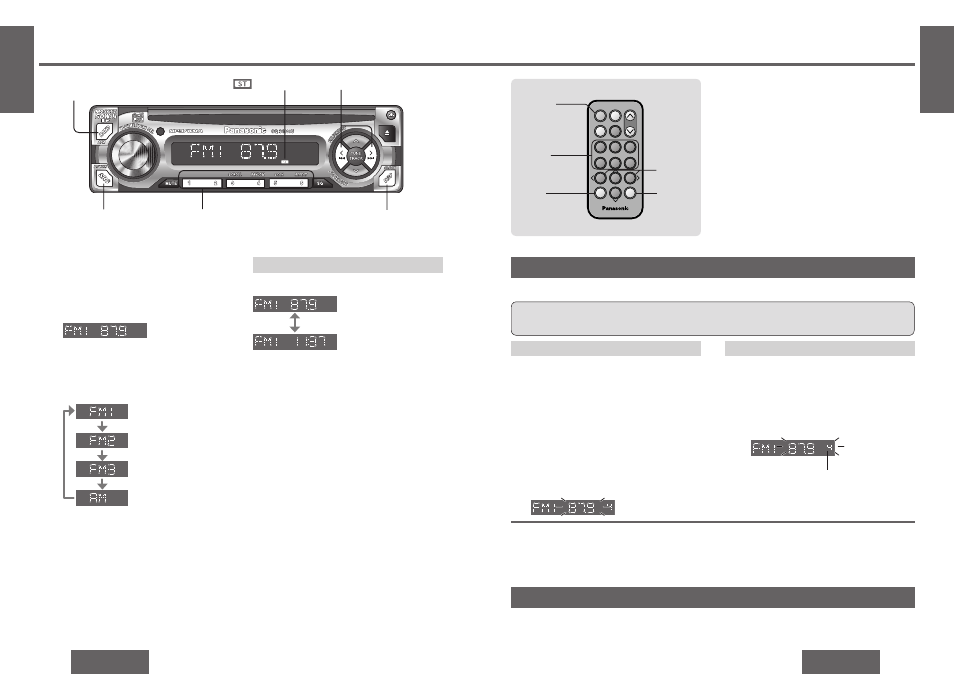
Radio
[
%] [$] (TUNE)
Caution:
≥ To ensure safety, never attempt to preset stations while you are driving.
E
N
G
L
I
S
H
5
E
N
G
L
I
S
H
6
Preset buttons [1] to [6]
(Preset station)
[BAND]
(APM: Auto Preset Memory)
Display Change
Press [DISP] (display).
[SRC] (Source)
6
4
9
7
5
Car Audio
SOURCE
MUTE
POWER
RAND
VOL
3
1
2
DISP
BAND
REP
6
5
SET
SEL
#
SCAN
MENU
NUMBER
8
0
[DISP]
(Display)
[SOURCE]
[
%] [$]
(Tuning)
[BAND]
(Auto preset
memory)
[1] to [6]
(Preset station)
(Stereo) indicator
Radio Mode
Press [SRC] (source) to select the radio
mode.
Radio mode display
1
Band
Press [BAND].
2
Tuning
[
$]: Higher frequency
[
%]: Lower frequency
Press and hold [
%] or [$] for more than
0.5 seconds, then release. Seeking will start.
3
Radio mode display
(default)
Clock display
[DISP]
(Display)
Frequency
Band
Auto Preset Memory (APM)
Automatically save stations with good reception in
the preset memory.
1
Select a band. (previous page)
2
Press and hold [BAND] (APM: Auto Preset
Memory) for more than 2 seconds.
≥ The 6 stations with good reception will be
automatically saved in the memory under
preset number 1 to 6.
≥ Once set, the preset stations are sequentially
scanned for 5 seconds each. (scanning)
Manual Preset Memory
Manually save a station in the preset memory.
1
Select a band and frequency. (previous page)
2
Press and hold one of the buttons from [1] to [6]
until the display blinks once.
Preset number
Station Preset
Up to 6 stations can be stored in each of the FM1, FM2, FM3 and AM band selections.
Note:
≥ To stop scanning, press one of the buttons from
[1] to [6].
≥ New stations overwrite existing saved stations
after this procedure.
Preset Station Calling
1
Select a band. (previous page)
2
Press one of the preset buttons from [1] to [6].