ProForm PFSY74490 User Manual
Page 14
14
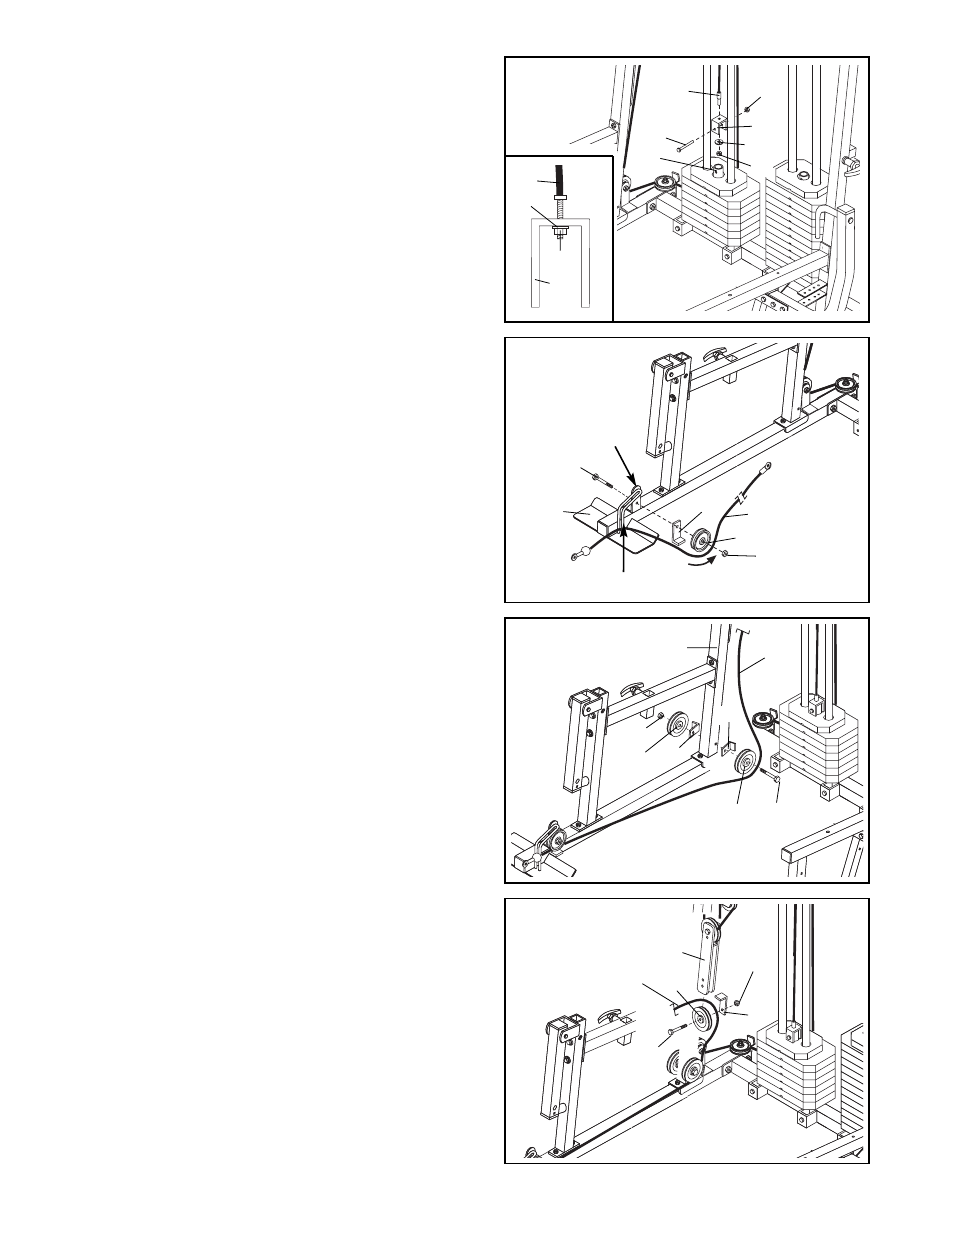
35. Wrap the Low Cable (75) around a 3 1/2” Pulley (24).
Attach two 3 1/2” Pulleys (24) and two Cable Traps
(25) to the Butterfly Upright (1) with a 3/8” x 5” Bolt
(108) and a hand tightened 3/8” Nylon Locknut (50)
as shown.
Do not tighten the Nylon Locknut
before step 37.
35
75
108
24
24
25
50
25
1
36. Wrap the Low Cable (75) over a 3 1/2” Pulley (24) as
shown. Attach the Pulley and a Cable Trap (25) to the
lower hole in the second set of Pulley Plates (23) with
a 3/8” x 2” Bolt (54) and a 3/8” Nylon Locknut (50).
Make sure the Cable Trap is oriented as shown.
36
25
50
54
24
75
23
34. Identify the Low Cable (75). It has a ball on one end
and a loop on the other. Route the end with the loop
through the slot in the cable guide on the Butterfly
Base (4).
Route the Low Cable (75) under a 3 1/2” Pulley (24).
Attach the Pulley and a Cable Trap (25) to the brack-
et on the Butterfly Base (4) with a 3/8” x 2” Bolt (54)
and a 3/8” Nylon Locknut (50).
Make sure the Cable
Trap is oriented as shown.
25
Cable Guide
Bracket
54
4
50
75
24
34
33. Attach the bolt at the end of the Ab Cable (74) to a
“U”-Bracket (97) with a 1/4” Flat Washer (71) and a
1/4” Nylon Locknut (68).
Note: Do not completely
tighten the Nylon Locknut; it should be threaded
only two turns onto the bolt, as shown in the
inset drawing.
Attach the “U”-Bracket (97) to the hole in the Short
Weight Tube (17) with a 5/16” x 1 3/4” Bolt (60) and a
5/16” Nylon Locknut (64).
64
97
74
71
60
17
68
33
74
97
71
68