143 integrator mode, 2 example of integrator mode operation – Pioneer MILESTONE 12 User Manual
Page 143
143
Integrator Mode
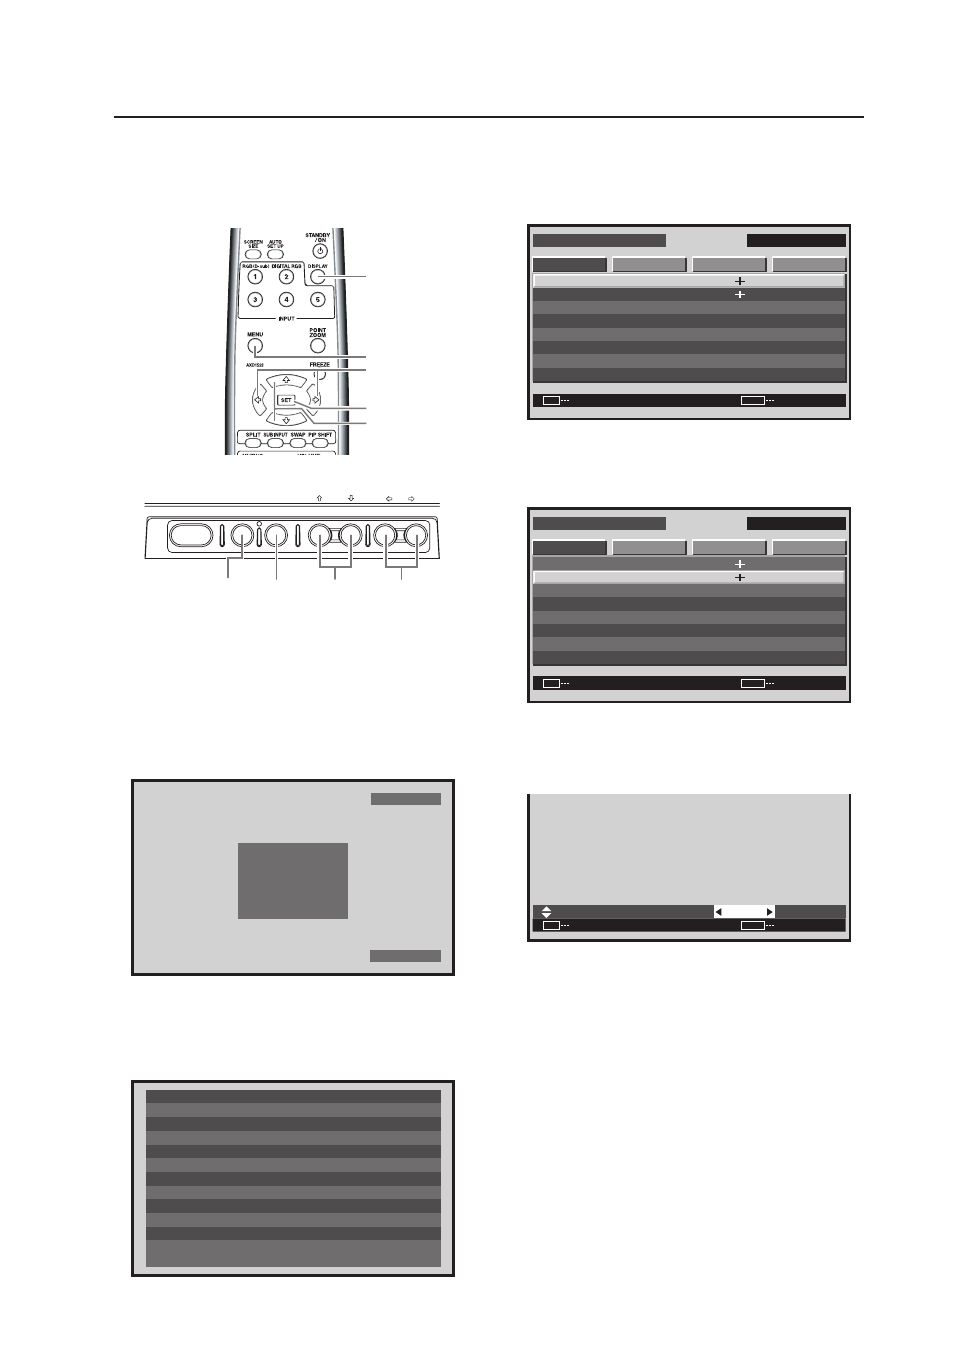
5.4.2 Example of Integrator Mode Operation
The basic operation in the menu mode is explained using
brightness adjustment as an example.
4
Press the [MENU] button on the remote control
unit or the main-control panel when ‘DISPLAY
CALL 2’ is displayed to open up the integrator
mode screen.
I N T E G R AT O R
I N P U T 1
ENTER
S C R E E N
S E T U P
O P T I O N
C O N T R A S T
B R I G H T N E S S
H . E N H A N C E
V . E N H A N C E
G AMMA
P I C T U R E R E S E T
W H I T E B A L A N C E
C O L O R D E T A I L
P I C T U R E
: 1 2 8
: 0
: 0
: 1 2 8
: 2 . 0
SET
EXIT
MENU
5
Press the [
5/∞] buttons on the remote control
unit or the main-control panel to select
‘BRIGHTNESS’ then press the [SET] button.
I N T E G R AT O R
I N P U T 1
ENTER
S C R E E N
S E T U P
O P T I O N
P I C T U R E
SET
EXIT
MENU
: 2 . 0
: 1 2 8
: 0
: 0
: 1 2 8
C O N T R A S T
B R I G H T N E S S
H . E N H A N C E
V . E N H A N C E
G AMMA
P I C T U R E R E S E T
W H I T E B A L A N C E
C O L O R D E T A I L
6
Press the [
2/3] buttons on the remote control
unit or the main-control panel to adjust to the
desired picture.
B R I G H T N E S S
:
SET
SET
EXIT
MENU
0
It is possible to move to other adjustment items
with the
5/∞ buttons.
7
Press the [SET] button on the remote control
unit or the main-control panel.
The adjusted value is saved in memory then
operation returns to the screen in step 5.
To continue with adjusting another item, repeat
steps 5 to 6.
8
When adjustment is complete, press the [MENU]
button on the remote control unit or the main-
control panel button to return to the normal
screen.
STANDBY/ON
MENU
DISPLAY
/ SET
– VOL +
INPUT SCREEN SIZE
2/3
MENU DISPLAY
/ SET
5/∞
MENU
5/∞
SET
2/3
DISPLAY
Main-control panel
Remote control unit
1
Set the device to normal operation then press
the [INPUT] button to switch to the input to be
adjusted.
2
Press the [DISPLAY] button on the remote
control unit or the main-control panel to display
‘DISPLAY CALL 1’.
FULL
6 4 0
X
4 8 0
I N P U T 1
F H : 3 1 . 5 k H z
F V : 6 0 . 0 H z
P O L . H : N E G A
P O L . V : P O S I
3
Press the [DISPLAY] button on the remote
control unit or the main-control panel (three
seconds or more) when ‘DISPLAY CALL 1’ is
displayed to display ‘DISPLAY CALL 2’.
T E M P E R AT U R E
H O U R M E T E R
O S D
B AU D R AT E
I N F O R M AT I O N
: A B C D E F G H I J K L M N
FA N C O N T R O L
I D N O. S E T
C O L O R M O D E
: + 2 5
: AU TO
: 9 6 0 0 B P S
: O N
: A L L
: N O R M A L
: 0 0 2 3 9 H
DAT E
: 0 0 1 A 0 0 1 X
L OT
: 0 0 1 A 0 0 1 K
S E R I A L N O.
: * * * * * * * * * * * * * * * *
P D P - 6 0 7 C M X