Docupen color calibration procedure, Docupen color calibration procedure (continued) – Planon System Solutions DocuPen RC810 User Manual
Page 15
DocuPen Color Calibration procedure
Before starting the calibration procedure please make sure that you have downloaded
our latest DocuPen PenTwain drivers. You can download the drivers from the installa-
tion CD or from the following link: http://www.planon.com/drivers.php
The DocuPen is factory calibrated and there should be no need to re-calibrate. We
advise you to recalibrate only if you experience poor scan quality, e.g. scanned image
appear in white or black.
1. Connect the DocuPen to your computer using the USB cable.
2. Start the Paperport software.
3. Press and hold the left Shift and Ctrl
keys on your keyboard and then click
the Scan button within the Paperport
window.
The DocuPen Scanner Control window
will appear with the Calibration function
enabled.
4. In the DocuPen Scanner Control
Window, click on Options and select the
Calibration function. If you don't see the
Calibration function please repeat step 3.
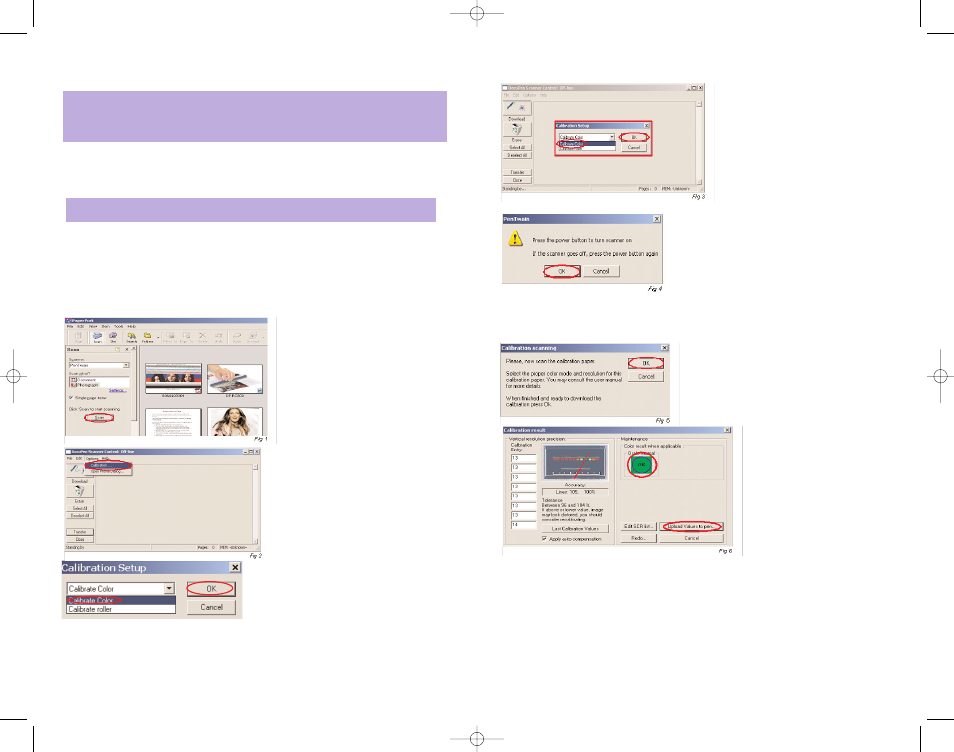
3. In the Calibration Setup window that
appears please Calibrate Color and click OK.
4. You will be prompted to turn the DocuPen ON. Press the Power On button on your
DocuPen and Click OK in the Dialog window.
DocuPen Operation Manual 24
Note:
In order to perform Color Calibration you need to print out the Color
Calibration sheet. You can download the file from the installation CD or from the link:
http://www.planon.com/drivers.php. Please print the color calibration sheet on photo
paper in landscape mode.
Note:
Your DocuPen must be
CONNECTED
to your PC before starting the
Calibration procedure
DocuPen Color Calibration procedure (continued)
5. In the Calibration Setup dialog win-
dow - Select Calibrate Color and con-
firm by clicking the OK button
6. You will be prompted to turn the DocuPen
ON. Press the Power On button on your
DocuPen and Click OK in the PenTwain Dialog
window
7. After the memory has been formatted the Calibration scanning dialog window will
appear. Please disconnect the DocuPen from the USB cable and position it on top of
the Color Calibration sheet. Please scan the sheet in photo mode and high resolution.
8. The DocuPen will now save the Calibration
image into memory. After the image is saved,
please re-attach the DocuPen to the USB
cable. Now press the Power ON button on
the DocuPen and click the OK button within
the Calibration scanning dialog window
9. The Calibration result dialog
window will appear. You should
see the calibration values to the
left and a Green OK sign to the
right
10. Finally, click Upload Values to pen button in the Calibration result dialog window to
send the calibration result to the DocuPen. You will be prompted to turn the
DocuPen ON. Press the Power ON button on the DocuPen and click OK in the dialog
window - this will store the new values.
You have successfully recalibrated your DocuPen!
DocuPen Operation Manual 25
RC810 850 Operating Manual:opman_eng_rc800_022006_eng.qxd 05/06/2008 9:30 AM Page 15