33 en – Philips BDP7200 User Manual
Page 33
33
EN
C
onnec
tions
Pla
yback
F
unc
tion
S
e
tup
O
thers
In
tr
oduc
tion
Basic
S
etup
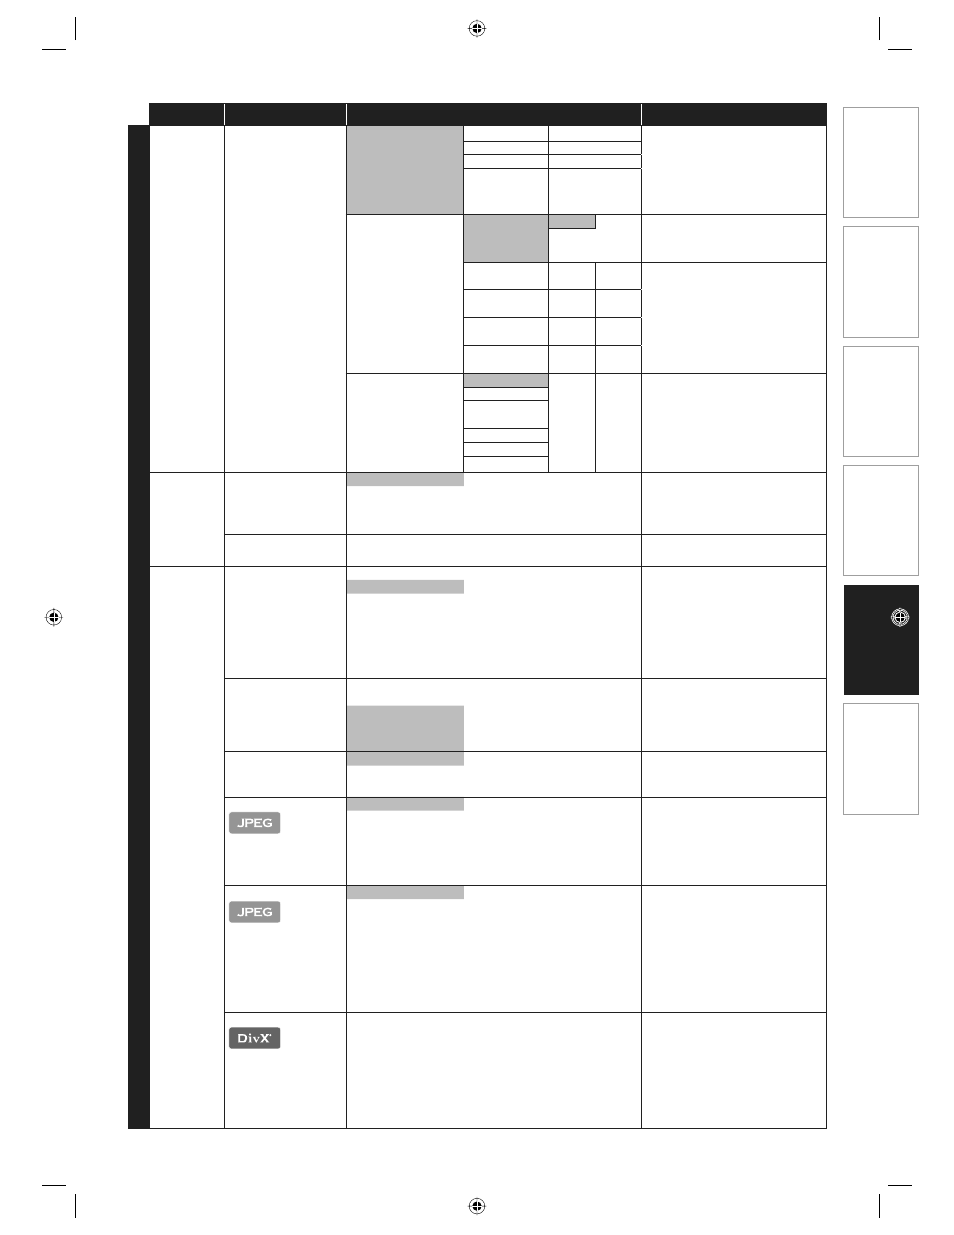
Category
Menus
Options/Sub-Menus
Description
A
d
v
anc
ed S
etup
Audio
Analog Audio
When HDMI cable
is connected, make
sure “HDMI Audio”
setting is set to
“Off” to change the
“Analog Audio”
setting.
•
Speaker Setup
Front (L/R)
Large/Small
Set the speaker configuration to
suite the size/number of your
speakers.
You can also output the test
tone from each speaker by
pressing [Red].
•
Refer to page
38 for more
information.
•
Center
Large/Small/Off
Surround (L/R) Large/Small/Off
Subwoofer
On/Off
Speaker Distance
Unit
Feet
Set the desired measure system.
This measure system will be used
for “Speaker Distance” setting
Meters
Front (L/R)
0-60ft
default
is 10ft
Select the distance from the
listening point to the speaker to
get the ideal delay time.
Center
5-10ft
default
is 10ft
Surround
0-10ft
default
is 10ft
Default
Yes/No default
is “No”
Speaker Level
Front (L)
Set the volume level for each
speaker to get the ideal audio
balance.
Center
Front (R)
0-12dB default
is 0dB
Subwoofer
Surround (R)
Surround (L)
Parental
Refer to
page 38
for more
information.
•
Rating Level
All
Set the rating level for the disc
playback.
8[Adult]
to
1[Kid Safe]
New PIN
Set the new password for the
parental setting.
Others
Auto Standby
On
Set whether to turn off the unit
(to the standby mode)
automatically after 25 minutes of
no action since the screen saver is
activated.
If the screen saver is off, the
unit will be turned off after 30
minutes of no action.
•
Off
Front Panel
Brightness
Bright
Set the brightness of the front
panel display.
When “Auto” is selected, the front
panel display automatically goes
dim during playback.
Dim
Auto
Screen Saver
On
Set whether to activate the
screen saver after 5 minutes of no
action on the unit.
Off
Slide Show Interval
5sec
Set the amount of time for
displaying one picture before
switching to the next one.
For example, select “5sec” to
switch the picture every 5
seconds.
10sec
Slide Show Transition Cut In/Out
Set the visual effect for the slide
show transition mode.
“Cut In/Out”:
The pictures will cut in and out
sharply as playback progresses.
“Fade In/Out”:
The pictures will fade in and out
as playback progresses.
Fade In/Out
DivX® VOD
Your registration code is:
cccccccc
To learn more visit
www.divx.com/vod
This menu item provides you
with the DivX® VOD registration
code. The DivX® registration code
is required when downloading
the DivX® VOD files from the
internet. To learn more about
DivX® VOD, visit
www.divx.com/vod.
E5E10UD_EN.indb 33
E5E10UD_EN.indb 33
12/28/2007 9:25:54 AM
12/28/2007 9:25:54 AM