Multi-function meter, Transmitting, 4 operating basics – Kenwood TS-480SAT User Manual
Page 28: Selecting transmission power, Peak hold readings cannot be deactivated
4 OPERATING BASICS
20
MULTI-FUNCTION METER
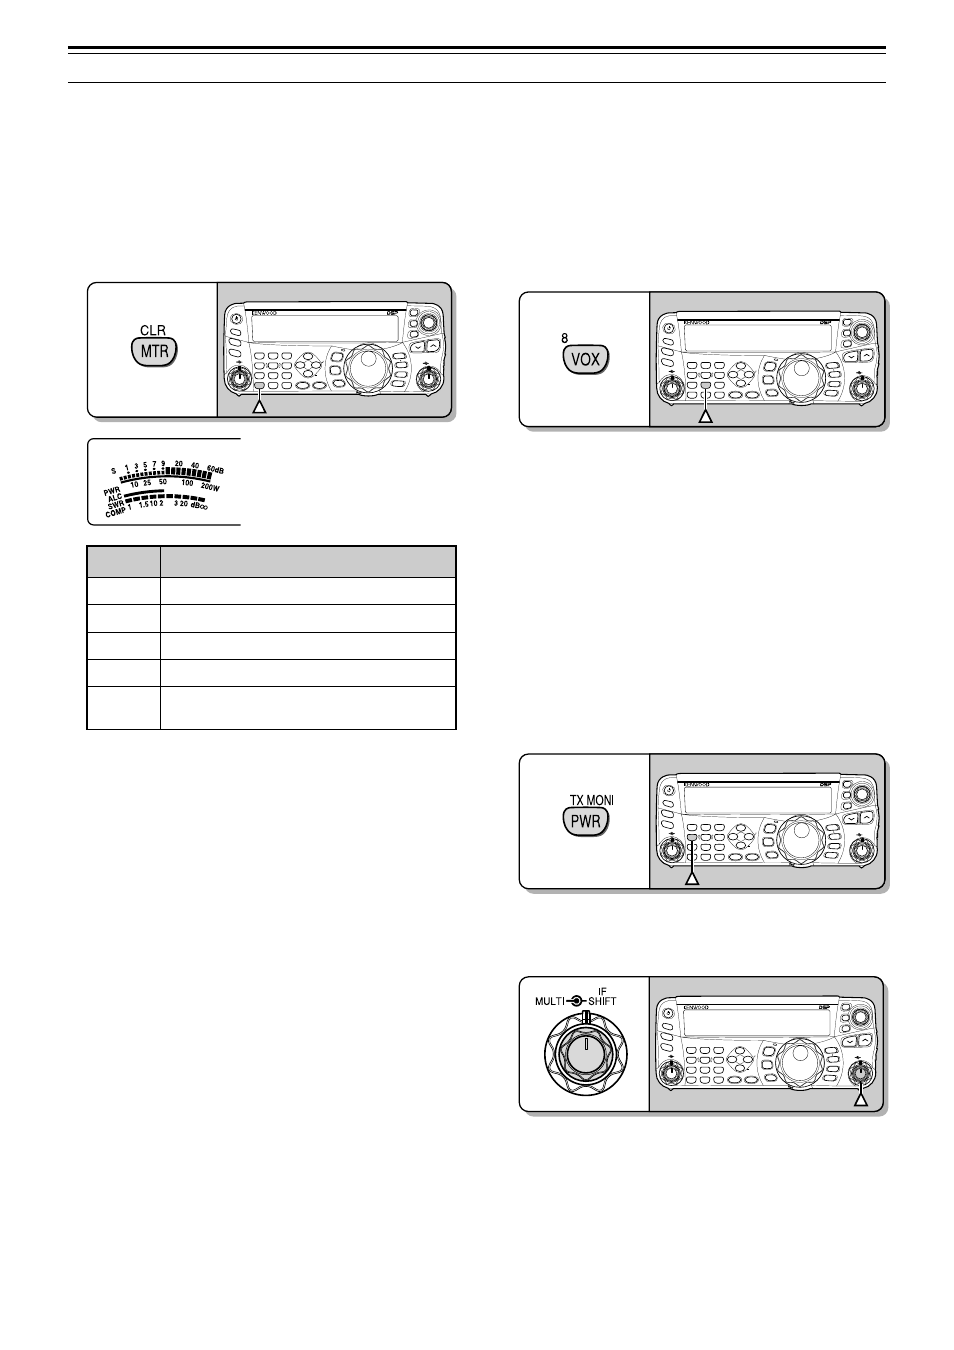
The multi-function meter measures the parameters in
the table below. The S-meter scale appears when
the transceiver is in reception mode, and the PWR
meter appears when it is in transmission mode.
Each time you press [MTR/ CLR], it cycles between
the ALC, SWR, and COMP meters. Peak readings
for the S-meter, ALC, SWR, COMP, and PWR
functions are held momentarily.
NAR
1 REC
2 REC
5 RF.G
0 OFF
8
3 REC
9
4
7
TX MONI
6 DELAY
HF/50MHz ALL MODE TRANSCEIVER TS-480
CLR
STEP
SG.SEL
CW.T
F.LOCK
M/V
SPLIT
M VFO
M.IN
TF-SET
MULTI
IF
SHIFT
AF
SQL
PF
AT
CH1
CH2
CH3
PWR
MIC
KEY
VOX
PROC
AGC
ENT
A / B
A=B
MODE
MHz
QMI
QMR
MENU
MTR
NB/T
ANT 1/2
FINE
SCAN
DNL
BC
NR
FIL
RIT
XIT
CL
ATT/PRE
Multi-function meter
r
e
t
e
M
?
d
e
r
u
s
a
e
M
s
I
t
a
h
W
S
s
l
a
n
g
i
s
d
e
v
i
e
c
e
r
f
o
h
t
g
n
e
r
t
S
R
W
P
r
e
w
o
p
t
u
p
t
u
o
n
o
i
s
s
i
m
s
n
a
r
T
C
L
A
s
u
t
a
t
s
l
o
r
t
n
o
c
l
e
v
e
l
c
i
t
a
m
o
t
u
A
R
W
S
o
i
t
a
r
e
v
a
w
g
n
i
d
n
a
t
s
m
e
t
s
y
s
a
n
n
e
t
n
A
P
M
O
C
g
n
i
s
u
n
e
h
w
l
e
v
e
l
n
o
i
s
s
e
r
p
m
o
c
h
c
e
e
p
S
}
7
3
e
g
a
p
{
r
o
s
s
e
c
o
r
P
h
c
e
e
p
S
e
h
t
Note:
◆
The COMP meter functions only when the Speech Processor is
ON for SSB, FM, or AM mode.
◆
Peak Hold readings cannot be deactivated.
◆
The S-meter responds differently in FM mode, compared to other
modes. This is not a malfunction.
TRANSMITTING
For voice communications, press and hold Mic [PTT],
then speak into the microphone in your normal tone
of voice. When you finish speaking, release Mic
[PTT] to receive.
To transmit CW, press [VOX/ 8] to switch the Break-in
function ON. “VOX” appears. Close the key or keyer
paddle. Connect a key or keyer paddle {pages 7, 15},
then select CW using [MODE] {page 19}.
NAR
1 REC
2 REC
5 RF.G
0 OFF
8
3 REC
9
4
7
TX MONI
6 DELAY
HF/50MHz ALL MODE TRANSCEIVER TS-480
CLR
STEP
SG.SEL
CW.T
F.LOCK
M/V
SPLIT
M VFO
M.IN
TF-SET
MULTI
IF
SHIFT
AF
SQL
PF
AT
CH1
CH2
CH3
PWR
MIC
KEY
VOX
PROC
AGC
ENT
A / B
A=B
MODE
MHz
QMI
QMR
MENU
MTR
NB/T
ANT 1/2
FINE
SCAN
DNL
BC
NR
FIL
RIT
XIT
CL
ATT/PRE
For a detailed explanation on transmitting, refer to
“BASIC COMMUNICATIONS”, beginning on page 27.
SELECTING TRANSMISSION POWER
It is wise to select a lower transmission power if
communication is still reliable. This lowers the risk of
interfering with others on the band. When operating
from battery power, selecting a lower transmission
power allows you more operating time before
recharging is necessary. This transceiver allows you
to change the transmission power even while
transmitting.
1 Press [PWR/ 4/ TX MONI].
•
The current transmission power appears.
NAR
1 REC
2 REC
5 RF.G
0 OFF
8
3 REC
9
4
7
TX MONI
6 DELAY
HF/50MHz ALL MODE TRANSCEIVER TS-480
CLR
STEP
SG.SEL
CW.T
F.LOCK
M/V
SPLIT
M VFO
M.IN
TF-SET
MULTI
IF
SHIFT
AF
SQL
PF
AT
CH1
CH2
CH3
PWR
MIC
KEY
VOX
PROC
AGC
ENT
A / B
A=B
MODE
MHz
QMI
QMR
MENU
MTR
NB/T
ANT 1/2
FINE
SCAN
DNL
BC
NR
FIL
RIT
XIT
CL
ATT/PRE
4
2 Turn the MULTI control counterclockwise to
reduce the power or clockwise to increase the
power.
NAR
1 REC
2 REC
5 RF.G
0 OFF
8
3 REC
9
4
7
TX MONI
6 DELAY
HF/50MHz ALL MODE TRANSCEIVER TS-480
CLR
STEP
SG.SEL
CW.T
F.LOCK
M/V
SPLIT
M VFO
M.IN
TF-SET
MULTI
IF
SHIFT
AF
SQL
PF
AT
CH1
CH2
CH3
PWR
MIC
KEY
VOX
PROC
AGC
ENT
A / B
A=B
MODE
MHz
QMI
QMR
MENU
MTR
NB/T
ANT 1/2
FINE
SCAN
DNL
BC
NR
FIL
RIT
XIT
CL
ATT/PRE
•
The selectable range differs, depending on the
transceiver model, the current band, and the
mode.
3 Press [PWR/ 4/ TX MONI] to complete the setting.
Note:
You may access Menu No. 21, and select “on” to change the
step size from 5 W to 1 W {page 65}.