Admin tool 6 – Ken-A-Vision 7700 User Manual
Page 8
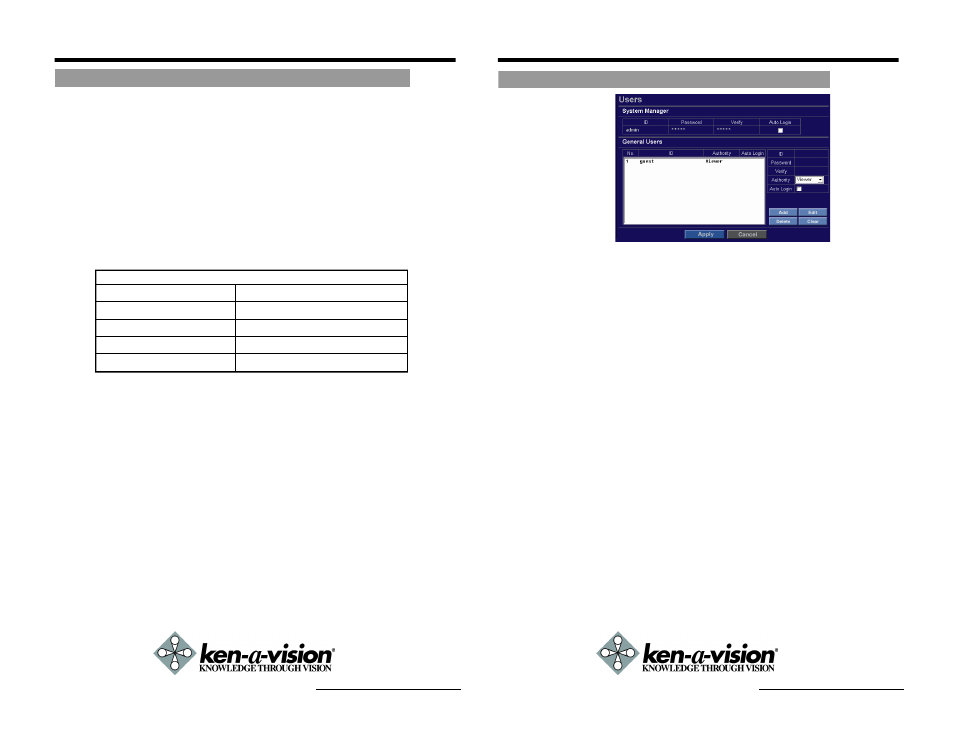
ADMIN TOOL 6
System Manager
Specify an ID and Password for the System
Administrator of the 7700. The System
Administrator will have all rights and privileges
to manage the system.
General Manager
Give access privileges up to 40 separate user
accounts.
w
Only 20 users may be logged on sim
ultaneously, regardless of what user identities
are logged on.
To add a user
Input an ID and Password, verify Password,
select Authority, and click ADD.
To edit a user
Select the user from the list of users, make
necessary changes, click EDIT.
To delete a user
Select the user from the list of users, click
DELETE.
Viewer Authority
This privilege gives the user rights to operate
only the icons associated with digital 2 zoom,
stretch, OSD, and video capture. These
options only affect that current user. The
changes made there will have no effect on the
other users logged on.
Auto Login
Only one user/administrator may have Auto
Login enabled. When the video server is
accessed, it will bypass the login screen and
logon automatically.
Network Video Flex
®
7700 Manual
7700 SETUP 3
This section provides a guide on how to connect the 7700 to your PC/laptop
for initial setup.
Please follow the instructions in the order they appear, without skipping steps.
Do not supply power to the 7700, until instructed.
In order to access the 7700's firmware you will need to connect the 7700
directly to a PC or laptop computer via the supplied crossover cable.
1. Before you begin, you must determine the current network/INTER
NET (TCP/IP) settings on the PC or laptop you plan to use to set up
the 7700. Jot down your entries below for quick reference.
A. For information on how to determine your current settings, see
Appendix A.
2. In order for the 7700 to communicate with your PC, you have to
change your PC's IP address and subnet mask.
A. We recommend that you change your IP address to 192.168.1.11
and change the subnet mask to 255.255.255.0
Leave all other entries (Default Gateway, DNS Servers, etc.)
blank.
B. For information on how to change your IP address and subnet
mask, see Appendix B
3. After you have made the changes to your IP address and subnet
mask, you may then attach the 7700 to your PC via the supplied
crossover cable. Plug in either end of the crossover cable into the
PC's network card and the other end into your 7700.
4. After connecting the PC and 7700 using the crossover cable, power
on the 7700 by plugging in the power supply shipped with the 7700.
5. No longer than 1 minute after powering on the 7700, verify that the
POWER indicator light is solid and the 10M indicator light is flickering
or solid. If they are not, please read the FAQ.
Network Video Flex
®
7700 Manual
Users Tool
7700 Initial Setup via a Crossover Cable
Current TCP/IP Settings
IP Address
Subnet Mask
Default Gateway
1st DNS Server
2nd DNS Server (Option)