Sanyo AHX0952 User Manual
Page 69
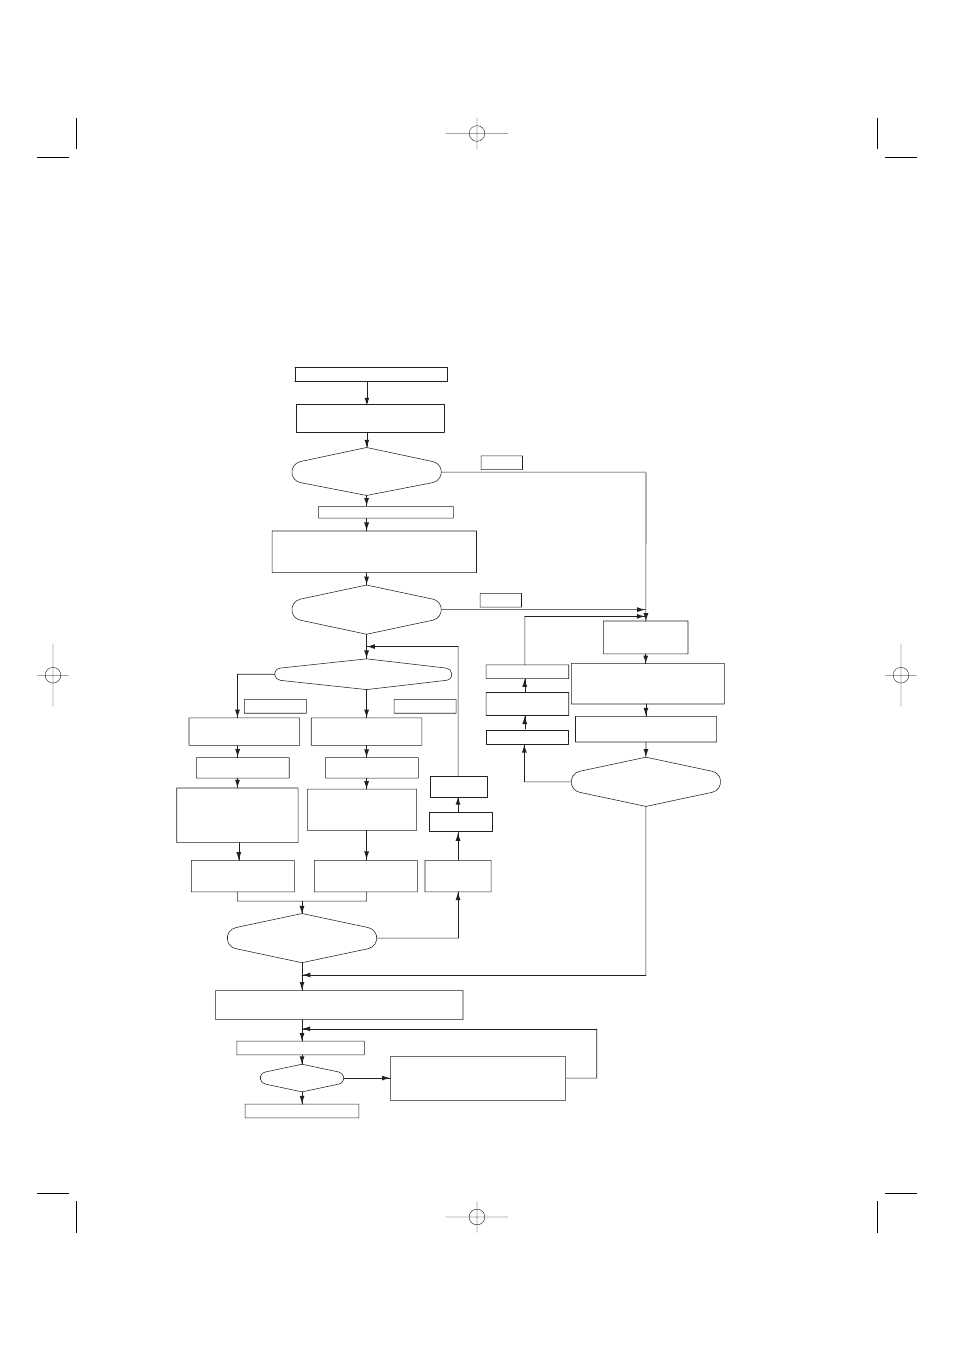
YES
Make necessary corrections.
Check the alarm
contents.
Check the alarm contents.
Turn OFF the indoor and
outdoor unit power
NO
*2
*3
*3
*2
CASE 1
CASE 2
CASE 3B
CASE 3A
YES
YES
NO
YES
NO
NO
NO
YES
YES
NO
Recheck the items to check before the test run.
Are the inter-unit control wires
connected to more than 1 refrigerant
system?
Is it possible to turn ON the power only
for the 1 refrigerant system where the
test run will be performed?
Will automatic address setting be
performed in Heating mode?
Is it OK to start the compressors?
Turn ON the indoor and
outdoor unit power.
Short-circuit the mode change pin
(CN50) on the outdoor main unit PCB.
At the same time, short-circuit the
automatic address pin (CN51) for 1
second or longer, then pull it out.
Short-circuit the automatic address
pin (CN51) on the outdoor unit PCB
for 1 second or longer,
then release it.
Short-circuit the automatic address pin (CN51)
on the outdoor unit PCB for 1 second or longer,
then release it.
Start indoor and outdoor unit
cooling operation.
LED 1 and 2 blink alternately.
Start indoor and outdoor unit
heating operation.
LED 1 and 2 blink alternately.
LED 1 and 2 blink alternately
(about 2 or 3 minutes).
Is it OK to start the compressors?
Turn ON the indoor and
outdoor unit power.
Turn OFF the indoor
and outdoor unit
Turn ON the indoor and
outdoor unit power for that
refrigerant system only.
Are LEDs 1 and 2 on the
outdoor unit PCB OFF?
Are LEDs 1 and 2 on the
outdoor unit PCB OFF?
Set the No. of indoor units.
Set the system address.
When multiple outdoor units exist, disconnect the terminals
extended from the shorted plugs (CN33) at all outdoor main unit
PCBs except for 1.
Alternatively, move the sockets to the OPEN side.
Unit No. setting switch
(S004)
Unit No. setting switch
(S002 and S003)
Refer to Fig. 8-4
(Check the link wiring.)
Refer to “Table of
Self-Diagnostic Functions and
Description of Alarm Displays.”
*2 A minimum of 5 hours must have passed after the
power was turned ON to the outdoor unit.
*3 All indoor units operate in all refrigerant systems
where the power is ON.
Check that test run preparation is OK.
(Do not allow the short-circuited pins to remain short-circuited.)
Refer to the remote
controller test-run
settings.
Set the wired remote controller for test run.
Does system operate?
Return remote control to normal mode
Check and make corrections according to
“Table of Self-Diagnostic Functions.”
End test run.
Make necessary
corrections
8-2. Test Run Procedure
Items to Check Before the Test Run
1. Turn the remote power switch on at
least 5 hours before the test, in order to
energize the crank case heater.
2. Turn the outdoor service valves (2
locations) to the full-open positions.
●
Use caution when making the settings. If
there are duplicated system addresses,
or if the settings for the Nos. of the
indoor units are not consistent, an alarm
will occur and the system will not start.
●
These settings are not made on the
indoor unit PCB.
Fig. 8-3
69
07-056 Mini_ECOi_II_NA 3/19/07 2:41 PM Page 69