Exposure control, Iris lock, 38 iris lock – JVC GR-D390EK User Manual
Page 38: Pg. 38), Features for recording
FEATURES FOR RECORDING
38
EN
Manual exposure control is recommended in the
following situations:
● When shooting using reverse lighting or when the
background is too bright.
● When shooting on a reflective natural background
such as at the beach or when skiing.
● When the background is overly dark or the subject
is bright.
1
Set the Power Switch to
“REC”
.
2
Set the recording mode to “M” (
3
Set “EXPOSURE” to “MANUAL” in
FUNCTION Menu. (
● The exposure control indicator appears.
4
To brighten the image, press
. To darken
the image, press
. (maximum ±6)
● +3 exposure has the same effect as the backlight
compensation. (
● –3 exposure has the same effect as when
“PROGRAM AE” is set to “SPOTLIGHT”.
(
5
Press SET or
. Exposure adjustment is
complete.
To return to automatic exposure control
Select “AUTO” in step
NOTES:
● You cannot use the manual exposure control at
the same time when “PROGRAM AE” is set to
“SPOTLIGHT” or “SNOW” (
backlight compensation.
● If the adjustment does not cause any visible
change in brightness, set “GAIN UP” to “AUTO”.
(
Like the pupil of the human eye, the iris
contracts in well-lit environments to keep too
much light from entering, and dilates in dim
environments to allow in more light.
Use this function in the following situations:
● When shooting a moving subject.
● When the distance to the subject changes (so its
size in the LCD monitor or the viewfinder
changes), such as when the subject is backing
away.
● When shooting on a reflective natural background
such as at the beach or when skiing.
● When shooting objects under a spotlight.
● When zooming.
1
Set the Power Switch to
“REC”
.
2
Set the recording mode to “M” (
3
Set “EXPOSURE” to “MANUAL” in
FUNCTION Menu. (
● The exposure control indicator appears.
4
Adjust zoom so that the subject fills the LCD
monitor or the viewfinder, then press and hold
SET or
for over 2 seconds. The “
”
indication appear.
5
Press SET or
. The iris is locked.
6
Press MENU. The Menu screen closes. The
“
” indication appears.
To return to automatic iris control
Select “AUTO” in step
3.
● The exposure control indicator and
“
”
disappear.
To lock the exposure control and the iris
After step
3, adjust the exposure by pressing
or
. Then lock the iris in steps
automatic locking, select “AUTO” in step
3. The
exposure control and the iris become automatic.
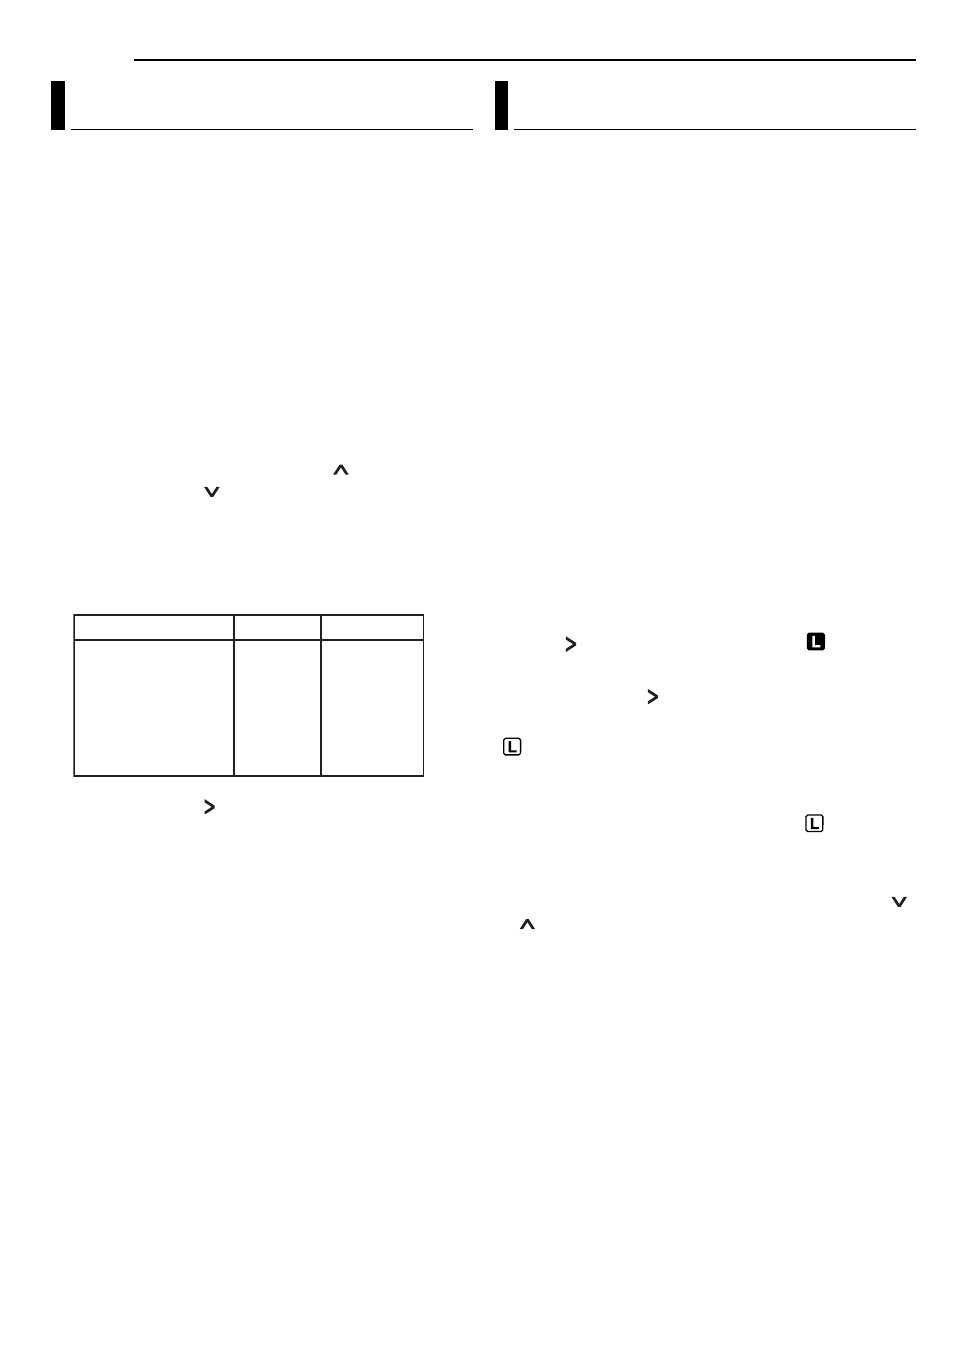
Exposure Control
Operation Mode
Exposure Level
MEMORY
VIDEO
±0
±1
±2
±3
±4
±5
±6
±0EV
±0.3EV
±0.7EV
±1.0EV
±1.3EV
±1.7EV
±2.0EV
Iris Lock