Previewing scenes, Previsualización de escenas, Eliminación de cortes – Sony GV-D300 User Manual
Page 56: Deleting cuts
56
Previewing scenes
2
4
ASSEMBLE
^
IN
4 0 : 0 8 : 2 8 : 1 3
MARK
PROGRAM
DELETE
PREVIEW
EXECUTE
SET UP
[ASSEMBLE]:END
0 : 0 8 : 5 5 : 2 8
OUT
0 : 0 8 : 4 5 : 0 9
LAP
0 : 0 0 : 1 7 : 0 3
TOTAL
0 : 0 5 : 3 2 : 1 4
ASSEMBLE
^
DELETE
1PGM DELETE
ALL CLEAR
RETURN
[ASSEMBLE]:END
0 : 0 8 : 4 5 : 0 9
ASSEMBLE
^
PROGRAM
IN
1 0 : 0 1 : 1 8 : 2 4
2 0 : 0 2 : 5 2 : 2 1
3 0 : 0 5 : 0 2 : 0 8
4 0 : 0 8 : 2 8 : 0 6
5 – : – – : – – : – –
6 – : – – : – – : – –
7 – : – – : – – : – –
8 – : – – : – – : – –
0 : 0 8 : 4 5 : 0 9
OUT
0 : 0 2 : 2 7 : 0 3
0 : 0 4 : 4 5 : 1 7
0 : 0 7 : 1 6 : 2 4
0 : 0 8 : 4 5 : 0 9
– : – – : – – : – –
– : – – : – – : – –
– : – – : – – : – –
– : – – : – – : – –
3
Previsualización de escenas
Eliminación de cortes
Eliminación de cortes
(1)Presione ASSEMBLE para que aparezca el
menú ASSEMBLE.
(2)Gire el dial de control para seleccionar
DELETE y, a continuación, presione dicho
dial.
(3)Gire el dial de control para seleccionar 1PGM
DELETE y, a continuación, presione dicho
dial.
(4)Gire el dial de control para seleccionar el corte
que desee eliminar y, a continuación, presione
dicho dial.
Los puntos IN y OUT aparecen como
“-:--:--:--” y, después, vuelve a aparecer el
menú ASSEMBLE. Para eliminar otros cortes,
repita los pasos 2, 3 y 4.
Eliminación de todos los cortes
(1)Presione ASSEMBLE para que aparezca el
menú ASSEMBLE.
(2)Gire el dial de control para seleccionar
DELETE y, a continuación, presione dicho
dial.
(3)Gire el dial de control para seleccionar ALL
CLEAR y, a continuación, presione dicho dial.
(4)Gire el dial de control para seleccionar ALL
CLEAR y, a continuación, presione dicho dial.
Aparece el menú ASSEMBLE.
Para cancelar la eliminación
Seleccione CANCEL en el paso 4.
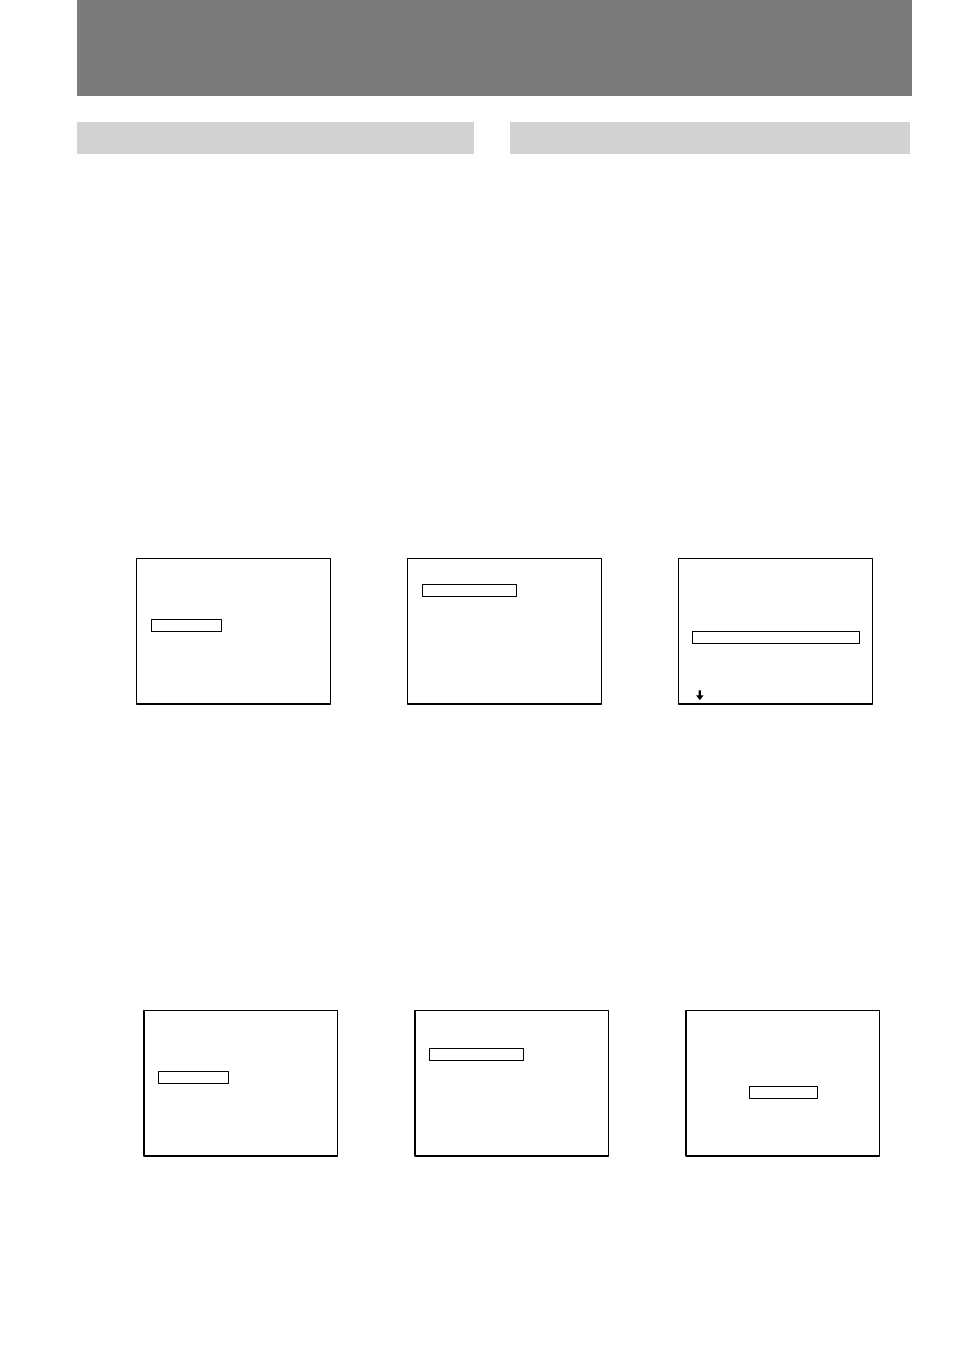
Deleting cuts
Deleting a cut
(1)Press ASSEMBLE to display the ASSEMBLE
menu.
(2)Turn the control dial to select DELETE, then
press the control dial.
(3)Turn the control dial to select 1PGM DELETE,
then press the control dial.
(4)Turn the control dial to select the cut you
want to delete, then press the control dial.
The IN and OUT points become “-:--:--:--”
and then the display returns to the
ASSEMBLE menu.
To delete other cuts, repeat steps 2, 3 and 4.
Deleting all cuts
(1)Press ASSEMBLE to display the ASSEMBLE
menu.
(2)Turn the control dial to select DELETE, then
press the control dial.
(3)Turn the control dial to select ALL CLEAR,
then press the control dial.
(4)Turn the control dial to select ALL CLEAR,
then press the control dial.
The ASSEMBLE menu appears.
To cancel deleting
Select CANCEL in step 4.
2
4
ASSEMBLE
^
IN
4 0 : 0 8 : 2 8 : 1 3
MARK
PROGRAM
DELETE
PREVIEW
EXECUTE
SET UP
[ASSEMBLE]:END
0 : 0 8 : 5 5 : 2 8
OUT
0 : 0 8 : 4 5 : 0 9
LAP
0 : 0 0 : 1 7 : 0 3
TOTAL
0 : 0 5 : 3 2 : 1 4
ASSEMBLE
^
DELETE
1PGM DELETE
ALL CLEAR
RETURN
[ASSEMBLE]:END
0 : 0 8 : 4 5 : 0 9
ASSEMBLE
^
[ASSEMBLE]:END
0 : 0 8 : 4 5 : 0 9
3
CANCEL
ALL CLEAR