Sub-Zero ICBBI-36UG User Manual
Page 11
11
I C E D I S P E N S I N G
Models ICBBI-42SD and ICBBI-48SD have a fea-
ture that limits the maximum amount of ice that
is dispensed each time the
key pad on the
glasswell is pressed.
To dispense ice, hold down the
key pad for
approximately two seconds. The dispenser will
meter out ice for about two seconds, collect the
ice directly above the glass, then drop the ice
into the glass. If less ice is desired, hold the
key pad down for less than two seconds. If more
ice is desired, hold the
key pad down until the
dispensing cycle repeats.
IMPORTANT NOTE: Be sure that dispenser key
pads are clean and dry when pressed to avoid
problems with the dispenser operation.
S U B - Z E R O B U I L T - I N U S E & C A R E
I C E A N D WAT E R D I S P E N S E R
For dispenser Models ICBBI-42SD and
ICBBI-48SD, the automatic ice and water dis-
penser gives you both ice and chilled water
without having to open doors.
I C E D I S P E N S E R O P E R A T I O N
To operate the ice dispenser for Models
ICBBI-42SD and ICBBI-48SD, set a glass on the
water grille of the glasswell, and press and hold
the
key pad on the glasswell until you have
the ice you need. For larger quantities of ice,
open the refrigerator door and place an ice con-
tainer under the dispenser chute, then press the
BULK ICE pad on the left hand wall inside the
refrigerator section. Refer to the illustration
below.
After initial ice maker start-up, discard the first
few batches of ice—they may be discolored by
the new system plumbing.
Initially, for water to dispense properly, the
key pad must be depressed and held until water
flows from the dispenser. You may have to hold
the key pad for 60 seconds for water to fill the
internal reservoir tank.
IMPORTANT NOTE: The chilled water reservoir
tank is mounted inside the refrigerator section. It
will take several hours to chill the water to the
refrigerator temperature during the original fill
or after a lot of water is used.
D I S P E N S E R L I G H T S
For dispenser models, there are three lighting
states than can be cycled by pressing the
key
pad on the glasswell.
All lights OFF
All lights ON (blue key pad and white
glasswell)
Key pad lights ON only
During water or ice dispensing, all lights will illu-
minate until dispensing is complete, then lights
will return to their previous state.
I C E D I S P E N S E R O P E R A T I N G T I P S
If there’s no ice, make sure the ice maker
system is turned on and
indicator is illu-
minated in the Control Center display panel.
Make sure there is a supply of ice in the ice
bucket. See Ice Bucket Removal, page 9.
Make sure the ice bucket is all the way in and
engaging the auger motor at the back of the
bucket. If it is not all the way back, push on
the ice bucket and depress the
key pad on
the glasswell at the same time.
Press the
key pad on the glasswell. If you
do not hear auger motor noise, wait five min-
utes, then try again. If you do not hear auger
noise after the second try, contact your
Sub-Zero dealer.
If the ice dispenser is not used for a long
period, the ice may fuse together. To avoid
this, empty the ice bucket as needed.
W A T E R D I S P E N S E R O P E R A T I O N
To operate the water dispenser for Models ICBBI-
42SD and ICBBI-48SD, set a glass on the water
grille of the glasswell, and press and hold the
key pad on the glasswell until the glass is filled.
The first time you use the water dispenser, purge
the water system and storage tank for three min-
utes. This will clear out any air in the system,
along with foreign material in the new plumbing
connection.
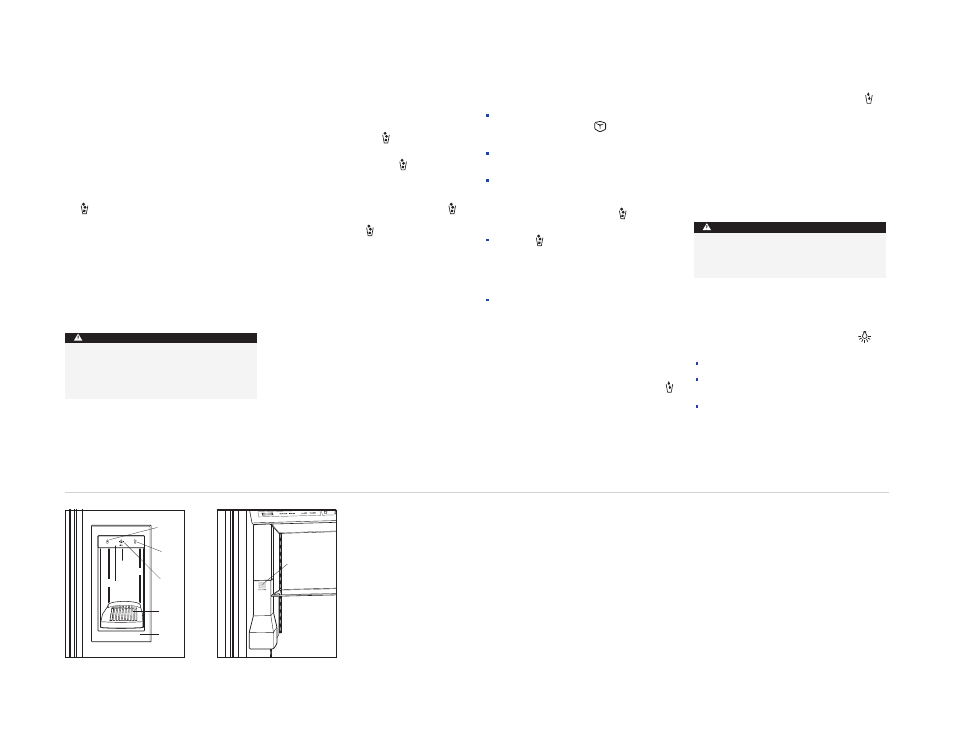
Water
Grille
Ice
Key Pad
Light
Key Pad
Water
Key Pad
Touch Pad
Lock
Indicator
Bezel
Bulk Ice
Glasswell—Models ICBBI-42SD
and ICBBI-48SD
Bulk ice dispenser—Models
ICBBI-42SD and ICBBI-48SD
Limit continuous ice and/or water dispenser
operation to seven minutes or less, to avoid
damaging the equipment.
CAUTION
Use a sturdy glass to catch ice crescents.
Fragile glasses can break. Also, to avoid
breakage, make sure that the glass is sitting
vertically on the water grille.
CAUTION